0%


ConstraintLayout是Android Studio 2.2中主要的新增功能之一,也是Google在去年的I/O大会上重点宣传的一个功能,升级Android Studio 2.3之后,IDE默认生成的Activity布局都是以ConstraintLayout做为根布局。

新技术毕竟有其优势,google大力宣传的ConstraintLayout有以下两大特性:

  1. 可视化操作编写界面,提高开发效率
  2. 有效地解决布局嵌套过多的问题,是一个升级版的RelativeLayout,有效提升性能

下面对其进行一个学习总结,毕竟这个布局是为了可视化而生,可视化操作的练习是必不可少的。由于constraintLayout的拖拽部分涉及到太多的动态效果图,就不详细描述了,已有很多文章写过这部分。其实constraintLayout的很多属性对于我们来说是新鲜的,是其它布局所没有的,所以这里主要总结一下constraintLayout的属性学习。


添加依赖

使用constraintLayout需要添加以下依赖

1
classpath 'com.android.support.constraint:constraint-layout:XXX'

基本用法

app:layout_constraintBottom_toBottomOf=”parent”
当前控件底部的布局约束是位于parent控件底部,parent是指包裹着它的ConstraintLayout,也可以设置指定某个控件的id。效果类似于RelativeLayout的layout_alignParentBottom=”true”
对比RelativeLayout,同类的属性还有以下这些
app:layout_constraintLeft_toLeftOf = layout_alignParentLeft=”true”
app:layout_constraintBottom_toBottomOf = layout_alignParentBottom=”true”
app:layout_constraintRight_toRightOf = layout_alignParentRight=”true”
app:layout_constraintTop_toTopOf = layout_alignParentTop=”true”
app:layout_constraintLeft_toRightOf = toRightOf
app:layout_constraintRight_toLeftOf = toLeftOf
app:layout_constraintTop_toBottomOf = toBottomOf
app:layout_constraintBottom_toTopOf = toTopOf
app:layout_constraintBaseline_toBaselineOf 此控件与指定控件水平对齐
点击该button按钮,下方会出现 x,ab两个图标,x表示去掉所有约束,ab表示切换显示横条还是四个点,点击ab,button中间会出现一根横条,然后把该控件和指定控件的横条相连就行了。

goneMargin属性
这些设置生效于当依赖的约束对象被设置visibility为gone时,支持的属性如下:
layout_goneMarginStart
layout_goneMarginEnd
layout_goneMarginLeft
layout_goneMarginTop
layout_goneMarginRight
layout_goneMarginBottom
比如A,B两个view,B在A的右边,这时候如果A消失了,但是你想让B在父布局的右边多少距离,就可以使用这个属性。

Bias属性
ConstraintLayout新增了如下两个属性用于控制控件在水平和垂直方向在屏幕上的偏移比例
当目标控件设置好水平方向约束
app:layout_constraintLeft_toLeftOf=”parent”、app:layout_constraintRight_toRightOf=”parent”
或者垂直方向约束时
app:layout_constraintTop_toTopOf=”parent”、app:layout_constraintBottom_toBottomOf=”parent”
layout_constraintHorizontal_bias和layout_constraintVertical_bias会随着控件的拖到一直发生相应的变化,如果你需要居中,那么直接将这两个属性的参数值设置为0.5即可。

与其他Layout不同之处

它的layout_width和layout_height不支持设置match_parent,其属性取值只有以下三种情况:
wrap_content;
指定具体dp值;
0dp(match_constraint),代表填充约束之意。和match_parent不一样
要让一个控件的宽高按某个比例进行布局可以使用layout_constraintDimentionRatio属性设置宽高比例,前提是目标控件的layout_widthlayout_height至少有一个设置为0dp,为0dp那个按宽高比适应
layout_constraintDimentionRatio默认参数比例是指宽:高
使其高:宽写成app:layout_constraintDimensionRatio=”H,2:1”

链条(Chains)

实现LinearLayout的水平布局

app:layout_constraintHorizontal_chainStyle
水平方向的layout_constraintHorizontal_chainStyle
垂直方向的layout_constraintVertical_chainStyle

两者均有spread,spread_inside,packed这三种取值

1
2
3
4
5
6
7
8
9
10
11
12
13
14
15
16
17
18
19
20
21
22
23
24
25
26
27
28
29
<?xml version="1.0" encoding="utf-8"?>
<android.support.constraint.ConstraintLayout xmlns:android="http://schemas.android.com/apk/res/android"
xmlns:app="http://schemas.android.com/apk/res-auto"
android:layout_width="match_parent"
android:layout_height="match_parent">

<Button
android:id="@+id/btn1"
android:layout_width="wrap_content"
android:layout_height="wrap_content"
app:layout_constraintHorizontal_chainStyle="spread"
app:layout_constraintLeft_toLeftOf="parent"
app:layout_constraintRight_toLeftOf="@+id/btn2" />

<Button
android:id="@+id/btn2"
android:layout_width="wrap_content"
android:layout_height="wrap_content"
app:layout_constraintLeft_toRightOf="@+id/btn1"
app:layout_constraintRight_toLeftOf="@+id/btn3" />

<Button
android:id="@+id/btn3"
android:layout_width="wrap_content"
android:layout_height="wrap_content"
app:layout_constraintLeft_toRightOf="@+id/btn2"
app:layout_constraintRight_toRightOf="parent" />

</android.support.constraint.ConstraintLayout>

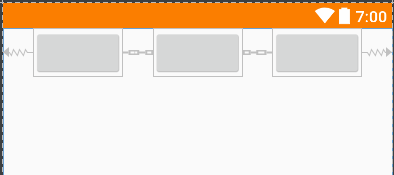
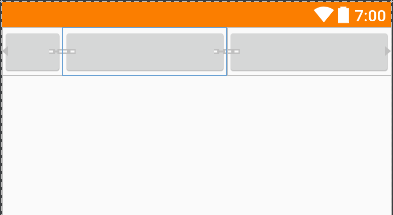
效果图如下
效果图
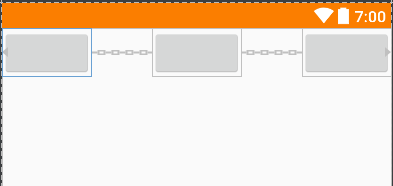
当app:layout_constraintHorizontal_chainStyle = “spread_inside”
效果图如下
效果图

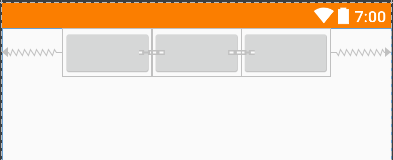
当app:layout_constraintHorizontal_chainStyle = “packed”
效果图如下
效果图

bias链条

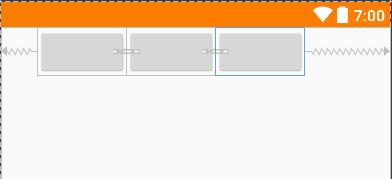
当app:layout_constraintHorizontal_chainStyle = “packed”的情况下,通过设置head头控件的bias属性,来设置链条的位置(更偏向左或更偏向右)

1
2
3
4
5
6
7
8
9
10
11
12
13
14
15
16
17
18
19
20
21
22
<Button
android:id="@+id/btn1"
android:layout_width="wrap_content"
android:layout_height="wrap_content"
app:layout_constraintHorizontal_bias="0.3" // 权重为靠左0.3
app:layout_constraintHorizontal_chainStyle="packed" // 样式为packed
app:layout_constraintLeft_toLeftOf="parent"
app:layout_constraintRight_toLeftOf="@+id/btn2" />

<Button
android:id="@+id/btn2"
android:layout_width="wrap_content"
android:layout_height="wrap_content"
app:layout_constraintLeft_toRightOf="@+id/btn1"
app:layout_constraintRight_toLeftOf="@+id/btn3" />

<Button
android:id="@+id/btn3"
android:layout_width="wrap_content"
android:layout_height="wrap_content"
app:layout_constraintLeft_toRightOf="@+id/btn2"
app:layout_constraintRight_toRightOf="parent" />

效果图如下
效果图

权重链

如果将控件的layout_widthlayout_height设置成为0dp,还可以配合layout_constraintHorizontal_weightlayout_constraintVertical_weight两个属性实现和LinearLayout中设置layout_weight相同的效果

1
2
3
4
5
6
7
8
9
10
11
12
13
14
15
16
17
18
19
20
21
22
23
24
25
26
27
28
29
30
<?xml version="1.0" encoding="utf-8"?>
<android.support.constraint.ConstraintLayout xmlns:android="http://schemas.android.com/apk/res/android"
xmlns:app="http://schemas.android.com/apk/res-auto"
android:layout_width="match_parent"
android:layout_height="match_parent">

<Button
android:id="@+id/btn1"
android:layout_width="60dp"
android:layout_height="wrap_content"
app:layout_constraintLeft_toLeftOf="parent"
app:layout_constraintRight_toLeftOf="@+id/btn2" />

<Button
android:id="@+id/btn2"
android:layout_width="0dp"
android:layout_height="wrap_content"
app:layout_constraintHorizontal_weight="1"
app:layout_constraintLeft_toRightOf="@+id/btn1"
app:layout_constraintRight_toLeftOf="@+id/btn3" />

<Button
android:id="@+id/btn3"
android:layout_width="0dp"
app:layout_constraintHorizontal_weight="1"
android:layout_height="wrap_content"
app:layout_constraintLeft_toRightOf="@+id/btn2"
app:layout_constraintRight_toRightOf="parent"/>

</android.support.constraint.ConstraintLayout>

layout_width设置为60dp时,app:layout_constraintHorizontal_weight="1"平分剩余的空间,效果图如下
效果图

GuildLine

这是一个辅助我们布局的View,并且默认设置了visibility为gone

Guideline也分为垂直和水平两种
设置在屏幕中所处的位置
layout_constraintGuide_begin 引导线距离左边框的距离
layout_constraintGuide_end 中引导线距离右边框的距离
layout_constraintGuide_percent 在整个布局中引导线距离左边框的百分比
app:layout_constraintGuide_percent=”0.5”表示距离左边框50%的位置)

2018.5.15 更新内容:

圆形布局

一个控件以另一个控件的中心为基准,以一定的角度和距离进行定位,如buttonB在buttonA的
顺时针方向45度,半径为100dp的位置

1
2
3
4
5
<Button android:id="@+id/buttonA" ... />
<Button android:id="@+id/buttonB" ...
app:layout_constraintCircle="@+id/buttonA"
app:layout_constraintCircleRadius="100dp"
app:layout_constraintCircleAngle="45" />

layout_constraintCircle参照的控件id
layout_constraintCircleRadius圆半径
layout_constraintCircleAngle偏离角度,当水平右方向为0时,逆时针方向旋转

屏障布局

将多个带约束的组件看作一个整体,以此为基准,约束其它的组件,如常见的表单填写,左边是textview的标签,右边是edittext的输入框这种常见布局,一般都是以左边textview最长的控件为准,确定右边的edittext的位置

1
2
3
4
5
6
7
8
9
10
11
12
13
14
15
16
17
18
19
20
21
22
23
24
25
26
27
28
29
30
31
32
33
34
35
36
37
38
39
40
41
<TextView
android:id="@+id/tv_id"
android:layout_width="wrap_content"
android:layout_height="wrap_content"
android:text="帐号:"
app:layout_constraintBottom_toBottomOf="@+id/et_id"
app:layout_constraintTop_toTopOf="@+id/et_id"/>

<TextView
android:id="@+id/tv_password"
android:layout_width="wrap_content"
android:layout_height="wrap_content"
android:layout_marginTop="8dp"
android:text="联系方式:"
app:layout_constraintBottom_toBottomOf="@+id/et_password"
app:layout_constraintTop_toTopOf="@+id/et_password"/>

<EditText
android:id="@+id/et_id"
android:layout_width="0dp"
android:layout_height="wrap_content"
android:hint="请输入姓名"
app:layout_constraintLeft_toLeftOf="@+id/barrier"
app:layout_constraintRight_toRightOf="parent"
app:layout_constraintTop_toTopOf="parent"/>

<EditText
android:id="@+id/et_password"
android:layout_width="0dp"
android:layout_height="wrap_content"
android:hint="请输入联系方式"
app:layout_constraintLeft_toLeftOf="@+id/barrier"
app:layout_constraintRight_toRightOf="parent"
app:layout_constraintTop_toBottomOf="@+id/et_id"/>

<android.support.constraint.Barrier
android:id="@+id/barrier"
android:layout_width="wrap_content"
android:layout_height="wrap_content"
app:barrierDirection="right"
app:constraint_referenced_ids="tv_id,tv_password"/>

barrierDirection 以这多个组件为基准,设置屏障的位置
constraint_referenced_ids 多个基准组件的id

强制约束

当控件的宽度设置为WRAP_CONTENT时,如果实际宽度超过了约束的宽度,约束会失效,这个实际宽度可能会受到内容的影响,比如button中的文字太长时,会让以前的约束失效。
防止约束失效,需要设置以下属性:
水平方向上仍然约束: layout_constrainedWidth="true|false" //默认false
垂直方向上仍然约束: layout_constrainedHeight="true|false" //默认false

到此约束布局的基本用法总结就结束了,接下来就需要更多的时间进行可视化操作练习~


目前android最火的架构就是MVP+Dagger+Retrofit+Rxjava,技术迭代真的是很快啊,程序猿这个职业,需要我们抱着终身学习的热情在互联网急速发展的浪潮中追逐最新的技术,提高开发效率和我们的核心竞争力,好吧,一不小心又灌了一口鸡汤。

架构在大型项目中是很重要的,一个好的架构有着高度的可扩展性,可维护性,低耦合,高聚合,而Dagger正是为了解耦而生,主要是通过依赖注入去实现。依赖注入是一种设计模式,降低了依赖和被依赖对象之间的耦合,方便扩展和单元测试。是面向对象六大原则之一的依赖倒置原则(dependency inversion principle)比如当服务端接口未开发完时,我们可使用本地json注入做一个测试,与MVP结合可以实现更大程度的解耦,当面对需求更改时,进行更灵活的处理,避免项目的大规模修改,妈妈再也不用担心我又加班了~

所以,Dagger值得我们去跳坑,在此做一个学习记录


依赖注入的场景

依赖注入,这个名词太抽象了,实际上我们平时开发是经常用到的,只不过你不知道这个就叫依赖注入而已,通过一个类的构造函数入参引入另一个类的对象,或者是通过set方法引入另一个类的对象,就是依赖注入。

比如这段代码:

1
2
3
4
5
6
7
8
9
10
11
12
13
14
15
//构造方法依赖注入
public class A {
B b;
public void A(B b) {
this.b = b;
}
}

//set()方法依赖注入
public class A {
B b;
public void setB(B b) {
this.b = b;
}
}

好吧,这么一说神秘感就没有了,Dagger2不同的地方就是通过注解的方式依赖注入的。如果有一天,产品需要更改需求,A类依赖的不是B而是C,如果我们很多地方都引用到A,并且A都需要依赖于B,那么我们的代码就需要大面积更改了,而Dagger能够让我们避免这种问题的出现。

Dagger常用注解

@Inject 一般情况下是标注成员属性和构造函数,标注的成员属性不能是private,Dagger 2 中还可以标注方法,一般用于注解需要注入的对象。
@Module 用来标注 Module类,用来生成实例,像一个工厂,用于生成各种类的实例。
@Provides 只能标注方法,必须在 Module类 中,Module类对外提供实例方法的注解。
@Component 只能标注接口或抽象类,声明的注入接口的参数类型必须和目标类一致。Module类的构造函数入参与调用类Activity保持一致。Component一般是个接口,就是将Activity与Module类联系起来,通过它调用Module,传入当前Activity,获得Provides提供的实例,完成注入。
@Named:Dagger2是根据Provide方法返回类型查找对应的依赖的,如果需要注入相同类型的,但是内容不同,多态情况,这个时候就可以使用@Named进行区分。
@Singleton有时候,我们不需要多次创建Component,可以使用一个Component,即单例模式,这个时候就可以使用@Singleton来修饰它,这样就会以单例的模式在生成的 Daggerxxxxx中保存 。如果某个module也只需要使用同一个,那么也可以使用@Single来修饰provide的方法,同时也需要使用@Singleton注解使用该module的Component。

Dagger注入过程

当某个变量被@Inject注解时,会先判断注解成员属性的构造函数是否被注解,(Dagger2通过Inject标记可以在需要这个类实例的时候来找到这个构造函数并把相关实例new出来),在建立Component和工厂类的情况下,直接完成注入,如果没有被注解,会通过Component查找对应的Module里的Provides方法生成。

Dagger的基本用法

以一个简陋的登录功能为例

首先我们定义一个接口ILoginModel

1
2
3
4
5
public interface ILoginModel {
public boolean login(String username,String password);
public boolean checkUserName(String username);
public boolean checkPassword(String password);
}

接着我们实现这个接口,创建一个类LoginModel,这里只是模拟一下,随便写点逻辑

1
2
3
4
5
6
7
8
9
10
11
12
13
14
15
16
17
18
19
20
21
22
23
24
25
26
27
28
29
public class LoginModel implements ILoginModel {

@Override
public boolean login(String username,String password) {
if("admin".equals(username)&&"123456".equals(password)){
return true;
}else{
return false;
}
}

@Override
public boolean checkUserName(String username) {
if("admin".equals(username)){
return true;
}else{
return false;
}
}

@Override
public boolean checkPassword(String password) {
if("123456".equals(password)){
return true;
}else{
return false;
}
}
}

接着在主Activity中声明这个对象,随意调用里面的一个方法比如checkUserName(String username)

1
2
3
4
5
6
7
8
9
10
11
12
public class MainActivity extends AppCompatActivity {

private static final String TAG = "测试注入";
LoginModel loginModel;

@Override
protected void onCreate(Bundle savedInstanceState) {
super.onCreate(savedInstanceState);
setContentView(R.layout.activity_main);
Log.d(TAG, "onCreate: "+loginModel.checkUserName("admin"));
}
}

是不是在作死呢?loginModel明显会报空指针啊,没错,loginModel没初始化必然报空指针。这里我们使用Dagger依赖注入。

@Inject注解构造方法

  • 给LoginModel增加构造方法,并使用@Inject注解

    1
    2
    @Inject
    public LoginModel(){}
  • 创建一个LoginModel的实例工厂LoginModelFactory,专门负责生成LoginModel,记得用@Module注解,这里由于我们已经用@Inject注解了构造方法,所以LoginModel会直接被new出来。

    1
    2
    3
    4
    5
    6
    7
    8
    9
    10
    @Module
    public class LoginModelFactory {

    private MainActivity mainActivity;

    //保持与需要被注入的变量所在的类名称一致
    public LoginModelFactory(MainActivity mainActivity){
    this.mainActivity=mainActivity;
    }
    }
  • 创建一个关联组建LoginModelComponent,关联LoginModelFactory和MainActivity

    1
    2
    3
    4
    @Component (modules = LoginModelFactory.class)
    public interface LoginModelComponent {
    void inject(MainActivity mainActivity);
    }
  • 在MainActivity中,将loginModel用@Inject注解,并增加一句代码实现注入

    1
    2
    3
    4
    5
    @Inject
    LoginModel loginModel;

    //开始注入
    DaggerLoginModelComponent.create().inject(this);

注:修改后的完整代码就不再贴了,完整代码已打包上传,文末有传送门。

至此,Dagger的基本使用结束,我们发现loginModel注入成功,loginModel.checkUserName("admin")成功调用,并没有抛异常。

下面介绍另一种实现方法。

@Provides注解实现

先取消LoginModel构造方法的注解。

前面说过@Provides必须在 Module 中,这里我们用@Module注解的类是LoginModelFactory,我们在LoginModelFactory中增加一个方法,生成LoginModel对象,注意用@Provides注解。

1
2
3
4
5
6
7
8
9
10
11
12
13
14
15
16
17
@Module
public class LoginModelFactory {
private MainActivity mainActivity;

//保持与需要被注入的变量所在的类名称一致
public LoginModelFactory(MainActivity mainActivity){
this.mainActivity=mainActivity;
}
@Provides
LoginModel provideLoginModel(){
return new LoginModel();
}
@Provides
MainActivity proviceMainActivity(){
return mainActivity;
}
}

这时主Activity的那句注入代码DaggerLoginModelComponent.create().inject(this);报错了,因为这次我们采用的不是注解构造方法的实现方式,而是采用@Provides注解,所以修改如下

1
2
3
4
DaggerLoginModelComponent.builder()
.loginModelFactory(new LoginModelFactory(this))
.build()
.inject(this);

这时我们发现loginModel依然注入成功,loginModel.checkUserName("admin")成功调用,也并没有抛异常。

多层依赖(引申)

通常有两种方式:

  1. 父component暴露接口
  • 定义父component依赖的module
    1
    2
    3
    4
    5
    6
    @Module
    public class ContainerModule {
    @Provides ContainerModel provideContainerModel() {
    return new ContainerModel();
    }
    }
  • 在父component中暴露接口给子component
    1
    2
    3
    4
    @Component(modules = ContainerModule.class)
    public interface ContainerComponent {
    ContainerModel containerModel();
    }
  • 子component依赖父component,修改子component的注解
    1
    2
    3
    4
    @Component (dependencies = ContainerComponent.class,modules = LoginModelFactory.class)
    public interface LoginModelComponent {
    void inject(MainActivity mainActivity);
    }
  1. 在父component中添加子component,使用@Subcomponent注解
  • 父component添加子component的module,并返回子component
    1
    2
    3
    4
    5
    @Component(modules = ContainerModule.class)
    public interface ContainerComponent {
    //需要将SubComponent 追加到 被依赖的Component中
    LoginModelComponent addSub(LoginModelFactory loginModelFactory);
    }
  • 修改子component的注解
    1
    2
    3
    4
    @Subcomponent (modules = LoginModelFactory.class)
    public interface LoginModelComponent {
    void inject(MainActivity mainActivity);
    }

    使用多个module(引申)

  • 定义一个新的module
    1
    2
    3
    4
    5
    6
    @Module
    public class OtherModule {
    @Provides OtherModel provideOtherModel() {
    return new OtherModel();
    }
    }
  • 直接修改注解部分modules的参数改为一个数组,modules = {moduleA,moduleB}
    1
    2
    3
    4
    @Component (modules = {LoginModelFactory.class, OtherModule.class})
    public interface LoginModelComponent {
    void inject(MainActivity mainActivity);
    }

接下来是比较常用的场景。

与MVP架构结合

按传统mvp的架构,我们现在有了M层的接口,M层的实现,还需要V层的接口和V层的实现,以及P层的实现,如果有必要还有P层的接口。

下面就直接贴传统mvp架构缺少的那部分代码

先删除主Activity中,引用到的LoginModel对象

删除或注释LoginModelComponent这个关联组件,否则会报错

V层接口ILoginView

1
2
3
4
5
public interface ILoginView {
public void onCheckUserNameResult(boolean result);
public void onCheckPasswordResult(boolean result);
public void onLoginResult(boolean result);
}

P层实现LoginPresenter

1
2
3
4
5
6
7
8
9
10
11
12
13
14
15
16
17
18
19
20
21
22
23
24
25
26
27
28
29
30
31
32
33
34
35
36
37
public class LoginPresenter {

private ILoginModel iLoginModel;
private ILoginView iLoginView;

public LoginPresenter(ILoginModel iLoginModel,ILoginView iLoginView){
this.iLoginModel=iLoginModel;
this.iLoginView=iLoginView;

}

public void checkPassword(String password){

if (iLoginModel.checkPassword(password)) {
iLoginView.onCheckPasswordResult(true);
}else{
iLoginView.onCheckPasswordResult(false);
}

}

public void checkUserName(String username){
if(iLoginModel.checkUserName(username)){
iLoginView.onCheckUserNameResult(true);
}else{
iLoginView.onCheckUserNameResult(false);
}
}

public void login(String username,String password){
if(iLoginModel.login(username,password)){
iLoginView.onLoginResult(true);
}else{
iLoginView.onLoginResult(false);
}
}
}

主Activity修改,实现ILoginView的接口,声明待注入的LoginPresenter对象

1
2
3
4
5
6
7
8
9
10
11
12
13
14
15
16
17
18
19
20
21
22
23
24
25
26
27
28
29
30
31
32
33
34
35
36
37
38
39
40
41
42
43
44
45
46
47
48
49
50
51
52
53
54
55
56
57
58
59
60
61
62
63
64
65
66
67
68
69
70
71
72
73
74
75
76
77
78
79
80
81
82
83
84
85
86
87
88
89
90
91
92
93
94
95
96
97
98
99
100
101
102
103
104
105
106
107
108
109
110
111
112
113
114
115
116
117
118
119
120
121
122
public class MainActivity extends AppCompatActivity implements ILoginView{

private static final String TAG = "测试Inject注释构造方法";
@Inject
LoginPresenter loginPresenter;

TextInputLayout usernameInput;
TextInputLayout passwordInput;


@Override
protected void onCreate(Bundle savedInstanceState) {
super.onCreate(savedInstanceState);
setContentView(R.layout.activity_main);
usernameInput = (TextInputLayout) findViewById(R.id.usernameInput);
passwordInput = (TextInputLayout) findViewById(R.id.passwordInput);
//开始注入
DaggerLoginPresenterComponent.builder()
.loginPresenterFactory(new LoginPresenterFactory(this))
.build()
.inject(this);
EditText editUsername= (EditText) findViewById(R.id.username);
EditText editPassword= (EditText) findViewById(R.id.password);
editUsername.addTextChangedListener(new TextWatcher() {
@Override
public void beforeTextChanged(CharSequence charSequence, int i, int i1, int i2) {

}

@Override
public void onTextChanged(CharSequence charSequence, int i, int i1, int i2) {

}

@Override
public void afterTextChanged(Editable editable) {
onChangeUsername();
}
});
editPassword.addTextChangedListener(new TextWatcher() {
@Override
public void beforeTextChanged(CharSequence charSequence, int i, int i1, int i2) {

}

@Override
public void onTextChanged(CharSequence charSequence, int i, int i1, int i2) {

}

@Override
public void afterTextChanged(Editable editable) {
onChangePassword();
}
});
}


//点击用户名输入回调
public void onChangeUsername(){
String username = usernameInput.getEditText().getText().toString().trim();
//密码输入框已输入
if(!TextUtils.isEmpty(username)){
loginPresenter.checkUserName(username);
}
}

//点击密码输入回调
public void onChangePassword(){
String password = passwordInput.getEditText().getText().toString().trim();
//用户名输入框已输入
if(!TextUtils.isEmpty(password)){
loginPresenter.checkPassword(password);
}
}

//登录按钮点击回调
public void onLoginClick(View view) {
hideKeyboard();
String username = usernameInput.getEditText().getText().toString().trim();
String password = passwordInput.getEditText().getText().toString().trim();

loginPresenter.login(username,password);
}

public void hideKeyboard(){
View view = getCurrentFocus();
if (view != null) {
((InputMethodManager) getSystemService(Context.INPUT_METHOD_SERVICE)).
hideSoftInputFromWindow(view.getWindowToken(), InputMethodManager.HIDE_NOT_ALWAYS);
}
}

@Override
public void onCheckUserNameResult(boolean result) {
if(result){
usernameInput.setErrorEnabled(false);

}else{
usernameInput.setError("用户名无效!");
}
}

@Override
public void onCheckPasswordResult(boolean result) {
if(result){
passwordInput.setErrorEnabled(false);
}else{
passwordInput.setError("密码无效!");

}
}

@Override
public void onLoginResult(boolean result) {
if(result){
Toast.makeText(this,"登录成功!",Toast.LENGTH_SHORT).show();
}else{
Toast.makeText(this,"登录失败!",Toast.LENGTH_SHORT).show();
}
}
}

修改了注入代码,这里我们需要新建LoginPresenter的实例工厂LoginPresenterFactory,和LoginPresenterFactory与主Activity的关联组件LoginPresenterComponent

1
2
3
4
5
6
7
8
9
10
11
12
13
14
15
16
17
18
19
20
21
22
23
@Module
public class LoginPresenterFactory {
MainActivity mainActivity;

public LoginPresenterFactory(MainActivity mainActivity){
this.mainActivity=mainActivity;
}

@Provides
LoginPresenter provideLoginPresenter(LoginModel loginModel,MainActivity mainActivity){
return new LoginPresenter(loginModel,mainActivity);
}

@Provides
LoginModel provideLoginModel(){
return new LoginModel();
}

@Provides
MainActivity proviceMainActivity(){
return mainActivity;
}
}
1
2
3
4
@Component (modules = LoginPresenterFactory.class)
public interface LoginPresenterComponent {
void inject(MainActivity mainActivity);
}

可以看到LoginPresenterFactory提供了3个实例方法,首先必须提供LoginPresenter的实例生成方法,其中LoginPresenter需要依赖MainActivity和LoginModel创建,所以我们可以增加两个实例的生成方法分别是provideLoginModel和proviceMainActivity,其中前者可以直接new出来,后者是通过注入方法从主Activity传进来。

到此mvp与Dagger结合的例子就完成了。

最后附上完整源码传送门


最近听说朋友面试被问到关于AOP的一些问题,我平时也没有接触到,google一下,发现AOP功能确实强大。AOP全称Aspect Oriented Programming,也就是面向切面编程,与我们平时用的OOP面向对象编程不同的是,针对同一类问题统一处理。在android中主要应用于日志埋点、性能监控、动态权限控制、代码调试,可以在非入侵项目源代码的条件下,完美的实现以上功能。将它应用于大项目中,既能达到解耦的效果,又能提高开发效率。发现网上并没有很系统的入门文章,在此做一个简单的学习记录。


目前android上应用的比较多的AOP框架是AspectJ

android studio 集成

在项目根目录的build.gradle中增加依赖:

1
2
3
4
5
6
7
8
9
buildscript {
repositories {
jcenter()
}
dependencies {
...
classpath 'com.hujiang.aspectjx:gradle-android-plugin-aspectjx:1.0.8'
}
}

在主项目的build.gradle中增加AspectJ的依赖,并添加模块:

1
compile 'org.aspectj:aspectjrt:1.8.9'
1
apply plugin: 'android-aspectjx'

踩坑提醒

在编译的时候,遇到了一个坑,xxx can't determine superclass of missing type xxxxx这样的错误,可能是与你的某个库冲突了,这时需加上

1
2
3
aspectjx {
excludeJarFilter 'xxx' //xxx为会产生冲突的库名
}

你可能还会遇到这个坑Error:Execution failed for task ':app:transformClassesWithExtractJarsForDebug'. > error

据说这个是Instant Run 的一个Bug,设置里关闭Instant Run功能解决。

如果发现灵异的缓存现象,以前插入的代码删除了还是被插入,删除App后重装就正常了。。。。。

AspectJ术语

  • JoinPoints:代码可插入的点,比如一个方法的调用处或者方法内部。
  • Pointcuts:切点,用来描述 JoinPoints 注入点的一段表达式。
  • Aspect:切面,Pointcuts和 Advice 合在一起称作 Aspect。
  • Advice:相关处理,常见的有 Before、After、Around 等,表示代码执行前、执行后、替换目标代码,也就是在 Pointcut 处插入代码。

常见用法

基础用法

具体代码如下:

首先在主Activity中调用测试方法

1
2
3
4
5
6
7
8
9
10
11
12
13
14
15
16
17
18
19
20
21
public class MainActivity extends AppCompatActivity {

private static final String TAG = "基础用法测试";

@Override
protected void onCreate(Bundle savedInstanceState) {
super.onCreate(savedInstanceState);
setContentView(R.layout.activity_main);

testBeforeAndAfter();
testAround();
}

private void testBeforeAndAfter(){
Log.d(TAG, "testBeforeAndAfter: 原本需执行的代码");
}

private void testAround(){
Log.d(TAG, "testAround: 原本需执行的代码");
}
}

新建一个切面类BaseAspect,用于基本用法测试

@Aspect注解切面类名

这一步很重要,不然AspectJ找不到Aspect切面,也找不到Advice的相关处理
@Before 在插入点之前插入
@After 在插入点之后插入

1
2
3
4
5
6
7
8
9
10
11
12
13
14
15
16
17
18
19
20
21
22
23
24
25
26
27
28
29
30
@Aspect
public class BaseAspect {

private static final String TAG = "基础用法测试";

@Before("execution(* com.jessie.aspectjdemo.MainActivity.testBeforeAndAfter(..))")
public void activityOnMethodBefore(JoinPoint joinPoint){
String key = joinPoint.getSignature().toString();
Log.d(TAG, "activityOnMethodBefore: 调用方法路径" + key);
}


@After("execution(* com.jessie.aspectjdemo.MainActivity.testBeforeAndAfter(..))")
public void activityOnMethodAfter(JoinPoint joinPoint){
String key = joinPoint.getSignature().toString();
Log.d(TAG, "activityOnMethodAfter: 调用方法路径" + key);

}


@Around("execution(* com.jessie.aspectjdemo.MainActivity.testAround(..))")
public void activityOnMethodAround(ProceedingJoinPoint proceedingJoinPoint) throws Throwable {
String key = proceedingJoinPoint.getSignature().toString();

Log.d(TAG,"tivityOnMethodAroundFirst:在" + key + "方法之前调用 ");
proceedingJoinPoint.proceed();
Log.d(TAG, "activityOnMethodAroundSecond:在" + key+"方法之后调用 ");
}

}

注解括号内的表达式说明

第一个*表示返回值。

第二个*表示返回值为任意类型。

后面如com.jessie.aspectjdemo.MainActivity.testBeforeAndAfter(..)方法的全路径。

其中可以用*来进行通配,几个*没区别。如android.app.Activity.on**(..)

可以通过『&&、||、!』来进行条件组合。(..)代表这个方法的参数,可以指定类型,或者(..)这样来代表任意类型、任意个数的参数。

如果发现没有回调(插入失败是没有错误提示的。。。)说明方法匹配失败,仔细检查方法的全路径,当()内参数为空时应填写(..)来进行匹配。

路径 含义
aaa.bbb.ccc 全路径
aaa.*.ccc 匹配aaa包下的任何“一级子包”下的ccc类
aaa.* 匹配aaa包及任何子包下的任何类
参数 含义
(..) 表示匹配接受任意个参数的方法
(..,java.lang.Integer) 表示匹配接受java.lang.Integer类型的参数结束,且其前边可以接受有任意个参数的方法
(java.lang.Integer,..) 表示匹配接受java.lang.Integer类型的参数开始,且其后边可以接受任意个参数的方法
(*,java.lang.Integer) 表示匹配接受java.lang.Integer类型的参数结束,且其前边接受有一个任意类型参数的方法

获取插入点方法的所有参数

1
2
3
4
joinpoint.getArgs();//参数列表
joinpoint.getTarget().getClass().getName();//类全路径
joinpoint.getSignature().getDeclaringTypeName();//接口全路径
joinpoint.getSignature().getName();//调用的方法名

可以用JoinPointProceedingJoinPoint

两者的区别:
JoinPoint是父类,提供获取拦截方法的信息的功能,如所有参数joinpoint.getArgs()
ProceedingJoinPoint是子类,只能用在@Around中,除了提供JoinPoint的所有功能外,还能提供方法的运行proceed()proceed(args)功能。

效果图

自定义Pointcuts

先新建一个自定义切点类,用@Retention,@Target注解类名

1
2
3
4
5
@Retention(RetentionPolicy.CLASS) //声明注解类
@Target({ElementType.CONSTRUCTOR, ElementType.METHOD}) //作用于构造方法和方法
public @interface MyPointcuts {

}

在主Activity中定义测试方法,都用自定义切点@MyPointcuts注解

1
2
3
4
5
6
7
8
9
10
11
12
13
14
@MyPointcuts
public void testMyPointcuts1(View view){
Log.d(MY_POINTCUTS_TAG, "testMyPointcuts: 测试自定义切点1");
}

@MyPointcuts
public void testMyPointcuts2(View view){
Log.d(MY_POINTCUTS_TAG, "testMyPointcuts: 测试自定义切点2");
}

@MyPointcuts
public void testMyPointcuts3(View view){
Log.d(MY_POINTCUTS_TAG, "testMyPointcuts: 测试自定义切点3");
}

通过三个按钮分别调用这3个方法

1
2
3
4
5
6
7
8
9
10
11
12
13
14
15
16
17
18
19
20
21
22
23
24
25
26
27
<?xml version="1.0" encoding="utf-8"?>
<LinearLayout xmlns:android="http://schemas.android.com/apk/res/android"
xmlns:app="http://schemas.android.com/apk/res-auto"
android:orientation="vertical"
android:layout_width="match_parent"
android:layout_height="match_parent"
android:gravity="center"
>

<android.support.v7.widget.AppCompatButton
android:text="测试自定义切点1"
android:layout_width="wrap_content"
android:layout_height="wrap_content"
android:onClick="testMyPointcuts1"/>

<android.support.v7.widget.AppCompatButton
android:text="测试自定义切点2"
android:layout_width="wrap_content"
android:layout_height="wrap_content"
android:onClick="testMyPointcuts2"/>

<android.support.v7.widget.AppCompatButton
android:text="测试自定义切点3"
android:layout_width="wrap_content"
android:layout_height="wrap_content"
android:onClick="testMyPointcuts3"/>
</LinearLayout>

新建自定义切点用法的切面类MyPointcutsAspect,记得@Aspect注解类名

1
2
3
4
5
6
7
8
9
10
11
12
13
14
15
16
17
@Aspect
public class MyPointcutsAspect {
private static final String MY_POINTCUTS_TAG = "自定义切点用法测试";

@Pointcut("execution(@com.jessie.aspectjdemo.MyPointcuts * *(..))")
public void myPointcutsMethod() {
}

@Around("myPointcutsMethod()")
public void onMyPointcutsMethodAround(ProceedingJoinPoint proceedingJoinPoint) throws Throwable {
String key = proceedingJoinPoint.getSignature().toString();
Log.d(MY_POINTCUTS_TAG, "方法调用之前插入: " + key);
proceedingJoinPoint.proceed();
Log.d(MY_POINTCUTS_TAG, "方法调用之后插入: " + key);
}

}

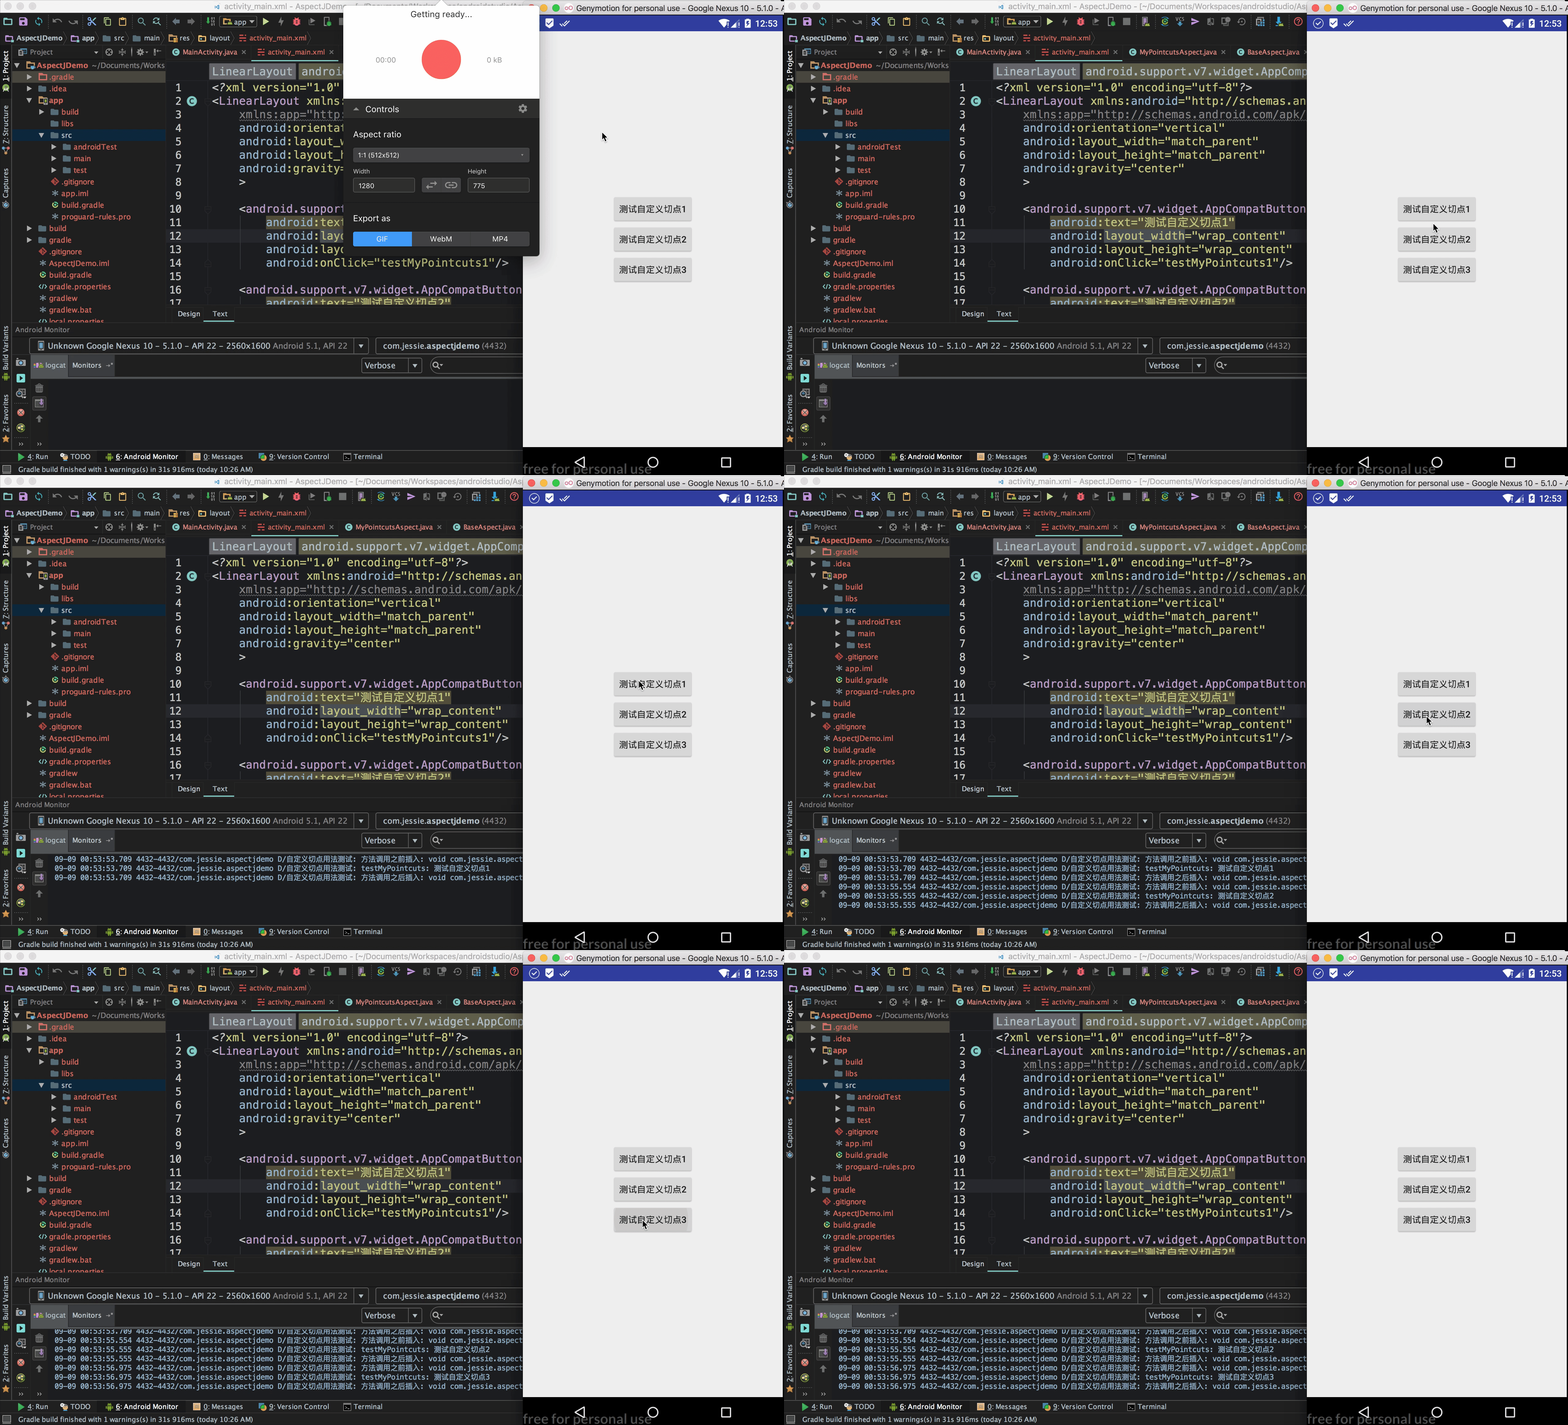
所有被自定义切点@MyPointcuts注解的方法都会插入代码,实现了插入多个切点的效果。

效果gif如下:

效果gif

execution与call的区别

除了execution表达式外常用到的还有call表达式,它们之间的区别是用execution插入的代码是调用在被插入的方法内,用call插入的代码是调用在被插入的方法外。

withincode组合

通过withincode组合可实现代码的精准插入,当两个方法同时调用一个公共方法时,可以选定只在其中一个方法调用公共方法时插入。

在主Activity中定义两个测试方法和一个公共方法

1
2
3
4
5
6
7
8
9
10
11
public void testWithcode1(View view){
testComment();
}

public void testWithcode2(View view){
testComment();
}

private void testComment(){
Log.d(WITH_CODE, "testComment: 公共方法执行的代码");
}

通过布局文件的两个按钮分别调用

1
2
3
4
5
6
7
8
9
10
11
 <android.support.v7.widget.AppCompatButton
android:text="测试精准插入1"
android:layout_width="wrap_content"
android:layout_height="wrap_content"
android:onClick="testWithcode1"/>

<android.support.v7.widget.AppCompatButton
android:text="测试精准插入2"
android:layout_width="wrap_content"
android:layout_height="wrap_content"
android:onClick="testWithcode2"/>

新建精确插入代码用法的切面类WithcodeAspect,记得@Aspect注解类名

我们让只有testWithcode2调用公共方法时才插入代码

1
2
3
4
5
6
7
8
9
10
11
12
13
14
15
16
17
18
19
20
21
22
23
24
25
26
27
@Aspect
public class WithcodeAspect {

private static final String WITH_CODE = "精确插入测试";

// 在testWithcode2()方法内插入
@Pointcut("withincode(* com.jessie.aspectjdemo.MainActivity.testWithcode2(..))")
public void testWithcode2Method() {
}

// 调用testComment()方法的时候插入
@Pointcut("call(* com.jessie.aspectjdemo.MainActivity.testComment(..))")
public void testCommentMethod() {
}

// 同时满足以上条件,在testWithcode2()方法内调用testComment()方法的时候才插入
@Pointcut("testWithcode2Method() && testCommentMethod()")
public void testWithcode2MethodOnlyInvoke() {
}

@After("testWithcode2MethodOnlyInvoke()")
public void beforeWithcode2MethodOnlyInvoke(JoinPoint joinPoint) {
String key = joinPoint.getSignature().toString();
Log.d(WITH_CODE, "beforeWithcode2MethodOnlyInvoke: " + key);
}

}

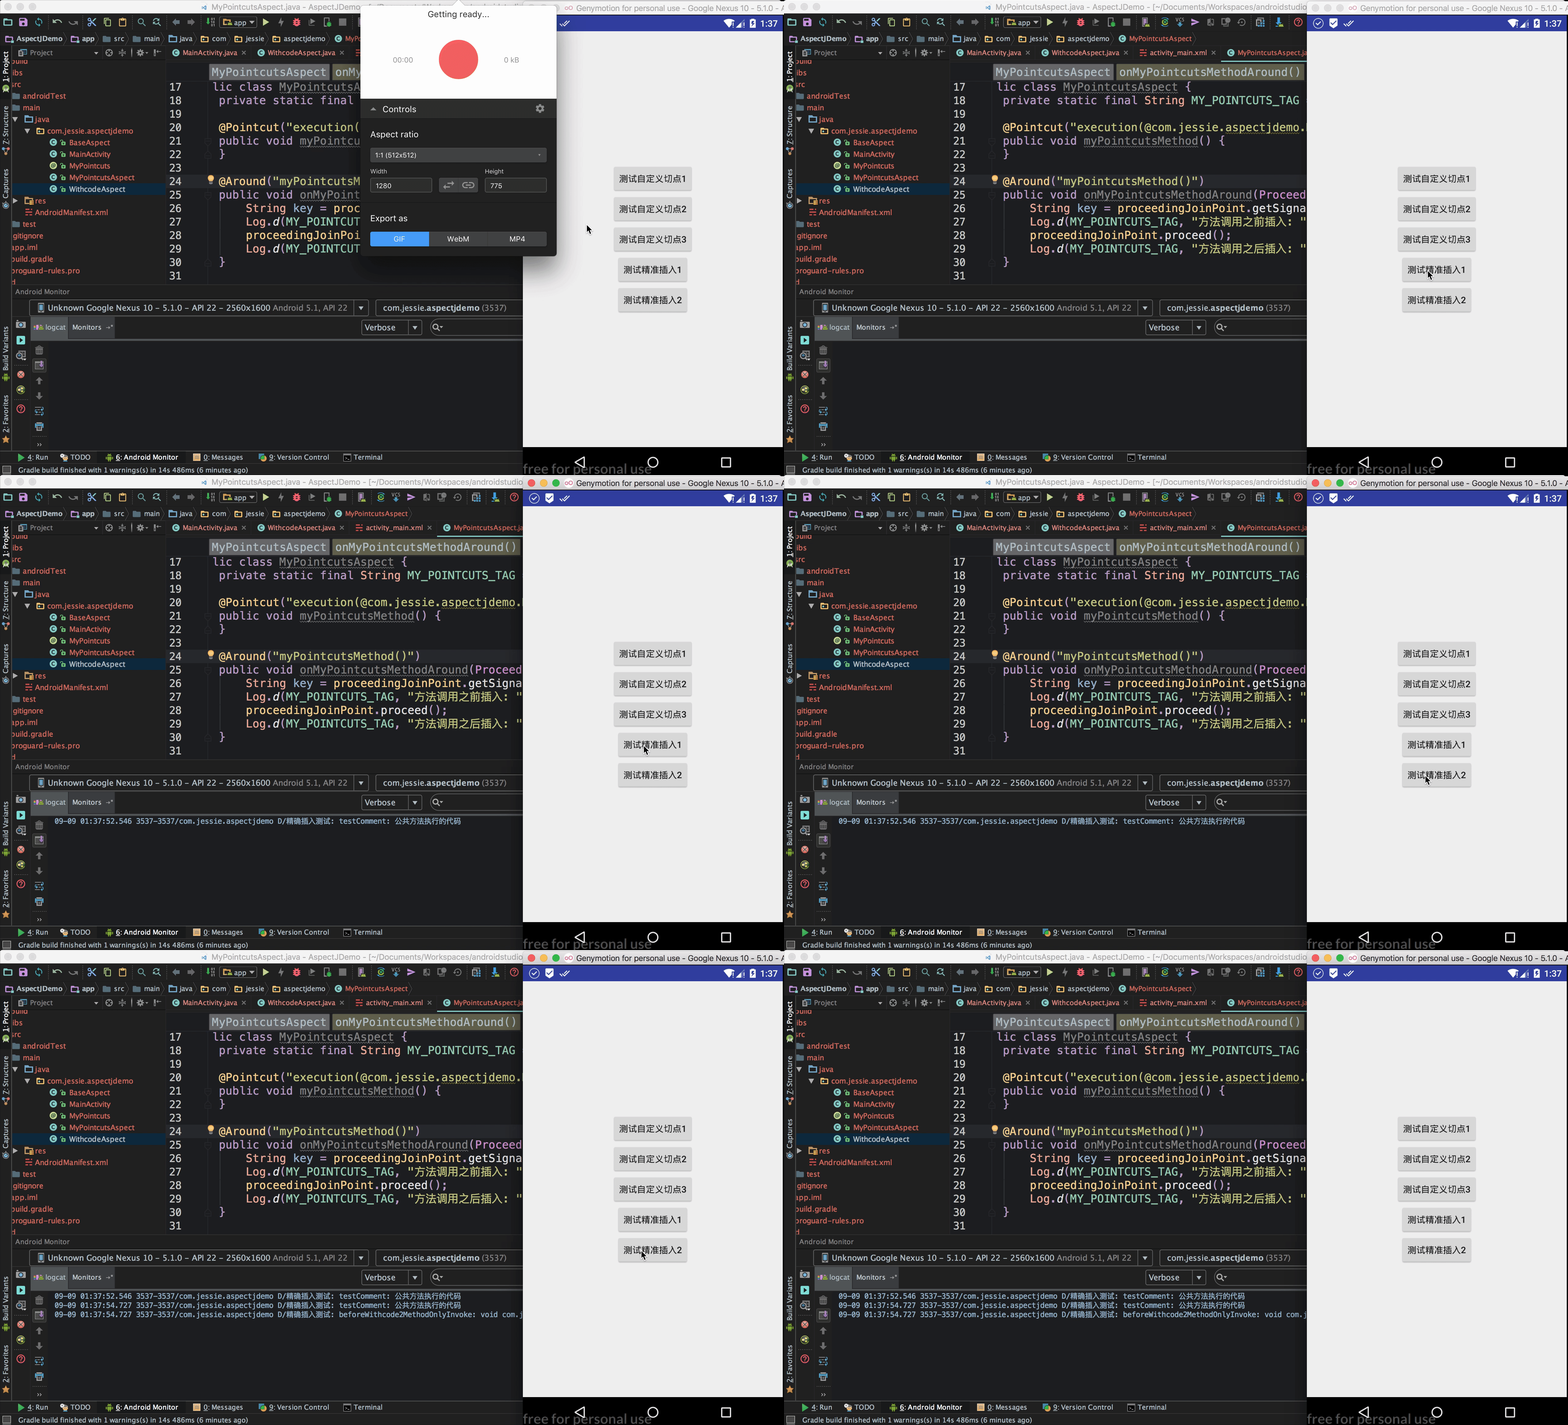
效果gif如下:

效果gif

可见第一个方法调用时没有被插入代码,第二个方法被调用时插入了代码,我们实现了精准插入。

demo已打包上传,想要查看代码的同学,点这里传送门


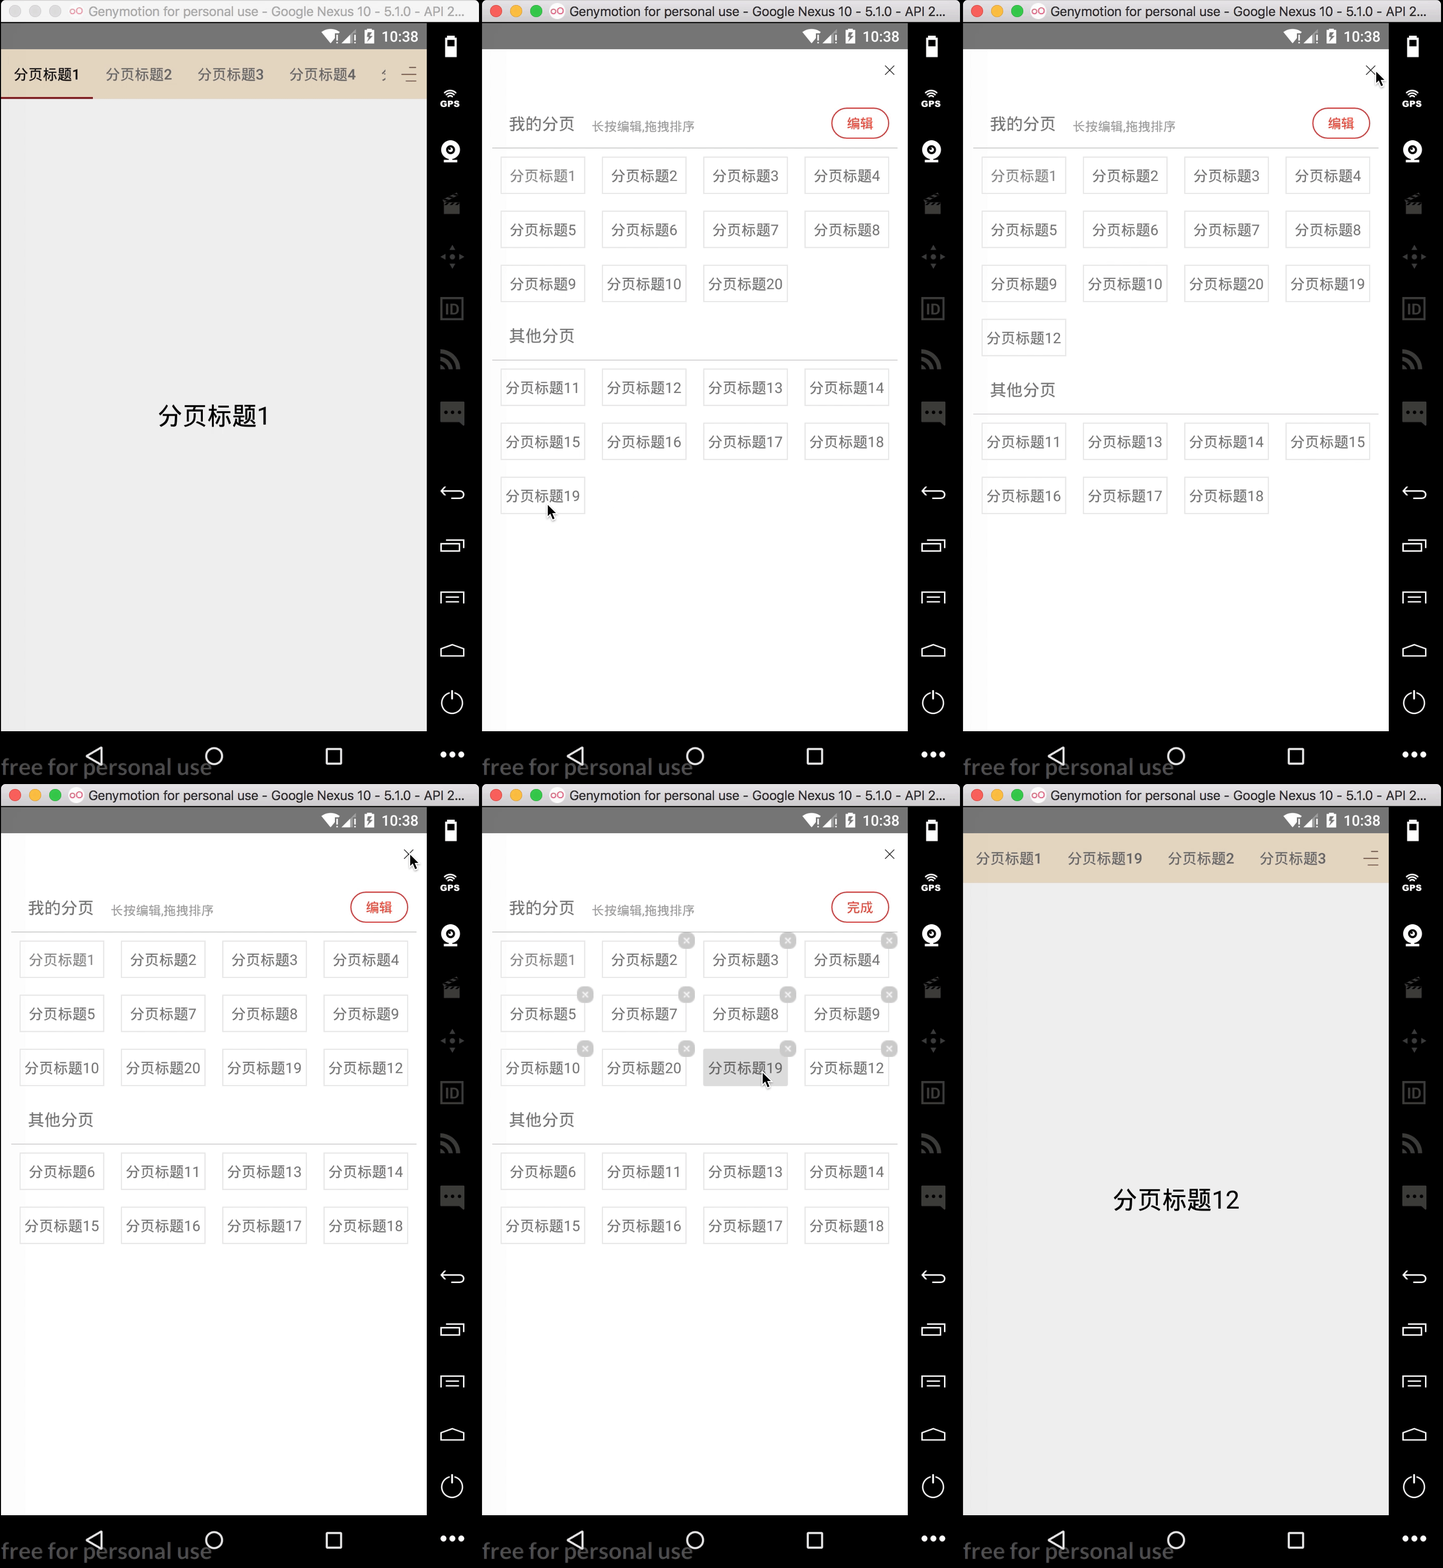
前段时间太忙了,终于可以抓紧周末的时间更一更blog,公司的项目有个这样的需求,一个界面的顶部有个tab分页栏,tab分页栏中的tab个数以及顺序都是可变的。在分页栏的最右侧有个按钮,点击按钮可进入分页tab的管理界面,在管理界面中,分为可见与不可见两组,可见组才能在界面顶部的tab分页栏中显示。可见组可拖拽排序,点击编辑按钮,在编辑状态下,可见组的item右上角出现按钮,点击后可调整到不可见组,非编辑状态下,点击item可跳转至该分页的界面。不可见组的item点击就会调整到可见组。效果类似今日头条的自定义频道功能。

整理大致思路如下,关于tab分页栏可用google在android 6.0上引入的控件tabLayout,需support v7包的支持,具体使用方法可以查看官网,这应该是最简单的实现方式了,不过这里有个坑,就是绑定了viewpager后不显示tab中的内容,查看源码可知是被清除了,需要重新绑定一次tab的view。有更高的自定义需求可参考这个[开源项目][1]。管理界面的拖拽可通过重写recyclerview的拖拽监听来实现,这里需要实现item的移动动画。


先放一张效果图:
效果gif

主界面的tab栏用TabLayout实现

主要用到一下几个属性,更多属性用法可参考官方文档:

  • app:tabIndicatorColor :指示条的颜色

  • app:tabIndicatorHeight :指示条的高度

  • app:tabSelectedTextColor : tab被选中时的字体颜色

  • app:tabTextColor : tab未被选中时的字体颜色

  • app:tabMode=”scrollable” : 默认是fixed:固定的,标签很多时候会被挤压,不能滑动。

  • app:tabBackground=: tab的背景

下面是主界面的布局文件

1
2
3
4
5
6
7
8
9
10
11
12
13
14
15
16
17
18
19
20
21
22
23
24
25
26
27
28
29
30
31
32
33
34
35
36
37
38
39
40
41
42
43
44
45
46
<?xml version="1.0" encoding="utf-8"?>
<LinearLayout xmlns:android="http://schemas.android.com/apk/res/android"
android:layout_width="match_parent"
android:layout_height="match_parent"
xmlns:app="http://schemas.android.com/apk/res-auto"
android:orientation="vertical">

<LinearLayout
android:layout_width="match_parent"
android:layout_height="wrap_content"
android:orientation="horizontal">
<android.support.design.widget.TabLayout
android:id="@+id/tablayout"
android:layout_width="0dp"
android:layout_height="wrap_content"
android:background="@color/indicator_yellow"
android:layout_weight="1"
app:tabBackground="@color/indicator_yellow"
app:tabIndicatorColor="@color/select_red_line"
app:tabIndicatorHeight="2dp"
app:tabSelectedTextColor="@color/indicator_select_black"
app:tabTextColor="@color/indicator_normal_black"
app:tabMode="scrollable"
/>

<ImageView
android:id="@+id/icon_category"
android:layout_width="40dp"
android:layout_height="match_parent"
android:layout_alignParentRight="true"
android:layout_centerVertical="true"
android:background="@color/indicator_yellow"
android:paddingLeft="5dp"
android:scaleType="center"
android:src="@drawable/sl_main_title_add" />
</LinearLayout>

<!--内容布局-->
<android.support.v4.view.ViewPager
android:id="@+id/view_pager"
android:layout_width="match_parent"
android:layout_height="match_parent"
android:layout_weight="1" />


</LinearLayout>

TabLayout的初始化

  1. 定义viewpager的adapter

    1
    2
    3
    4
    5
    6
    7
    8
    9
    10
    11
    12
    13
    14
    15
    16
    17
    18
    19
    20
    21
    22
    23
    24
    25
    26
    27
    28
    29
    30
    31
    32
    33
    34
    35
    36
    37
    38
    39
    40
    41
    42
    43
    44
    45
    46
    47
    48
    49
    public class ExamplePagerAdapter extends PagerAdapter {
    private List<String> mDataList;

    public ExamplePagerAdapter(List<String> dataList) {
    mDataList = dataList;
    }

    @Override
    public int getCount() {
    return mDataList == null ? 0 : mDataList.size();
    }

    @Override
    public boolean isViewFromObject(View view, Object object) {
    return view == object;
    }

    @Override
    public Object instantiateItem(ViewGroup container, int position) {
    TextView textView = new TextView(container.getContext());
    textView.setText(mDataList.get(position));
    textView.setGravity(Gravity.CENTER);
    textView.setTextColor(Color.BLACK);
    textView.setTextSize(24);
    container.addView(textView);
    return textView;
    }

    @Override
    public void destroyItem(ViewGroup container, int position, Object object) {
    container.removeView((View) object);
    }

    @Override
    public int getItemPosition(Object object) {
    TextView textView = (TextView) object;
    String text = textView.getText().toString();
    int index = mDataList.indexOf(text);
    if (index >= 0) {
    return index;
    }
    return POSITION_NONE;
    }

    @Override
    public CharSequence getPageTitle(int position) {
    return mDataList.get(position);
    }
    }
  2. 初始化viewpager和TabLayout

    1
    2
    3
    4
    5
    6
    7
    8
    9
    10
    11
    12
    13
    14
    15
    tabLayout.setupWithViewPager(viewPager);
    setTabTitle(true);
    viewPager.setAdapter(mExamplePagerAdapter);

    private void setTabTitle(boolean addTab) {
    mDataList.clear();
    Iterator<MainTitleDTO> it = items.iterator();
    while (it.hasNext()) {
    MainTitleDTO mainTitleDTO = it.next();
    mDataList.add(mainTitleDTO.getTitle());
    if(addTab){
    tabLayout.addTab(tabLayout.newTab().setText(mainTitleDTO.getTitle()));
    }
    }
    }

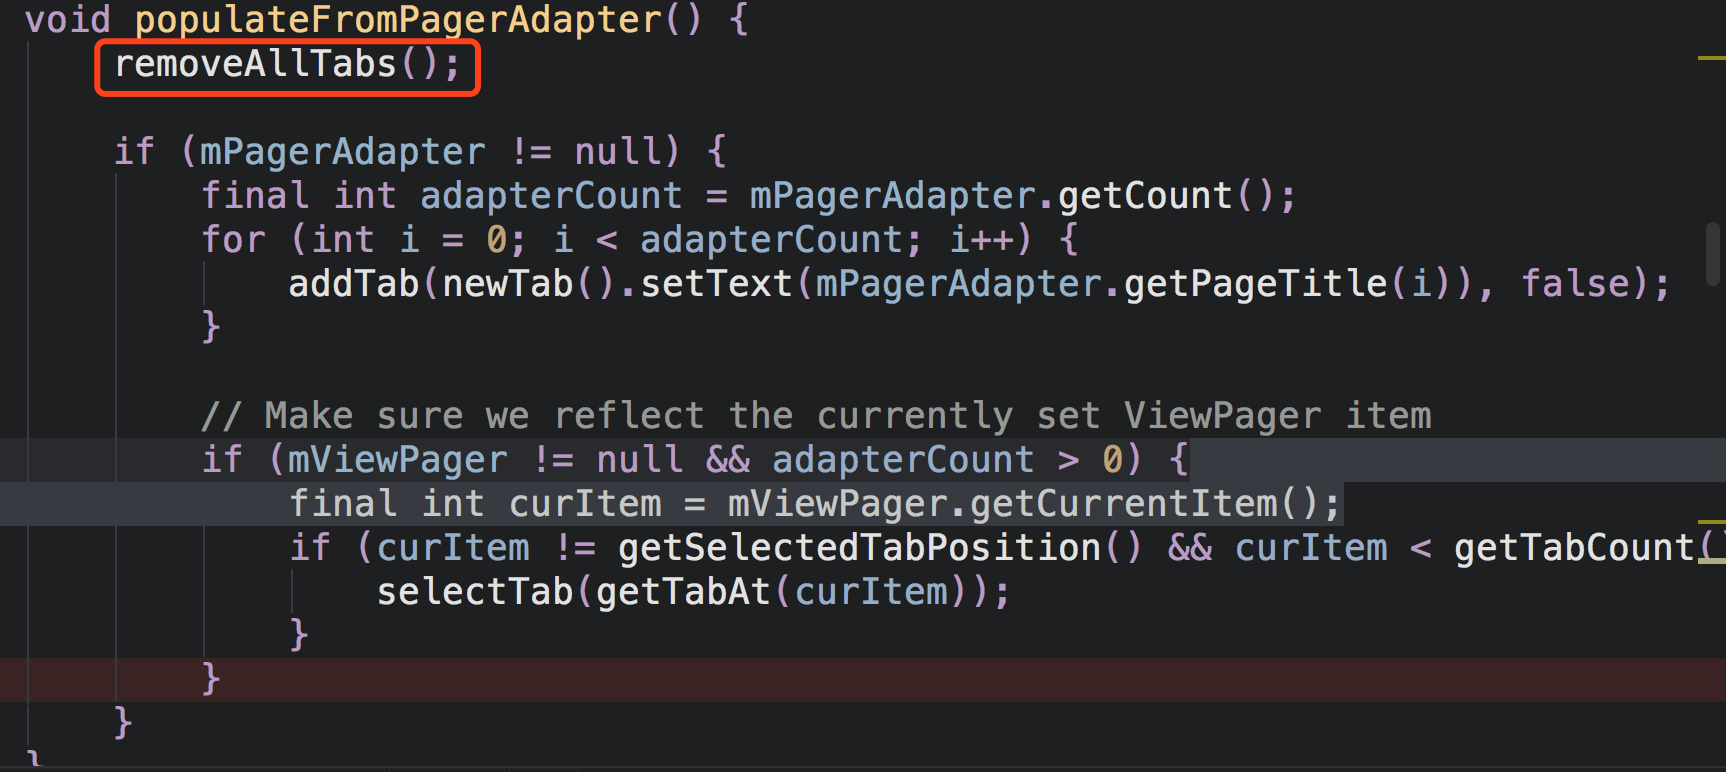
    注意这里容易入坑,调用tabLayout.setupWithViewPager(viewPager);会清除tab。
    看下源码我们就可以得知真相:第一次用TabLayout的时候也在这里卡住了,Are You Kidding Me?真的好坑~
    Android源码中的坑
    所以有两个解决办法,一是在这个调用后去初始化tabLayout中的tab,二是在调用tabLayout.setupWithViewPager(viewPager);后再次设置tabLayout中的tab,代码如下:

    1
    2
    3
    for(int i=0;i<title.size();i++){
    tabLayout.getTabAt(i).setText(title.get(i));
    }

    然后是主页tab栏右边进入管理界面的点击监听

    1
    2
    3
    4
    5
    6
    7
    8
    9
    10
    11
    @OnClick({R.id.icon_category})
    public void onEventClick(View view) {
    switch (view.getId()) {
    case R.id.icon_category:
    Intent intent = new Intent(this, TabManageActivity.class);
    intent.putExtra(MY_CHANNEL, items);
    intent.putExtra(OTHER_CHANNEL, otherItems);
    startActivityForResult(intent, REQUEST_CODE);
    break;
    }
    }

    tab管理界面的实现

    这里主要是用recyclerview实现,布局很简单,xml文件如下:

    1
    2
    3
    4
    5
    6
    7
    8
    9
    10
    11
    12
    13
    14
    15
    16
    17
    18
    19
    20
    21
    22
    23
    24
    25
    26
    27
    28
    29
    30
    31
    <?xml version="1.0" encoding="utf-8"?>
    <LinearLayout xmlns:android="http://schemas.android.com/apk/res/android"
    android:id="@+id/activity_channel"
    android:layout_width="match_parent"
    android:layout_height="match_parent"
    android:background="@color/white"
    android:orientation="vertical">

    <ImageView
    android:id="@+id/icon_collapse"
    android:layout_width="wrap_content"
    android:layout_height="wrap_content"
    android:layout_gravity="right"
    android:layout_marginTop="3.0dip"
    android:padding="10.0dip"
    android:scaleType="center"
    android:src="@drawable/select_channel_category_edit_close" />


    <FrameLayout
    android:layout_width="match_parent"
    android:layout_height="match_parent">

    <android.support.v7.widget.RecyclerView
    android:id="@+id/recyclerView"
    android:layout_width="match_parent"
    android:layout_height="match_parent"
    android:padding="10dp"/>

    </FrameLayout>
    </LinearLayout>

    自定义recyclerview的adapter

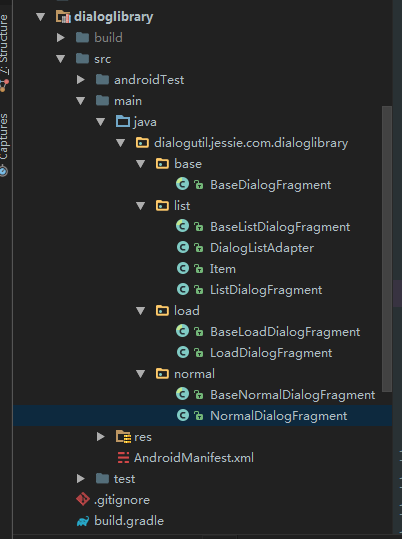
    这里是实现调整tab分组和顺序的核心,封装了一个库
    封装好的lib库结构如下:
    libtabmanage结构

  3. 自定义接口选中与拖拽后监听

    1
    2
    3
    4
    5
    6
    public interface OnItemDragListener {
    //Item选中监听
    void onItemSelected();
    //Item拖拽结束/滑动结束后监听
    void onItemFinish();
    }
  4. 自定义接口移动后监听

    1
    2
    3
    public interface OnItemMoveListener {
    void onItemMove(int fromPosition, int toPosition);
    }
  5. 重写recyclerview的拖拽回调

    1
    2
    3
    4
    5
    6
    7
    8
    9
    10
    11
    12
    13
    14
    15
    16
    17
    18
    19
    20
    21
    22
    23
    24
    25
    26
    27
    28
    29
    30
    31
    32
    33
    34
    35
    36
    37
    38
    39
    40
    41
    42
    43
    44
    45
    46
    47
    48
    49
    50
    51
    52
    53
    54
    55
    56
    57
    58
    59
    60
    61
    62
    63
    64
    65
    66
    67
    public class ItemDragHelperCallback extends ItemTouchHelper.Callback {
    @Override
    public int getMovementFlags(RecyclerView recyclerView, RecyclerView.ViewHolder viewHolder) {
    int dragFlags;
    RecyclerView.LayoutManager manager = recyclerView.getLayoutManager();
    if (manager instanceof GridLayoutManager || manager instanceof StaggeredGridLayoutManager) {
    dragFlags = ItemTouchHelper.UP | ItemTouchHelper.DOWN | ItemTouchHelper.LEFT | ItemTouchHelper.RIGHT;
    } else {
    dragFlags = ItemTouchHelper.UP | ItemTouchHelper.DOWN;
    }
    // 如果想支持滑动(删除)操作, swipeFlags = ItemTouchHelper.START | ItemTouchHelper.END
    int swipeFlags = 0;
    return ItemTouchHelper.Callback.makeMovementFlags(dragFlags, swipeFlags);
    }

    @Override
    public boolean onMove(RecyclerView recyclerView, RecyclerView.ViewHolder viewHolder, RecyclerView.ViewHolder target) {
    // 当前type与目标type不同,不同Type之间不可移动
    if (viewHolder.getItemViewType() != target.getItemViewType()) {
    return false;
    }

    //移动后的监听调用
    if (recyclerView.getAdapter() instanceof OnItemMoveListener) {
    OnItemMoveListener listener = ((OnItemMoveListener) recyclerView.getAdapter());
    listener.onItemMove(viewHolder.getAdapterPosition(), target.getAdapterPosition());
    }
    return true;
    }

    @Override
    public void onSwiped(RecyclerView.ViewHolder viewHolder, int direction) {
    }

    @Override
    public void onSelectedChanged(RecyclerView.ViewHolder viewHolder, int actionState) {
    // 不在闲置状态,调用拖拽监听
    if (actionState != ItemTouchHelper.ACTION_STATE_IDLE) {
    if (viewHolder instanceof OnItemDragListener) {
    OnItemDragListener itemViewHolder = (OnItemDragListener) viewHolder;
    itemViewHolder.onItemSelected();
    }
    }
    super.onSelectedChanged(viewHolder, actionState);
    }

    @Override
    public void clearView(RecyclerView recyclerView, RecyclerView.ViewHolder viewHolder) {
    //拖拽后的监听
    if (viewHolder instanceof OnItemDragListener) {
    OnItemDragListener itemViewHolder = (OnItemDragListener) viewHolder;
    itemViewHolder.onItemFinish();
    }
    super.clearView(recyclerView, viewHolder);
    }

    @Override
    public boolean isLongPressDragEnabled() {
    // 不支持长按拖拽功能
    return false;
    }

    @Override
    public boolean isItemViewSwipeEnabled() {
    // 不支持滑动功能
    return false;
    }

    由于非可见组的item点击后要自动调整到可见组,可见组的item通过长按或者点击编辑按钮,切换到编辑状态时,点击右上角的叉,要自动调整到非可见组,所以这里需要实现两个动画,item从可见组当前位置移动到非可见组的首位,item从非可见组的当前位置移动到可见组的末尾。

  6. item动画工具类

    1
    2
    3
    4
    5
    6
    7
    8
    9
    10
    11
    12
    13
    14
    15
    16
    17
    18
    19
    20
    21
    22
    23
    24
    25
    26
    27
    28
    29
    30
    31
    32
    33
    34
    35
    36
    37
    38
    39
    40
    41
    42
    43
    44
    45
    46
    47
    48
    49
    50
    51
    52
    53
    54
    55
    56
    57
    58
    59
    60
    61
    62
    63
    64
    65
    66
    67
    68
    69
    70
    71
    72
    73
    74
    75
    76
    77
    78
    79
    80
    81
    82
    83
    84
    85
    86
    87
    88
    89
    90
    91
    92
    93
    94
    95
    96
    97
    98
    99
    100
    101
    102
    103
    104
    105
    106
    107
    108
    109
    110
    111
    112
    113
    114
    115
    116
    117
    118
    119
    120
    121
    122
    123
    124
    125
    126
    127
    128
    129
    130
    131
    132
    133
    134
    135
    136
    137
    138
    139
    140
    141
    142
    143
    144
    145
    146
    147
    148
    149
    150
    151
    152
    153
    154
    155
    156
    157
    158
    159
    160
    161
    162
    163
    164
    165
    166
    167
    168
    169
    170
    171
    172
    173
    174
    175
    176
    177
    178
    179
    180
    181
    182
    183
    184
    185
    186
    187
    188
    189
    190
    191
    192
    193
    194
    195
    196
    197
    198
    199
    200
    201
    202
    203
    204
    205
    206
    207
    208
    209
    210
    211
    212
    213
    214
    215
    216
    217
    218
    219
    220
    221
    222
    223
    224
    225
    226
    227
    228
    229
    230
    231
    232
    233
    234
    235
    236
    237
    238
    239
    240
    241
    242
    243
    244
    245
    246
    247
    248
    249
    250
    251
    252
    253
    254
    255
    256
    257
    258
    259
    260
    261
    262
    263
    public class RecyclerviewAnimator {

    public static Handler delayHandler = new Handler();//延时handler
    private static final long ANIM_TIME = 360L;//动画时间
    //我的分页移动到其他分页
    public static void myToOther(int position, RecyclerView parent, RecyclerView.Adapter adapter,RecyclerView.ViewHolder myHolder, List myItems,List otherItems){
    if(position == 1){//过滤第一个
    return;
    }
    RecyclerView recyclerView = parent;
    //目标view是其他分页的第一个
    View targetView = recyclerView.getLayoutManager().findViewByPosition(myItems.size() + BaseTabListAdapter.COUNT_PRE_OTHER_HEADER);
    //当前view
    View currentView = recyclerView.getLayoutManager().findViewByPosition(position);
    // 如果targetView不在屏幕内,则indexOfChild为-1,此时不需要添加动画,因为此时notifyItemMoved自带一个向目标移动的动画
    // 如果在屏幕内,则添加一个位移动画
    if (recyclerView.indexOfChild(targetView) >= 0) {
    int targetX, targetY;

    RecyclerView.LayoutManager manager = recyclerView.getLayoutManager();
    int spanCount = ((GridLayoutManager) manager).getSpanCount();
    // 计算移动后的坐标
    // 移动后 高度变化 (我的分页Grid最后一个item在其他分页新的一行第一个)
    if ((myItems.size() - BaseTabListAdapter.COUNT_PRE_MY_HEADER) % spanCount == 0) {
    //获取我的分页最后一个
    View preTargetView = recyclerView.getLayoutManager().findViewByPosition(myItems.size() + BaseTabListAdapter.COUNT_PRE_OTHER_HEADER - 1);
    targetX = preTargetView.getLeft();
    targetY = preTargetView.getTop();
    } else {
    targetX = targetView.getLeft();
    targetY = targetView.getTop();
    }
    //开始执行动画
    startAnimation(recyclerView, currentView, targetX, targetY);
    moveMyToOther(adapter,myHolder,myItems,otherItems);
    } else {
    moveMyToOther(adapter,myHolder,myItems,otherItems);
    }
    }

    //其他分页移动到我的分页
    public static void otherToMy(RecyclerView parent,RecyclerView.Adapter adapter,RecyclerView.ViewHolder otherHolder, List myItems ,List otherItems){
    RecyclerView recyclerView = parent;
    RecyclerView.LayoutManager manager = recyclerView.getLayoutManager();
    //获取当前位置
    int currentPiosition = otherHolder.getAdapterPosition();
    // 获取当前位置的view
    View currentView = manager.findViewByPosition(currentPiosition);
    // 获取目标位置的view,我的分页最后一个
    View preTargetView = manager.findViewByPosition(myItems.size() - 1 + BaseTabListAdapter.COUNT_PRE_MY_HEADER);

    // 如果targetView不在屏幕内,则为-1,此时不需要添加动画,因为此时notifyItemMoved自带一个向目标移动的动画
    // 如果在屏幕内,则添加一个位移动画
    if (recyclerView.indexOfChild(preTargetView) >= 0) {
    int targetX = preTargetView.getLeft();
    int targetY = preTargetView.getTop();
    // target 我的分页最后一个
    int targetPosition = myItems.size() - 1 + BaseTabListAdapter.COUNT_PRE_OTHER_HEADER;

    GridLayoutManager gridLayoutManager = ((GridLayoutManager) manager);
    int spanCount = gridLayoutManager.getSpanCount();

    //目标位置在grid的第一个位置
    if ((targetPosition - BaseTabListAdapter.COUNT_PRE_MY_HEADER) % spanCount == 0) {
    View targetView = manager.findViewByPosition(targetPosition);
    targetX = targetView.getLeft();
    targetY = targetView.getTop();
    } else {
    targetX += preTargetView.getWidth();

    // 最后一个item可见时
    if (gridLayoutManager.findLastVisibleItemPosition() == adapter.getItemCount() - 1) {
    // 最后一个item在最后一行第一个位置
    if ((adapter.getItemCount() - 1 - myItems.size() - BaseTabListAdapter.COUNT_PRE_OTHER_HEADER) % spanCount == 0) {
    int firstVisiblePostion = gridLayoutManager.findFirstVisibleItemPosition();
    // 第一个item可见时
    if (firstVisiblePostion == 0) {
    // FirstCompletelyVisibleItemPosition == 0 内容不满一屏幕 , targetY值不需要变化
    // // FirstCompletelyVisibleItemPosition != 0 内容满一屏幕 并且 可滑动 , targetY值 + firstItem.getTop
    if (gridLayoutManager.findFirstCompletelyVisibleItemPosition() != 0) {
    int offset = (-recyclerView.getChildAt(0).getTop()) - recyclerView.getPaddingTop();
    targetY += offset;
    }
    } else {
    // 移动后, targetY值+一个item的高度
    targetY += preTargetView.getHeight();
    }
    }
    } else {
    System.out.println("current--No");
    }
    }

    // 如果当前位置是其他分页的最后一个
    // 并且 当前位置不在grid的第一个位置
    // 并且 目标位置不在grid的第一个位置

    // 则需要延迟250秒notifyItemMove,这种情况,不触发ItemAnimator,会直接刷新界面
    if (currentPiosition == gridLayoutManager.findLastVisibleItemPosition()
    && (currentPiosition - myItems.size() - BaseTabListAdapter.COUNT_PRE_OTHER_HEADER) % spanCount != 0
    && (targetPosition - BaseTabListAdapter.COUNT_PRE_MY_HEADER) % spanCount != 0) {
    moveOtherToMyWithDelay(otherHolder,adapter,myItems,otherItems);
    } else {
    moveOtherToMy(otherHolder,adapter,myItems,otherItems);
    }
    startAnimation(recyclerView, currentView, targetX, targetY);

    } else {
    moveOtherToMy(otherHolder,adapter,myItems,otherItems);
    }
    }

    /**
    * 其他分页移动到我的分页
    *
    * @param otherHolder
    */
    public static void moveOtherToMy(RecyclerView.ViewHolder otherHolder,RecyclerView.Adapter adapter,List myItems,List otherItems) {
    int position = processItemRemoveAdd(otherHolder,myItems,otherItems);
    if (position == -1) {
    return;
    }
    //刷新该位置item
    adapter.notifyItemMoved(position, myItems.size() - 1 + BaseTabListAdapter.COUNT_PRE_MY_HEADER);
    }


    //其他分页移动到我的分页 伴随延迟
    public static void moveOtherToMyWithDelay(RecyclerView.ViewHolder otherHolder, final RecyclerView.Adapter adapter, final List myItems,List otherItems) {
    final int position = processItemRemoveAdd(otherHolder,myItems,otherItems);
    if (position == -1) {
    return;
    }
    delayHandler.postDelayed(new Runnable() {
    @Override
    public void run() {
    //刷新该位置item
    adapter.notifyItemMoved(position, myItems.size() - 1 + BaseTabListAdapter.COUNT_PRE_MY_HEADER);
    }
    }, ANIM_TIME);
    }

    //将其他分页移动到我的分页
    public static int processItemRemoveAdd(RecyclerView.ViewHolder otherHolder, List myItems ,List otherItems) {
    //当前操作的位置
    int position = otherHolder.getAdapterPosition();
    //对应数据集中的位置
    int startPosition = position - myItems.size() - BaseTabListAdapter.COUNT_PRE_OTHER_HEADER;

    if (startPosition > otherItems.size() - 1) {
    return -1;
    }
    //获得移动的item
    Object item = otherItems.get(startPosition);
    //移除数据集中对应的数据
    otherItems.remove(startPosition);
    //添加到末尾
    myItems.add(item);
    return position;
    }


    //我的分页移动到其他分页
    public static void moveMyToOther(RecyclerView.Adapter adapter, RecyclerView.ViewHolder myHolder, List myItems ,List otherItems) {
    //当前操作的位置
    int position = myHolder.getAdapterPosition();
    //对应数据集中的位置
    int startPosition = position - BaseTabListAdapter.COUNT_PRE_MY_HEADER;
    if(startPosition == 0){ //过滤第一个
    return;
    }
    if (startPosition > myItems.size() - 1) {
    return;
    }
    //获得移动的item
    Object item = myItems.get(startPosition);
    //移除数据集中对应的数据
    myItems.remove(startPosition);
    //添加到第一个的位置
    otherItems.add(0, item);
    //刷新该位置item
    adapter.notifyItemMoved(position, myItems.size() + BaseTabListAdapter.COUNT_PRE_OTHER_HEADER);
    }


    /**
    * 启动动画
    */
    public static void startAnimation(RecyclerView recyclerView, final View currentView, float targetX, float targetY) {
    //获取recyclerView的外层view
    final ViewGroup viewGroup = (ViewGroup) recyclerView.getParent();
    final ImageView mirrorView = addMirrorView(viewGroup, recyclerView, currentView);

    Animation animation = getTranslateAnimator(
    targetX - currentView.getLeft(), targetY - currentView.getTop());
    //隐藏当前view
    currentView.setVisibility(View.INVISIBLE);
    //镜像view开始动画
    mirrorView.startAnimation(animation);
    // 动画监听
    animation.setAnimationListener(new Animation.AnimationListener() {
    @Override
    public void onAnimationStart(Animation animation) {
    }

    @Override
    public void onAnimationEnd(Animation animation) {
    //动画结束,移除镜像view
    viewGroup.removeView(mirrorView);
    //当前view不可见时让其可见
    if (currentView.getVisibility() == View.INVISIBLE) {
    currentView.setVisibility(View.VISIBLE);
    }
    }

    @Override
    public void onAnimationRepeat(Animation animation) {

    }
    });
    }

    //位移动画
    public static TranslateAnimation getTranslateAnimator(float targetX, float targetY) {
    TranslateAnimation translateAnimation = new TranslateAnimation(
    Animation.RELATIVE_TO_SELF, 0f,
    Animation.ABSOLUTE, targetX,
    Animation.RELATIVE_TO_SELF, 0f,
    Animation.ABSOLUTE, targetY);
    // RecyclerView默认移动动画250ms 这里设置360ms 是为了防止在位移动画结束后 remove(view)过早 导致闪烁
    translateAnimation.setDuration(ANIM_TIME);
    translateAnimation.setFillAfter(true);
    return translateAnimation;
    }

    //添加需要移动的 镜像View
    public static ImageView addMirrorView(ViewGroup parent, RecyclerView recyclerView, View view) {
    //把旧的cache销毁
    view.destroyDrawingCache();
    //通过setDrawingCacheEnable方法开启cache
    view.setDrawingCacheEnabled(true);
    //创建镜像view
    ImageView mirrorView = new ImageView(recyclerView.getContext());
    //调用getDrawingCache方法就可以获得view的cache图片
    Bitmap bitmap = Bitmap.createBitmap(view.getDrawingCache());
    mirrorView.setImageBitmap(bitmap);
    view.setDrawingCacheEnabled(false);
    int[] locations = new int[2];
    //获取view的位置到locations
    view.getLocationOnScreen(locations);
    int[] parenLocations = new int[2];
    //获取recyclerView的位置到parenLocations
    recyclerView.getLocationOnScreen(parenLocations);
    //设置布局的margin值
    FrameLayout.LayoutParams params = new FrameLayout.LayoutParams(bitmap.getWidth(), bitmap.getHeight());
    params.setMargins(locations[0], locations[1] - parenLocations[1], 0, 0);
    //在动画起始处添加镜像view
    parent.addView(mirrorView, params);

    return mirrorView;
    }

    }

    最后,封装一下BaseTabListAdapter,定义部分常量,重写通用的方法

    1
    2
    3
    4
    5
    6
    7
    8
    9
    10
    11
    12
    13
    14
    15
    16
    17
    18
    19
    20
    21
    22
    23
    24
    25
    26
    27
    28
    29
    30
    31
    32
    33
    34
    35
    36
    37
    38
    39
    40
    41
    42
    43
    44
    45
    46
    47
    48
    49
    50
    51
    52
    53
    54
    55
    56
    57
    58
    59
    60
    61
    62
    63
    64
    65
    66
    67
    68
    69
    70
    71
    72
    73
    74
    75
    76
    77
    78
    public class BaseTabListAdapter extends RecyclerView.Adapter<RecyclerView.ViewHolder> implements OnItemMoveListener {
    // 类型定义
    public static final int TYPE_MY_HEADER = 0; // 我的分页标题
    public static final int TYPE_MY = 1; // 我的分页
    public static final int TYPE_OTHER_HEADER = 2; // 其他分页标题
    public static final int TYPE_OTHER = 3; // 其他分页

    // 数量定义
    protected static final int COUNT_PRE_MY_HEADER = 1; // 我的分页之前header数量
    protected static final int COUNT_PRE_OTHER_HEADER = COUNT_PRE_MY_HEADER + 1; // 其他分页之前header数量

    protected long startTime; // touch点击开始时间
    protected static final long SPACE_TIME = 100; // touch间隔时间 与"点击"区分

    protected boolean isEditMode; //编辑模式标志
    protected ItemTouchHelper mItemTouchHelper;
    protected OnMyItemClickListener onMyItemClickListener;// 我的分页点击事件

    private List myItems;
    private List otherItems;

    public BaseTabListAdapter(List myItems, List otherItems) {
    this.myItems = myItems;
    this.otherItems = otherItems;
    }

    public interface OnMyItemClickListener {
    void onItemClick(View v, int position);
    }

    public void setOnMyItemClickListener(OnMyItemClickListener listener) {
    this.onMyItemClickListener = listener;
    }
    @Override
    public RecyclerView.ViewHolder onCreateViewHolder(ViewGroup parent, int viewType) {
    return null;
    }

    @Override
    public void onBindViewHolder(RecyclerView.ViewHolder holder, int position) {

    }

    @Override
    public int getItemCount() {
    // 我的分页标题 + 我的分页.size + 其他分页标题 + 其他分页.size
    return myItems.size() + otherItems.size() + BaseTabListAdapter.COUNT_PRE_OTHER_HEADER;
    }

    @Override
    public void onItemMove(int fromPosition, int toPosition) {
    //过滤第一个,并且也不能移动到第一个去
    if(fromPosition == 1 || toPosition == 1){
    return;
    }
    //得到当前移动的item
    Object item = myItems.get(fromPosition - BaseTabListAdapter.COUNT_PRE_MY_HEADER);
    //删除数据集中的对应数据
    myItems.remove(fromPosition - BaseTabListAdapter.COUNT_PRE_MY_HEADER);
    //添加数据到移动后的位置
    myItems.add(toPosition - BaseTabListAdapter.COUNT_PRE_MY_HEADER, item);
    //开始刷新
    notifyItemMoved(fromPosition, toPosition);
    }

    @Override
    public int getItemViewType(int position) {
    if (position == 0) { // 我分页标题
    return BaseTabListAdapter.TYPE_MY_HEADER;
    } else if (position == myItems.size() + 1) { // 其他分页标题
    return BaseTabListAdapter.TYPE_OTHER_HEADER;
    } else if (position > 0 && position < myItems.size() + 1) { //我的分页
    return BaseTabListAdapter.TYPE_MY;
    } else { //其他分页
    return BaseTabListAdapter.TYPE_OTHER;
    }
    }
    }

    Lib库的使用

需继承BaseTabListAdapter,代码如下:

1
2
3
4
5
6
7
8
9
10
11
12
13
14
15
16
17
18
19
20
21
22
23
24
25
26
27
28
29
30
31
32
33
34
35
36
37
38
39
40
41
42
43
44
45
46
47
48
49
50
51
52
53
54
55
56
57
58
59
60
61
62
63
64
65
66
67
68
69
70
71
72
73
74
75
76
77
78
79
80
81
82
83
84
85
86
87
88
89
90
91
92
93
94
95
96
97
98
99
100
101
102
103
104
105
106
107
108
109
110
111
112
113
114
115
116
117
118
119
120
121
122
123
124
125
126
127
128
129
130
131
132
133
134
135
136
137
138
139
140
141
142
143
144
145
146
147
148
149
150
151
152
153
154
155
156
157
158
159
160
161
162
163
164
165
166
167
168
169
170
171
172
173
174
175
176
177
178
179
180
181
182
183
184
185
186
187
188
189
190
191
192
193
194
195
196
197
198
199
200
201
202
203
204
205
206
207
208
209
210
211
212
213
214
215
216
217
218
219
220
221
222
223
224
225
226
227
228
229
230
231
232
233
234
235
236
237
238
239
240
241
242
243
244
245
246
247
248
249
public class TabListAdapter  extends BaseTabListAdapter{

private LayoutInflater mInflater;
private List<MainTitleDTO> myItems, otherItems;//我的tab项,其余tab项

public TabListAdapter(Context context, ItemTouchHelper helper, List<MainTitleDTO> myItems, List<MainTitleDTO> otherItems) {
super(myItems,otherItems);
this.mInflater = LayoutInflater.from(context);
this.mItemTouchHelper = helper;
this.myItems = myItems;
this.otherItems = otherItems;
}

@Override
public RecyclerView.ViewHolder onCreateViewHolder(final ViewGroup parent, int viewType) {
final View view;
switch (viewType) {
case BaseTabListAdapter.TYPE_MY_HEADER://我的分页标题
view = mInflater.inflate(R.layout.item_my_header, parent, false);
final MyHeaderViewHolder holder = new MyHeaderViewHolder(view);
holder.tvBtnEdit.setOnClickListener(new View.OnClickListener() {
@Override
public void onClick(View v) {
if (!isEditMode) {
startEditMode((RecyclerView) parent);
holder.tvBtnEdit.setText(R.string.finish);
} else {
cancelEditMode((RecyclerView) parent);
holder.tvBtnEdit.setText(R.string.edit);
}
}
});
return holder;
case BaseTabListAdapter.TYPE_MY: //我的分页
view = mInflater.inflate(R.layout.item_my, parent, false);
final MyViewHolder myHolder = new MyViewHolder(view);
//item点击监听
myHolder.textView.setOnClickListener(new View.OnClickListener() {
@Override
public void onClick(final View v) {
int position = myHolder.getAdapterPosition();
//编辑模式
if (isEditMode) {
//执行移动到其他分页的逻辑和动画
RecyclerviewAnimator.myToOther(position,(RecyclerView) parent,TabListAdapter.this,myHolder,myItems,otherItems);

} else {
//执行点击事件回调
onMyItemClickListener.onItemClick(v, position - BaseTabListAdapter.COUNT_PRE_MY_HEADER);
}

}
});
//长按监听
myHolder.textView.setOnLongClickListener(new View.OnLongClickListener() {
@Override
public boolean onLongClick(final View v) {
//非编辑模式下
if (!isEditMode) {
RecyclerView recyclerView = ((RecyclerView) parent);
//启动开始编辑
startEditMode(recyclerView);

// header 按钮文字 改成 "完成"
View view = recyclerView.getChildAt(0);
if (view == recyclerView.getLayoutManager().findViewByPosition(0)) {
TextView tvBtnEdit = (TextView) view.findViewById(R.id.tv_btn_edit);
tvBtnEdit.setText(R.string.finish);
}
}
//开始拖拽
mItemTouchHelper.startDrag(myHolder);
return true;
}
});
//触摸监听
myHolder.textView.setOnTouchListener(new View.OnTouchListener() {
@Override
public boolean onTouch(View v, MotionEvent event) {
if (isEditMode) {
int position = myHolder.getAdapterPosition();
if(position == 1){//过滤第一个
return false;
}
switch (MotionEventCompat.getActionMasked(event)) {
case MotionEvent.ACTION_DOWN:
//按下时间记录
startTime = System.currentTimeMillis();
break;
case MotionEvent.ACTION_MOVE:
//如果当前时间-按下时间大于间隔时间,判定为拖拽
if (System.currentTimeMillis() - startTime > BaseTabListAdapter.SPACE_TIME) {
mItemTouchHelper.startDrag(myHolder);
}
break;
case MotionEvent.ACTION_CANCEL:
case MotionEvent.ACTION_UP:
startTime = 0;
break;
}

}
return false;
}
});
return myHolder;
case BaseTabListAdapter.TYPE_OTHER_HEADER: //其他分页标题
view = mInflater.inflate(R.layout.item_other_header, parent, false);
return new RecyclerView.ViewHolder(view) {
};
case BaseTabListAdapter.TYPE_OTHER: //其他分页
view = mInflater.inflate(R.layout.item_other, parent, false);
final OtherViewHolder otherHolder = new OtherViewHolder(view);
otherHolder.textView.setOnClickListener(new View.OnClickListener() {
@Override
public void onClick(View v) {
//不管什么模式,都执行移动到我的分页逻辑和动画
RecyclerviewAnimator.otherToMy((RecyclerView) parent,TabListAdapter.this,otherHolder,myItems,otherItems);
}
});
return otherHolder;
}
return null;
}

@Override
public void onBindViewHolder(RecyclerView.ViewHolder holder, int position) {
//我的分页
if (holder instanceof MyViewHolder) {
MyViewHolder myHolder = (MyViewHolder) holder;
myHolder.textView.setText(myItems.get(position - BaseTabListAdapter.COUNT_PRE_MY_HEADER).getTitle());
if(position == 1){//过滤第一个,字体颜色更改
myHolder.textView.setTextColor(Color.GRAY);
}
if (isEditMode) {
myHolder.imgEdit.setVisibility(View.VISIBLE);
} else {
myHolder.imgEdit.setVisibility(View.INVISIBLE);
}

}
//其他分页
else if (holder instanceof OtherViewHolder) {

((OtherViewHolder) holder).textView.setText(otherItems.get(position - myItems.size() - BaseTabListAdapter.COUNT_PRE_OTHER_HEADER).getTitle());

}
//我的分页标题
else if (holder instanceof MyHeaderViewHolder) {

MyHeaderViewHolder headerHolder = (MyHeaderViewHolder) holder;
if (isEditMode) {
headerHolder.tvBtnEdit.setText(R.string.finish);
} else {
headerHolder.tvBtnEdit.setText(R.string.edit);
}
}
}


//开启编辑
protected void startEditMode(RecyclerView parent) {
isEditMode = true; //更新标志
//得到item数量
int visibleChildCount = parent.getChildCount();
//遍历item的view
for (int i = 0; i < visibleChildCount; i++) {
View view = parent.getChildAt(i);
if(i == 1){//过滤第一个,屏蔽点击事件
TextView textView = (TextView) view.findViewById(R.id.tv);
textView.setTextColor(Color.GRAY);
textView.setClickable(false);
textView.setEnabled(false);
}else { //设置右上角按钮可见
ImageView imgEdit = (ImageView) view.findViewById(R.id.img_edit);
if (imgEdit != null) {
imgEdit.setVisibility(View.VISIBLE);
}
}

}
}

//完成编辑
protected void cancelEditMode(RecyclerView parent) {
isEditMode = false;//更新标志
//得到item数量
int visibleChildCount = parent.getChildCount();
//遍历item的view
for (int i = 0; i < visibleChildCount; i++) {
View view = parent.getChildAt(i);
if(i == 1){ //过滤第一个,恢复点击事件
TextView textView = (TextView) view.findViewById(R.id.tv);
textView.setTextColor(Color.GRAY);
textView.setClickable(true);
textView.setEnabled(true);
}else { //设置右上角按钮不可见
ImageView imgEdit = (ImageView) view.findViewById(R.id.img_edit);
if (imgEdit != null) {
imgEdit.setVisibility(View.INVISIBLE);
}
}
}
}

//我的分页holder
public static class MyViewHolder extends RecyclerView.ViewHolder implements OnItemDragListener {
private TextView textView;
private ImageView imgEdit;

public MyViewHolder(View itemView) {
super(itemView);
textView = itemView.findViewById(R.id.tv);
imgEdit = itemView.findViewById(R.id.img_edit);
}

//item 被选中时
@Override
public void onItemSelected() {
textView.setBackgroundResource(R.drawable.bg_channel_p);
}

//item 取消选中时
@Override
public void onItemFinish() {
textView.setBackgroundResource(R.drawable.bg_channel);
}
}

//其他分页holder
public static class OtherViewHolder extends RecyclerView.ViewHolder {
private TextView textView;

public OtherViewHolder(View itemView) {
super(itemView);
textView = itemView.findViewById(R.id.tv);
}
}

//我的分页标题holder
public static class MyHeaderViewHolder extends RecyclerView.ViewHolder {
private TextView tvBtnEdit;

public MyHeaderViewHolder(View itemView) {
super(itemView);
tvBtnEdit = itemView.findViewById(R.id.tv_btn_edit);
}
}
}

初始化recyclerview,实现item点击切换到该页面

1
2
3
4
5
6
7
8
9
10
11
12
13
14
15
16
17
18
19
20
21
22
23
24
25
26
27
28
29
30
31
32
33
private void init() {
GridLayoutManager manager = new GridLayoutManager(this, 4);
mRecyclerView.setLayoutManager(manager);

ItemDragHelperCallback callback = new ItemDragHelperCallback();
final ItemTouchHelper helper = new ItemTouchHelper(callback);
helper.attachToRecyclerView(mRecyclerView);

final TabListAdapter adapter = new TabListAdapter(this, helper, myTabs, otherTabs);
manager.setSpanSizeLookup(new GridLayoutManager.SpanSizeLookup() {
@Override
public int getSpanSize(int position) {
int viewType = adapter.getItemViewType(position);
return viewType == BaseTabListAdapter.TYPE_MY || viewType == BaseTabListAdapter.TYPE_OTHER ? 1 : 4;
}
});
mRecyclerView.setAdapter(adapter);

adapter.setOnMyItemClickListener(new BaseTabListAdapter.OnMyItemClickListener() {
@Override
public void onItemClick(View v, int position) {
Intent intent=new Intent();
if(isUpdate()){
intent.putExtra(MY_CHANNEL, myTabs);
intent.putExtra(OTHER_CHANNEL, otherTabs);
}

intent.putExtra(MainActivity.GOTO_FRAGMENT,position);
setResult(RESULT_CODE,intent);
finish();
}
});
}

这里要回到主界面,需要判断一下,是否有item调整,数据更新

1
2
3
4
5
6
7
8
9
10
11
12
13
14
//数据是否改变,有无操作
private boolean isUpdate(){
if(lastTabs.size()!= myTabs.size()){
return true;
}else{
for (int i = 0; i < lastTabs.size(); i++) {
if(lastTabs.get(i).getId()!= myTabs.get(i).getId()){
return true;
}
}

}
return false;
}

读取主界面传过来的值

1
2
3
4
5
6
7
8
9
10
11
12
13
14
15
16
17
18
@Override
protected void onCreate(@Nullable Bundle savedInstanceState) {
super.onCreate(savedInstanceState);
setContentView(R.layout.activity_tab_manage);
if (getIntent().hasExtra(MY_CHANNEL)) {
ArrayList curTabs = (ArrayList) getIntent().getSerializableExtra(MY_CHANNEL);

this.lastTabs.addAll(curTabs);
this.myTabs.addAll(curTabs);
}
if (getIntent().hasExtra(OTHER_CHANNEL)) {
ArrayList otherChannels = (ArrayList) getIntent().getSerializableExtra(OTHER_CHANNEL);

this.otherTabs.addAll(otherChannels);
}
init();

}

关闭按钮的监听

1
2
3
4
5
6
7
8
9
10
11
12
13
@OnClick({R.id.icon_collapse})
public void onEventClick(View view) {
switch (view.getId()) {
case R.id.icon_collapse://退出监听

Intent intent=new Intent();
intent.putExtra(MY_CHANNEL, myTabs);
intent.putExtra(OTHER_CHANNEL, otherTabs);
setResult(RESULT_CODE,intent);
finish();
break;
}
}

主界面处理

接收tab管理页传过来的值,刷新界面和跳转到对应页面

1
2
3
4
5
6
7
8
9
10
11
12
13
14
15
16
17
18
19
20
21
22
23
24
25
26
27
28
@Override
protected void onActivityResult(int requestCode, int resultCode, Intent data) {
super.onActivityResult(requestCode, resultCode, data);
if (requestCode == REQUEST_CODE) {
if (resultCode == TabManageActivity.RESULT_CODE) {
if (data.hasExtra(MY_CHANNEL) && data.hasExtra(OTHER_CHANNEL)) {

if (data.hasExtra(MY_CHANNEL)) {
items.clear();
ArrayList myChannels = (ArrayList) data.getSerializableExtra(MY_CHANNEL);
items.addAll(myChannels);
}
if (data.hasExtra(OTHER_CHANNEL)) {
otherItems.clear();
ArrayList otherChannels = (ArrayList) data.getSerializableExtra(OTHER_CHANNEL);
otherItems.addAll(otherChannels);
}
setTabTitle(false);
mExamplePagerAdapter.notifyDataSetChanged();
}
if (data.hasExtra(GOTO_FRAGMENT)) {
int index = data.getIntExtra(GOTO_FRAGMENT, 0);
gotoFragment(index);
}

}
}
}

以上就是实现调整tab分组和顺序的全过程,如果需要查看源码的可以访问我的github,这里是[传送门][5],别忘了点下star哦~
[1]: https://github.com/hackware1993/MagicIndicator
[5]:https://github.com/jessieeeee/SelectLabelTab


最近公司的项目有个这样的需求,在页面的顶部显示周日历,可左右水平滑动切换当前显示的周,默认选择日为今日,也可以点击选择查看日,查看当日的行程列表,显示在界面下方。周日历的左侧有个按钮可点击进入月日历,自动定位到当前选择日,月日历是可垂直滑动查看的,两个日历的可查看范围为当前月的前3个月和后6个月,都需要在有行程安排的日期下绘制行字。大概整理一下思路,周日历可采用自定义viewpager来实现,上部分的星期几标识可使用gridview来实现。月日历可采用自定义的recyclerview来实现,每个月为一个item,每个item为一个自定义的view,采用canvas来绘制。


最终效果图gif:
image

weekCalendar的自定义实现

自定义LinearLayout

顶部的星期几采用gridview来实现,然后动态添加到自定义的LinearLayout,代码如下:

1
2
3
4
5
6
7
8
9
10
11
12
13
14
15
16
17
18
19
20
21
22
23
24
25
26
27
28
29
30
31
32
33
34
35
36
37
38
39
40
41
42
43
private GridView getDaysNames() {

daysName = new GridView(getContext());
daysName.setSelector(new StateListDrawable());
daysName.setNumColumns(7);

daysName.setAdapter(new BaseAdapter() {
private String[] days = {"日","一","二","三","四","五","六"};

public int getCount() {
return days.length;
}

@Override
public String getItem(int position) {
return days[position];
}

@Override
public long getItemId(int position) {
return 0;
}

@SuppressLint("InflateParams")
@Override
public View getView(int position, View convertView, ViewGroup parent) {
if (convertView == null) {
LayoutInflater inflater = LayoutInflater.from(getContext());
convertView = inflater.inflate(R.layout.week_day_grid_item, null);
}
TextView day = (TextView) convertView.findViewById(R.id.daytext);
day.setText(days[position]);
if (typedArray != null) {
day.setTextColor(typedArray.getColor(R.styleable.WeekCalendar_weekTextColor,
Color.WHITE));
day.setTextSize(TypedValue.COMPLEX_UNIT_PX, typedArray.getDimension(R.styleable
.WeekCalendar_weekTextSize, day.getTextSize()));
}
return convertView;
}
});
return daysName;
}

在控件初始化时调用,代码如下:

1
2
3
daysName = getDaysNames();
daysName.setGravity(Gravity.CENTER);
addView(daysName);

还需要暴露一些其它的接口,以及自定义的属性设置

1
2
3
4
5
6
7
8
9
10
11
12
13
14
15
16
17
18
19
20
21
22
23
24
25
26
27
28
29
30
31
32
33
34
35
36
37
38
39
40
41
42
43
44
45
46
47
48
49
50
51
52
53
54
55
56
57
58
59
60
61
62
63
64
65
66
67
68
69
70
71
72
73
74
75
76
77
78
79
80
81
82
 private void init(AttributeSet attrs) {
if (attrs != null) {
typedArray = getContext().obtainStyledAttributes(attrs, R.styleable.WeekCalendar);
int selectedBgColor = typedArray.getColor(R.styleable
.WeekCalendar_selectedBgColor_week, ContextCompat.getColor(getContext(), R.color
.colorAccent));
int dayTextColorPre = typedArray.getColor(R.styleable
.WeekCalendar_previousTextColor_week, Color.WHITE);
int dayTextColorNormal = typedArray.getColor(R.styleable.WeekCalendar_normalTextColor_week,ContextCompat.getColor(getContext(),R.color.default_light_gray));
float daysTextSize = typedArray.getDimension(R.styleable
.WeekCalendar_dayTextSize_week, -1);
int todayDateTextColor = typedArray.getColor(R.styleable
.WeekCalendar_todayTextColor_week, ContextCompat.getColor(getContext(), R.color.default_blue));
int selectedTextColor = typedArray.getColor(R.styleable
.WeekCalendar_selectedTextColor_week, ContextCompat.getColor(getContext(), R.color.white));
int flagPreBgColor=typedArray.getColor(R.styleable.WeekCalendar_flagPreBgColor_week,ContextCompat.getColor(getContext(), R.color.default_light_gray));
int flagNormalBgColor=typedArray.getColor(R.styleable.WeekCalendar_flagNormalBgColor_week,ContextCompat.getColor(getContext(), R.color.default_orange));
int flagTextColor=typedArray.getColor(R.styleable.WeekCalendar_flagTextColor_week,ContextCompat.getColor(getContext(), R.color.white));
String flagTextStr=typedArray.getString(R.styleable.WeekCalendar_flagTextStr_week);
if(TextUtils.isEmpty(flagTextStr)){
flagTextStr="行";
}
boolean drawRoundRect = typedArray.getBoolean(R.styleable.WeekCalendar_isRoundRect_weekview,false);
setDayDecorator(new DefaultDayDecorator(getContext(),
selectedBgColor,
selectedTextColor,
todayDateTextColor,
dayTextColorPre,
dayTextColorNormal,
flagPreBgColor,
flagNormalBgColor,
flagTextColor,
flagTextStr,
daysTextSize,
drawRoundRect));
}
setOrientation(VERTICAL);

if (!typedArray.getBoolean(R.styleable.WeekCalendar_hideWeekNum, false)) {
daysName = getDaysNames();
daysName.setGravity(Gravity.CENTER);
addView(daysName);
}
RelativeLayout.LayoutParams lpWeek = new RelativeLayout.LayoutParams(ViewGroup.LayoutParams.MATCH_PARENT,DensityUtil.dip2px(getContext(),92)- DensityUtil.dip2px(getContext(),92)/3);
lpWeek.addRule(RelativeLayout.CENTER_IN_PARENT);
WeekPager weekPager = new WeekPager(getContext(), attrs);
addView(weekPager,lpWeek);
}

@Subscribe
public void onDateClick(Event.OnDateClickEvent event) {
if (listener != null)
listener.onDateClick(event.getDateTime());
}

@Subscribe
public void onDayDecorate(Event.OnDayDecorateEvent event) {
if (dayDecorator != null) {
dayDecorator.decorate(event.getView(), event.getDayTextView(), event.getDateTime(),
event.getFirstDay(), event.getSelectedDateTime());
dayDecorator.drawFlag(event.getFlagText(),event.getDateTime(),flagDates);
}
}

@Subscribe
public void onWeekChange(Event.OnWeekChange event) {
if (onWeekChangeListener != null) {
onWeekChangeListener.onWeekChange(event.getFirstDayOfTheWeek(), event.isForward());
}
}

public void setOnDateClickListener(OnDateClickListener listener) {
this.listener = listener;
}

public void setDayDecorator(DayDecorator decorator) {
this.dayDecorator = decorator;
}

public void setOnWeekChangeListener(OnWeekChangeListener onWeekChangeListener) {
this.onWeekChangeListener = onWeekChangeListener;
}

这里的DayDecorator接口是管理每一个item的绘制,包括标签绘制和日期绘制,代码如下:

1
2
3
4
public interface DayDecorator {
void decorate(View view, TextView dayTextView, DateTime dateTime, DateTime firstDayOfTheWeek, DateTime selectedDateTime);
void drawFlag(TextView flagText, DateTime dateTime, List<String> flagDates);
}

具体实现代码如下:

1
2
3
4
5
6
7
8
9
10
11
12
13
14
15
16
17
18
19
20
21
22
23
24
25
26
27
28
29
30
31
32
33
34
35
36
37
38
39
40
41
42
43
44
45
46
47
48
49
50
51
52
53
54
55
56
57
58
59
60
61
62
63
64
65
66
67
68
69
70
71
72
73
74
75
76
77
78
79
80
81
82
83
84
85
86
87
88
89
90
91
92
93
94
95
96
97
98
99
100
101
102
103
104
105
106
public class DefaultDayDecorator implements DayDecorator {

private Context context;
private final int selectedBgColor;
private final int selectedTextColor;
private int todayDateTextColor;
private int textColorPre;
private int textColorNormal;
private float textSize;
private boolean drawRoundRect;
private String flagTextStr;
private int flagPreBgColor;
private int flagNormalBgColor;
private int flagTextColor;

public DefaultDayDecorator(Context context,
@ColorInt int selectedBgColor,
@ColorInt int selectedTextColor,
@ColorInt int todayDateTextColor,
@ColorInt int textColorPre,
@ColorInt int textColorNormal,
@ColorInt int flagPreBgColor,
@ColorInt int flagNormalBgColor,
@ColorInt int flagTextColor,
String flagTextStr,
float textSize,
boolean drawRoundRect) {
this.context = context;
this.selectedBgColor = selectedBgColor;
this.selectedTextColor = selectedTextColor;
this.todayDateTextColor = todayDateTextColor;
this.textColorPre = textColorPre;
this.textColorNormal = textColorNormal;
this.textSize = textSize;
this.drawRoundRect = drawRoundRect;
this.flagPreBgColor=flagPreBgColor;
this.flagNormalBgColor=flagNormalBgColor;
this.flagTextColor=flagTextColor;
this.flagTextStr=flagTextStr;
}

@TargetApi(Build.VERSION_CODES.JELLY_BEAN)
@Override
public void decorate(View view, TextView dayTextView,
DateTime dateTime, DateTime firstDayOfTheWeek, DateTime selectedDateTime) {
//DateTime dt = new DateTime();
Drawable todayShape,selectShape;
if(drawRoundRect){
todayShape = ContextCompat.getDrawable(context, R.drawable.today_rect);
selectShape = ContextCompat.getDrawable(context, R.drawable.select_rect);
}else{
todayShape = ContextCompat.getDrawable(context, R.drawable.today_circle);
selectShape = ContextCompat.getDrawable(context, R.drawable.select_circle);
}
selectShape.setColorFilter(selectedBgColor, PorterDuff.Mode.SRC_ATOP);
todayShape.setColorFilter(todayDateTextColor, PorterDuff.Mode.SRC_ATOP);

// solidCircle.mutate().setAlpha(200);
//holoCircle.mutate().setAlpha(200);

DateTime calendarStartDate = DateTime.now();
if (selectedDateTime != null && !selectedDateTime.toLocalDate().equals(dateTime.toLocalDate())) { //当前时间未选中
if (dateTime.toLocalDate().isBefore(calendarStartDate.toLocalDate())) {//在今天之前
dayTextView.setTextColor(textColorPre);
dayTextView.setBackground(null);
} else if (dateTime.toLocalDate().isAfter(calendarStartDate.toLocalDate())) {//今天之后
dayTextView.setTextColor(textColorNormal);
dayTextView.setBackground(null);
} else {//就是今天
dayTextView.setBackground(todayShape);
dayTextView.setTextColor(todayDateTextColor);
}
} else if (selectedDateTime != null && selectedDateTime.toLocalDate().equals(dateTime.toLocalDate())) {//当前时间选中
dayTextView.setBackground(selectShape);
dayTextView.setTextColor(selectedTextColor);
}
float size = textSize;
if (size == -1)
size = dayTextView.getTextSize();
Log.v("jessie", dayTextView.getText().toString());
dayTextView.setTextSize(TypedValue.COMPLEX_UNIT_PX, size);
}

@Override
public void drawFlag(TextView flagText, DateTime dateTime, List<String> flagDates) {
if (flagDates != null) {
Iterator<String> it = flagDates.iterator();
DateTime calendarStartDate = DateTime.now();
while (it.hasNext()) {
String date = it.next();
String curDate = OtherUtils.formatDate(dateTime.toDate(), "yyyy-MM-dd");
if (curDate.equals(date)) {//当前为目标日期
flagText.setText(flagTextStr);
flagText.setTextColor(flagTextColor);
if (dateTime.toLocalDate().isBefore(calendarStartDate.toLocalDate())) {//已经过了
flagText.setBackgroundColor(flagPreBgColor);
} else {//还没有过
flagText.setBackgroundColor(flagNormalBgColor);
}
flagText.setVisibility(View.VISIBLE);

}
}
}
}
}

自定义viewpager

左右水平滑动切换当前显示的周的效果可用自定义的viewpager来实现,暴露一些设置当前页,选择日期,重置到今天的接口

1
2
3
4
5
6
7
8
9
10
11
12
13
14
15
16
17
18
19
20
21
22
23
24
25
26
27
28
29
30
31
32
33
34
35
36
37
38
39
40
41
42
43
44
45
46
47
48
49
50
51
52
53
54
55
56
57
58
59
60
61
62
63
64
65
66
67
68
69
70
71
72
73
74
75
76
77
78
79
80
81
82
83
84
85
86
87
88
89
90
91
92
93
94
95
96
97
98
99
100
101
102
103
104
105
106
107
108
109
110
111
112
113
114
115
public class WeekPager extends ViewPager {
private PagerAdapter adapter;
private int pos;
private boolean check;
public static int NUM_OF_PAGES;
private TypedArray typedArray;


public WeekPager(Context context) {
super(context);
initialize(null);
}

public WeekPager(Context context, AttributeSet attrs) {
super(context, attrs);
initialize(attrs);
}

@Override
public void onRestoreInstanceState(Parcelable state) {
super.onRestoreInstanceState(state);
post(new Runnable() {
@Override
public void run() {
//Force rerendering so the week is drawn again when you return to the view after
// back button press.
if (adapter != null) {
adapter.notifyDataSetChanged();
}
}
});
}

private void initialize(AttributeSet attrs) {
if (attrs != null) {
typedArray = getContext().obtainStyledAttributes(attrs, R.styleable.WeekCalendar);
// NUM_OF_PAGES = typedArray.getInt(R.styleable.WeekCalendar_numOfPages, 100);
NUM_OF_PAGES= DateUtil.countPageNum();
}
setId(idCheck());
if (!isInEditMode()) {
initPager(new DateTime());
BusProvider.getInstance().register(this);
}
}


private void initPager(DateTime dateTime) {
// pos = NUM_OF_PAGES / 2;
pos = DateUtil.countCurPage();
adapter = new PagerAdapter(((FragmentActivity) getContext())
.getSupportFragmentManager(), dateTime);
setAdapter(adapter);
addOnPageChangeListener(new ViewPager
.SimpleOnPageChangeListener() {
@Override
public void onPageSelected(int position) {
if (!check)
if (position < pos){
adapter.swipeBack();
}
else if (position > pos){
adapter.swipeForward();
}

pos = position;
check = false;

}

});
setOverScrollMode(OVER_SCROLL_NEVER);
setCurrentItem(pos);
if (WeekFragment.selectedDateTime == null)
WeekFragment.selectedDateTime = new DateTime();
}

@Subscribe
public void setCurrentPage(Event.SetCurrentPageEvent event) {
check = true;
if (event.getDirection() == 1)
adapter.swipeForward();
else
adapter.swipeBack();
setCurrentItem(getCurrentItem() + event.getDirection());

}

@Subscribe
public void reset(Event.ResetEvent event) {
WeekFragment.selectedDateTime = DateTime.now();
//WeekFragment.CalendarStartDate = new DateTime();
initPager(DateTime.now());
}

@Subscribe
public void setSelectedDate(Event.SetSelectedDateEvent event) {
WeekFragment.selectedDateTime = event.getSelectedDate();
initPager(event.getSelectedDate());
}

@Subscribe
public void setStartDate(Event.SetStartDateEvent event) {
WeekFragment.selectedDateTime = event.getStartDate();
initPager(event.getStartDate());
}

private int idCheck() {
int id = 0;
while (true) {
if (findViewById(++id) == null) break;
}
return id;
}
}

自定义FragmentStatePagerAdapter

这里的viewpager需要一个自定的FragmentStatePagerAdapter来实现,每个item是一个自定义的fragment,滑动的时候通过evenbus调用页面翻转的接口

1
2
3
4
5
6
7
8
9
10
11
12
13
14
15
16
17
18
19
20
21
22
23
24
25
26
27
28
29
30
31
32
33
34
35
36
37
38
39
40
41
42
43
44
45
46
47
48
49
50
51
52
53
54
55
56
57
58
59
60
61
62
63
64
65
66
67
68
public class PagerAdapter extends FragmentStatePagerAdapter {
private static final String TAG = "PagerAdapter";
// private int currentPage = NUM_OF_PAGES / 2;
private int currentPage= DateUtil.countCurPage();
private DateTime date;
public PagerAdapter(FragmentManager fm, DateTime date) {
super(fm);
this.date = date;
}

@Override
public Fragment getItem(int position) {
WeekFragment fragment = new WeekFragment();
Bundle bundle = new Bundle();

if (position < currentPage)
bundle.putSerializable(DATE_KEY, getPerviousDate());
else if (position > currentPage)
bundle.putSerializable(DATE_KEY, getNextDate());
else
bundle.putSerializable(DATE_KEY, getTodaysDate());

fragment.setArguments(bundle);
return fragment;
}

@Override
public int getCount() {
return NUM_OF_PAGES;
}

private DateTime getTodaysDate() {
return date;
}

private DateTime getPerviousDate() {
return date.plusDays(-7);
}

private DateTime getNextDate() {
return date.plusDays(7);
}

@Override
public int getItemPosition(Object object) {
//Force rerendering so the week is drawn again when you return to the view after
// back button press.
return POSITION_NONE;
}

public void swipeBack() {
date = date.plusDays(-7);
currentPage--;
currentPage = currentPage <= 1 ? NUM_OF_PAGES - 1 : currentPage;
BusProvider.getInstance().post(
new Event.OnWeekChange(date.withDayOfWeek(DateTimeConstants.MONDAY), false));
}

public void swipeForward() {
date = date.plusDays(7);
currentPage++;
currentPage = currentPage >= NUM_OF_PAGES - 1 ? 1 : currentPage;
BusProvider.getInstance().post(
new Event.OnWeekChange(date.withDayOfWeek(DateTimeConstants.MONDAY), true));

}

}

内嵌fragment与对应的adapter

内嵌的fragment,是一个gridview的布局, 对应的adapter代码如下,绘制的时候将控件通过evenbus传到我们自定义的layout里面做处理:

1
2
3
4
5
6
7
8
9
10
11
12
13
14
15
16
17
18
19
20
21
22
23
24
25
26
27
28
29
30
31
32
33
34
35
36
37
38
39
40
41
42
43
44
45
46
47
48
49
50
51
52
53
54
55
56
57
58
59
60
61
62
63
64
65
66
67
68
69
70
71
72
73
74
75
76
77
78
79
80
81
82
83
84
85
86
87
88
89
90
91
92
93
94
95
96
97
98
99
100
101
102
103
104
105
106
107
108
109
110
111
112
113
114
115
116
117
118
119
120
121
122
123
124
125
126
127
128
129
130
131
132
133
134
135
136
137
138
139
140
141
142
143
public class WeekFragment extends Fragment {
public static String DATE_KEY = "date_key";
private GridView gridView;
private WeekAdapter weekAdapter;
public static DateTime selectedDateTime = new DateTime();
private DateTime startDate;
private DateTime endDate;
private boolean isVisible;

@Nullable
@Override
public View onCreateView(LayoutInflater inflater, ViewGroup container, Bundle savedInstanceState) {
View rootView = inflater.inflate(R.layout.fragment_week, container, false);
gridView = (GridView) rootView.findViewById(R.id.gridView);
init();
return rootView;
}

private void init() {
ArrayList<DateTime> days = new ArrayList<>();
DateTime midDate = (DateTime) getArguments().getSerializable(DATE_KEY);
if (midDate != null) {
midDate = midDate.withDayOfWeek(DateTimeConstants.THURSDAY);
}
//Getting all seven days

for (int i = -4; i <= 2; i++){
DateTime dateTime=midDate.plusDays(i);
days.add(midDate != null ?dateTime : null);

}


startDate = days.get(0);
endDate = days.get(days.size() - 1);

weekAdapter = new WeekAdapter(getActivity(), days);
gridView.setAdapter(weekAdapter);

gridView.setOnItemClickListener(new AdapterView.OnItemClickListener() {
@Override
public void onItemClick(AdapterView<?> parent, View view, int position, long id) {
BusProvider.getInstance().post(new Event.OnDateClickEvent(weekAdapter.getItem
(position)));
selectedDateTime = weekAdapter.getItem(position);
BusProvider.getInstance().post(new Event.InvalidateEvent());
}
});
}

@Subscribe
public void updateSelectedDate(Event.UpdateSelectedDateEvent event) {
if (isVisible) {
selectedDateTime = selectedDateTime.plusDays(event.getDirection());
if (selectedDateTime.toLocalDate().equals(endDate.plusDays(1).toLocalDate())
|| selectedDateTime.toLocalDate().equals(startDate.plusDays(-1).toLocalDate())) {
if (!(selectedDateTime.toLocalDate().equals(startDate.plusDays(-1).toLocalDate()) &&
event.getDirection() == 1)
&& !(selectedDateTime.toLocalDate().equals(endDate.plusDays(1)
.toLocalDate()) && event.getDirection() == -1))
BusProvider.getInstance().post(new Event.SetCurrentPageEvent(event.getDirection()));
}
BusProvider.getInstance().post(new Event.InvalidateEvent());
}
}


@Subscribe
public void invalidate(Event.InvalidateEvent event) {
gridView.invalidateViews();
}

@Subscribe
public void updateUi(Event.OnUpdateUi event) {
weekAdapter.notifyDataSetChanged();
}

@Override
public void onStart() {
BusProvider.getInstance().register(this);
super.onStart();
}

@Override
public void onStop() {
BusProvider.getInstance().unregister(this);
super.onStop();
}

@Override
public void setUserVisibleHint(boolean isVisibleToUser) {
isVisible = isVisibleToUser;
super.setUserVisibleHint(isVisibleToUser);
}

public class WeekAdapter extends BaseAdapter {
private ArrayList<DateTime> days;
private Context context;
private DateTime firstDay;

WeekAdapter(Context context, ArrayList<DateTime> days) {
this.days = days;
this.context = context;
}

@Override
public int getCount() {
return days.size();
}

@Override
public DateTime getItem(int position) {
return days.get(position);
}

@Override
public long getItemId(int position) {
return 0;
}

@SuppressLint("InflateParams")
@TargetApi(Build.VERSION_CODES.JELLY_BEAN)
@Override
public View getView(int position, View convertView, ViewGroup parent) {

if (convertView == null) {
LayoutInflater inflater = LayoutInflater.from(context);
convertView = inflater.inflate(R.layout.grid_item, null);
firstDay = getItem(0);
}

DateTime dateTime = getItem(position).withMillisOfDay(0);

TextView dayTextView = (TextView) convertView.findViewById(R.id.daytext);
dayTextView.setText(String.valueOf(dateTime.getDayOfMonth()));
TextView textflag= (TextView) convertView.findViewById(R.id.textflag);
Log.v("jessie","传过去的"+dateTime.getDayOfMonth() );
BusProvider.getInstance().post(new Event.OnDayDecorateEvent(convertView, dayTextView,
dateTime, firstDay, WeekFragment.selectedDateTime,textflag));
return convertView;
}
}

item的布局grid_item,很简单,代码如下:

1
2
3
4
5
6
7
8
9
10
11
12
13
14
15
16
17
18
19
20
21
22
23
24
25
26
27
28
29
<?xml version="1.0" encoding="utf-8"?>
<LinearLayout xmlns:android="http://schemas.android.com/apk/res/android"
android:layout_width="match_parent"
android:layout_height="match_parent"
android:orientation="vertical"
android:gravity="center">

<TextView
android:gravity="center"
android:id="@+id/daytext"
android:layout_width="@dimen/day_text_wh"
android:layout_height="@dimen/day_text_wh"
android:text="20"
android:textColor="@color/default_black"
android:textSize="17sp"/>

<TextView
android:visibility="gone"
android:id="@+id/textflag"
android:layout_width="16dp"
android:layout_height="16dp"
android:layout_marginTop="4dp"
android:gravity="center"
android:background="@color/default_orange"
android:text="行"
android:textColor="@color/white"
android:textSize="12sp"
/>
</LinearLayout>

自定义MonthCalendar的实现

自定义RecyclerView

将自定义的属性值传到adapter中对SimpleMonthView做自定义,这里的SimpleMonthView就是我们自定义的日历item,绘制每个月日历。

1
2
3
4
5
6
7
8
9
10
11
12
13
14
15
16
17
18
19
20
21
22
23
24
25
26
27
28
29
30
31
32
33
34
35
36
37
38
39
40
41
42
43
44
45
46
47
48
49
50
51
52
53
54
55
56
57
58
59
60
61
62
63
64
65
66
67
68
69
70
71
72
73
74
75
76
77
78
79
80
81
82
83
84
85
86
public class MonthCalendarView extends RecyclerView {
protected Context mContext;
protected MonthAdapter mAdapter;
private MonthCalendarController mController;
protected int mCurrentScrollState = 0;
protected long mPreviousScrollPosition;
protected int mPreviousScrollState = 0;
private TypedArray typedArray;
private OnScrollListener onScrollListener;
private LinearLayoutManager linearLayoutManager;
public MonthCalendarView(Context context) {
this(context, null);
}

public MonthCalendarView(Context context, AttributeSet attrs) {
this(context, attrs, 0);
}

public MonthCalendarView(Context context, AttributeSet attrs, int defStyle) {
super(context, attrs, defStyle);
if (!isInEditMode()) {
typedArray = context.obtainStyledAttributes(attrs, R.styleable.MonthCalendarView);
setLayoutParams(new LayoutParams(LayoutParams.MATCH_PARENT, LayoutParams.MATCH_PARENT));
init(context);
}
}

public void setController(MonthCalendarController mController) {
this.mController = mController;
setUpAdapter();
setAdapter(mAdapter);
}


public int getStartYear(){
return DateUtil.getStartYear();
}

public LinearLayoutManager getLinearLayoutManager(){
return linearLayoutManager;
}

public void init(Context paramContext) {
linearLayoutManager=new LinearLayoutManager(paramContext);
setLayoutManager(linearLayoutManager);
mContext = paramContext;
setUpListView();

onScrollListener = new OnScrollListener() {
@Override
public void onScrolled(RecyclerView recyclerView, int dx, int dy) {
super.onScrolled(recyclerView, dx, dy);
final MonthView child = (MonthView) recyclerView.getChildAt(0);
if (child == null) {
return;
}

mPreviousScrollPosition = dy;
mPreviousScrollState = mCurrentScrollState;
}
};
}

public void setFlagDates(List<String> dates){
mAdapter.setFlagDates(dates);
}

public void setSelected(CalendarDay calendarDay){
mAdapter.setSelectedDay(calendarDay);
mAdapter.notifyDataSetChanged();
}

protected void setUpAdapter() {
if (mAdapter == null) {
mAdapter = new MonthAdapter(getContext(), mController, typedArray);
}
mAdapter.notifyDataSetChanged();
}

protected void setUpListView() {
setVerticalScrollBarEnabled(false);
setOnScrollListener(onScrollListener);
setFadingEdgeLength(0);
}

}

自定义recyclerview的adapter

1
2
3
4
5
6
7
8
9
10
11
12
13
14
15
16
17
18
19
20
21
22
23
24
25
26
27
28
29
30
31
32
33
34
35
36
37
38
39
40
41
42
43
44
45
46
47
48
49
50
51
52
53
54
55
56
57
58
59
60
61
62
63
64
65
66
67
68
69
70
71
72
73
74
75
76
77
78
79
80
81
82
83
84
85
86
87
88
89
90
91
92
93
94
95
96
97
98
99
100
101
102
103
104
105
106
107
108
public class SimpleMonthAdapter extends RecyclerView.Adapter<SimpleMonthAdapter.ViewHolder> implements SimpleMonthView.OnDayClickListener {
protected static final int MONTHS_IN_YEAR = 12;
private final TypedArray typedArray;
private final Context mContext;
private final DatePickerController mController;
private final Calendar calendar;
private CalendarDay selectedDay;
private final Integer firstMonth;
private final Integer lastMonth;
private List<String> dates;
private int count= DateUtil.getPreMonthNum()+DateUtil.getNextMonthNum()+1;


public SimpleMonthAdapter(Context context, DatePickerController datePickerController, TypedArray typedArray) {
this.typedArray = typedArray;
calendar = Calendar.getInstance();
firstMonth = getFirstMonth();
lastMonth = getLastMonth();
mContext = context;
mController = datePickerController;
init();
}

@Override
public ViewHolder onCreateViewHolder(ViewGroup viewGroup, int i) {
final SimpleMonthView simpleMonthView = new SimpleMonthView(mContext, typedArray);
return new ViewHolder(simpleMonthView, this);
}

@Override
public void onBindViewHolder(ViewHolder viewHolder, int position) {
final SimpleMonthView v = viewHolder.simpleMonthView;
final HashMap<String, Integer> drawingParams = new HashMap<String, Integer>();
int month;
int year;

month = (firstMonth + (position % MONTHS_IN_YEAR)) % MONTHS_IN_YEAR;
year = position / MONTHS_IN_YEAR + getStartYear() + ((firstMonth + (position % MONTHS_IN_YEAR)) / MONTHS_IN_YEAR);

int selectedFirstDay = (selectedDay==null?-1:selectedDay.day);
int selectedFirstMonth = (selectedDay==null?-1:selectedDay.month);
int selectedFirstYear = (selectedDay==null?-1:selectedDay.year);

v.reuse();
drawingParams.put(SimpleMonthView.VIEW_PARAMS_SELECTED_BEGIN_YEAR, selectedFirstYear);
drawingParams.put(SimpleMonthView.VIEW_PARAMS_SELECTED_BEGIN_MONTH, selectedFirstMonth);
drawingParams.put(SimpleMonthView.VIEW_PARAMS_SELECTED_BEGIN_DAY, selectedFirstDay);

drawingParams.put(SimpleMonthView.VIEW_PARAMS_YEAR, year);
drawingParams.put(SimpleMonthView.VIEW_PARAMS_MONTH, month);
drawingParams.put(SimpleMonthView.VIEW_PARAMS_WEEK_START, calendar.getFirstDayOfWeek());
v.setMonthParams(drawingParams);
if(dates!=null){
v.setFlagDates(dates);
}
v.invalidate();
}

public long getItemId(int position) {
return position;
}

@Override
public int getItemCount() {
return count;
}


public static class ViewHolder extends RecyclerView.ViewHolder {
final SimpleMonthView simpleMonthView;

public ViewHolder(View itemView, SimpleMonthView.OnDayClickListener onDayClickListener) {
super(itemView);
simpleMonthView = (SimpleMonthView) itemView;
simpleMonthView.setLayoutParams(new AbsListView.LayoutParams(LayoutParams.MATCH_PARENT, LayoutParams.MATCH_PARENT));
simpleMonthView.setClickable(true);
simpleMonthView.setOnDayClickListener(onDayClickListener);
}
}

protected void init() {
onDayTapped(new CalendarDay(System.currentTimeMillis()));
}

public void onDayClick(SimpleMonthView simpleMonthView, CalendarDay calendarDay) {
if (calendarDay != null) {
onDayTapped(calendarDay);
}
}

//设置flag标记日期
public void setFlagDates(List<String> flagDates){
this.dates=flagDates;
notifyDataSetChanged();
}


protected void onDayTapped(CalendarDay calendarDay) {
mController.onDayOfMonthSelected(calendarDay.year, calendarDay.month, calendarDay.day);
setSelectedDay(calendarDay);
}

public void setSelectedDay(CalendarDay calendarDay) {
this.selectedDay=calendarDay;
notifyDataSetChanged();
}

}

对日期对象CalendarDay做了简单的封装

1
2
3
4
5
6
7
8
9
10
11
12
13
14
15
16
17
18
19
20
21
22
23
24
25
26
27
28
29
30
31
32
33
34
35
36
37
38
39
40
41
42
43
44
45
46
47
48
49
50
51
52
53
54
55
56
57
58
59
60
61
62
63
64
65
66
67
68
69
70
public class CalendarDay {
private static final long serialVersionUID = -5456695978688356202L;
private Calendar calendar;

int day;
int month;
int year;

public CalendarDay() {
setTime(System.currentTimeMillis());
}

public CalendarDay(int year, int month, int day) {
setDay(year, month, day);
}

public CalendarDay(long timeInMillis) {
setTime(timeInMillis);
}

public CalendarDay(Calendar calendar) {
year = calendar.get(Calendar.YEAR);
month = calendar.get(Calendar.MONTH);
day = calendar.get(Calendar.DAY_OF_MONTH);
}

private void setTime(long timeInMillis) {
if (calendar == null) {
calendar = Calendar.getInstance();
}
calendar.setTimeInMillis(timeInMillis);
month = this.calendar.get(Calendar.MONTH);
year = this.calendar.get(Calendar.YEAR);
day = this.calendar.get(Calendar.DAY_OF_MONTH);
}

public void set(CalendarDay calendarDay) {
year = calendarDay.year;
month = calendarDay.month;
day = calendarDay.day;
}

public void setDay(int year, int month, int day) {
this.year = year;
this.month = month;
this.day = day;
}

public Date getDate() {
if (calendar == null) {
calendar = Calendar.getInstance();
}
calendar.set(year, month, day);
return calendar.getTime();
}

@Override
public String toString() {
final StringBuilder stringBuilder = new StringBuilder();
stringBuilder.append("{ year: ");
stringBuilder.append(year);
stringBuilder.append(", month: ");
stringBuilder.append(month);
stringBuilder.append(", day: ");
stringBuilder.append(day);
stringBuilder.append(" }");

return stringBuilder.toString();
}
}

自定义月日历itemview

这里根据自定义的属性读取值,对画笔初始化后用canvas进行绘制,计算当前绘制的日期坐标,对是否已过,是否为今日,是否选择分情况进行绘制。

1
2
3
4
5
6
7
8
9
10
11
12
13
14
15
16
17
18
19
20
21
22
23
24
25
26
27
28
29
30
31
32
33
34
35
36
37
38
39
40
41
42
43
44
45
46
47
48
49
50
51
52
53
54
55
56
57
58
59
60
61
62
63
64
65
66
67
68
69
70
71
72
73
74
75
76
77
78
79
80
81
82
83
84
85
86
87
88
89
90
91
92
93
94
95
96
97
98
99
100
101
102
103
104
105
106
107
108
109
110
111
112
113
114
115
116
117
118
119
120
121
122
123
124
125
126
127
128
129
130
131
132
133
134
135
136
137
138
139
140
141
142
143
144
145
146
147
148
149
150
151
152
153
154
155
156
157
158
159
160
161
162
163
164
165
166
167
168
169
170
171
172
173
174
175
176
177
178
179
180
181
182
183
184
185
186
187
188
189
190
191
192
193
194
195
196
197
198
199
200
201
202
203
204
205
206
207
208
209
210
211
212
213
214
215
216
217
218
219
220
221
222
223
224
225
226
227
228
229
230
231
232
233
234
235
236
237
238
239
240
241
242
243
244
245
246
247
248
249
250
251
252
253
254
255
256
257
258
259
260
261
262
263
264
265
266
267
268
269
270
271
272
273
274
275
276
277
278
279
280
281
282
283
284
285
286
287
288
289
290
291
292
293
294
295
296
297
298
299
300
301
302
303
304
305
306
307
308
309
310
311
312
313
314
315
316
317
318
319
320
321
322
323
324
325
326
327
328
329
330
331
332
333
334
335
336
337
338
339
340
341
342
343
344
345
346
347
348
349
350
351
352
353
354
355
356
357
358
359
360
361
362
363
364
365
366
367
368
369
370
371
372
373
374
375
376
377
378
379
380
381
382
383
384
385
386
387
388
389
390
391
392
393
394
395
396
397
398
399
400
401
402
403
404
405
406
407
408
409
410
411
412
413
414
415
416
417
418
419
420
421
422
423
424
425
426
427
428
429
430
431
432
433
class MonthView extends View {

public static final String VIEW_PARAMS_HEIGHT = "height";
public static final String VIEW_PARAMS_MONTH = "month";
public static final String VIEW_PARAMS_YEAR = "year";
public static final String VIEW_PARAMS_SELECTED_BEGIN_DAY = "selected_begin_day";
// public static final String VIEW_PARAMS_SELECTED_LAST_DAY = "selected_last_day";
public static final String VIEW_PARAMS_SELECTED_BEGIN_MONTH = "selected_begin_month";
// public static final String VIEW_PARAMS_SELECTED_LAST_MONTH = "selected_last_month";
public static final String VIEW_PARAMS_SELECTED_BEGIN_YEAR = "selected_begin_year";
// public static final String VIEW_PARAMS_SELECTED_LAST_YEAR = "selected_last_year";
public static final String VIEW_PARAMS_WEEK_START = "week_start";

protected int DEFAULT_HEIGHT = DensityUtil.dip2px(getContext(),16);
protected static final int DEFAULT_NUM_ROWS = 6;
protected static int DAY_SELECTED_CIRCLE_SIZE;
protected int DAY_SEPARATOR_WIDTH = DensityUtil.dip2px(getContext(),33);
protected static int MINI_DAY_NUMBER_TEXT_SIZE;
protected int MIN_HEIGHT = DensityUtil.dip2px(getContext(),3);
protected static int MONTH_LINE_SIZE;
protected static int MONTH_HEADER_SIZE;
protected static int MONTH_TITLE_TEXT_SIZE;

protected int mPadding = dip2px(getContext(),10);

private String mMonthTitleTypeface;//月份标题风格
protected Paint flagTextPaint;//标记字画笔
protected Paint flagPreBgPaint;//已过标记背景画笔
protected Paint flagNormalBgPaint;//标记背景画笔
protected Paint mMonthLinePaint;//月份标题线画笔
protected Paint mMonthNumPaint;//日期画笔
protected Paint mMonthTitlePaint;//月份标题画笔
protected Paint todayCiclePaint;//今天圆圈画笔
protected Paint mSelectedCirclePaint;//选择圆圈画笔

protected int mMonthTitleColor;//月份标题颜色
protected int mMonthLineColor;//月份标题线颜色
protected int mNormalDayColor;//日期颜色
protected int mPreviousDayColor;//已过日期颜色
protected int mSelectedBgColor;//选择背景颜色
protected int mSelectedTextColor;//选择文字颜色
protected int todayTextColor;//今日日期颜色
protected int flagPreBgColor;//已过标记背景色
protected int flagNormalBgColor;//标记背景色
protected int flagTextColor;//标记文字色
protected String flag; //标记文本
private final StringBuilder mStringBuilder;

protected boolean mHasToday = false;
protected boolean mIsPrev = false;
protected int mSelectedBeginDay = -1;
protected int mSelectedBeginMonth = -1;
protected int mSelectedBeginYear = -1;
private List<String> dates;
protected int mToday = -1;
protected int mWeekStart = 1;
protected int mNumDays = 7;
protected int mNumCells = mNumDays;
private int mDayOfWeekStart = 0;
protected int mMonth;
protected Boolean mDrawRect;
protected int mRowHeight = DEFAULT_HEIGHT;
protected int mWidth;
protected int mYear;
final Time today;

private final Calendar mCalendar;

private int mNumRows = DEFAULT_NUM_ROWS;


private OnDayClickListener mOnDayClickListener;

public MonthView(Context context, TypedArray typedArray) {
super(context);

Resources resources = context.getResources();
mCalendar = Calendar.getInstance();
today = new Time(Time.getCurrentTimezone());
today.setToNow();
mMonthTitleTypeface = resources.getString(R.string.sans_serif);
mMonthTitleColor = typedArray.getColor(R.styleable.MonthCalendarView_monthTitleColor, ContextCompat.getColor(context,R.color.normal_day));
mMonthLineColor = typedArray.getColor(R.styleable.MonthCalendarView_monthLineColor, ContextCompat.getColor(context,R.color.normal_day));
mNormalDayColor = typedArray.getColor(R.styleable.MonthCalendarView_normalDayTextColor_month, ContextCompat.getColor(context,R.color.normal_day));
mPreviousDayColor = typedArray.getColor(R.styleable.MonthCalendarView_previousDayTextColor_month, ContextCompat.getColor(context,R.color.normal_day));
mSelectedBgColor = typedArray.getColor(R.styleable.MonthCalendarView_selectedBgColor_month, ContextCompat.getColor(context,R.color.selected_day_background));
mSelectedTextColor = typedArray.getColor(R.styleable.MonthCalendarView_selectedTextColor_month, ContextCompat.getColor(context,R.color.white));
todayTextColor = typedArray.getColor(R.styleable.MonthCalendarView_todayTextColor_month,ContextCompat.getColor(context,R.color.default_blue));
flagTextColor= typedArray.getColor(R.styleable.MonthCalendarView_flagTextColor_month,ContextCompat.getColor(context,R.color.white));
flagPreBgColor=typedArray.getColor(R.styleable.MonthCalendarView_flagPreBgColor_month,ContextCompat.getColor(context,R.color.white));
flagNormalBgColor=typedArray.getColor(R.styleable.MonthCalendarView_flagNormalBgColor_month,ContextCompat.getColor(context,R.color.default_orange));
mDrawRect = typedArray.getBoolean(R.styleable.MonthCalendarView_isRoundRect_month, false);
int preMonthNum = typedArray.getInteger(R.styleable.MonthCalendarView_preMonthNum_month,2);
DateUtil.setPreMonthNum(preMonthNum);
int nextMonthNum = typedArray.getInteger(R.styleable.MonthCalendarView_nextMonthNum_month,2);
DateUtil.setNextMonthNum(nextMonthNum);

flag = typedArray.getString(R.styleable.MonthCalendarView_flagTextStr_month);
if(TextUtils.isEmpty(flag)){
flag="行";
}
mStringBuilder = new StringBuilder(50);

MINI_DAY_NUMBER_TEXT_SIZE = typedArray.getDimensionPixelSize(R.styleable.MonthCalendarView_dayTextSize_month, resources.getDimensionPixelSize(R.dimen.text_size_day));
MONTH_TITLE_TEXT_SIZE = typedArray.getDimensionPixelSize(R.styleable.MonthCalendarView_monthTitleTextSize, resources.getDimensionPixelSize(R.dimen.text_size_month));
MONTH_LINE_SIZE = typedArray.getDimensionPixelSize(R.styleable.MonthCalendarView_monthLineTextSize, resources.getDimensionPixelSize(R.dimen.text_size_day_name));
MONTH_HEADER_SIZE = typedArray.getDimensionPixelOffset(R.styleable.MonthCalendarView_headerMonthHeight, resources.getDimensionPixelOffset(R.dimen.header_month_height));
DAY_SELECTED_CIRCLE_SIZE = typedArray.getDimensionPixelSize(R.styleable.MonthCalendarView_selectedDayBgRadius, resources.getDimensionPixelOffset(R.dimen.selected_day_radius));

mRowHeight = ((typedArray.getDimensionPixelSize(R.styleable.MonthCalendarView_calendarHeight, resources.getDimensionPixelOffset(R.dimen.calendar_height)) - MONTH_HEADER_SIZE) / 6);

initView();

}

//设置flag标记日期
public void setFlagDates(List<String> flagDates){
this.dates=flagDates;
}

private int calculateNumRows() {
int offset = findDayOffset();
int dividend = (offset + mNumCells) / mNumDays;
int remainder = (offset + mNumCells) % mNumDays;
return (dividend + (remainder > 0 ? 1 : 0));
}


//绘制每月标题
private void drawMonthTitle(Canvas canvas) {
StringBuilder stringBuilder = new StringBuilder(getMonthAndYearString().toLowerCase());
stringBuilder.setCharAt(0, Character.toUpperCase(stringBuilder.charAt(0)));
Rect rect=new Rect();
mMonthTitlePaint.getTextBounds(String.valueOf(stringBuilder),0,stringBuilder.length(),rect);
int x = mWidth / mNumDays -mPadding;
int y = (MONTH_HEADER_SIZE - MONTH_LINE_SIZE) / 2 ;
canvas.drawLine(0, y-rect.height()-MIN_HEIGHT, mWidth, y-rect.height()-MIN_HEIGHT, mMonthLinePaint);
canvas.drawText(stringBuilder.toString(), x, y, mMonthTitlePaint);
canvas.drawLine(0, y+MIN_HEIGHT, mWidth, y+MIN_HEIGHT, mMonthLinePaint);
}

private int findDayOffset() {
return (mDayOfWeekStart < mWeekStart ? (mDayOfWeekStart + mNumDays) : mDayOfWeekStart)
- mWeekStart;
}

private String getMonthAndYearString() {
int flags = DateUtils.FORMAT_SHOW_DATE | DateUtils.FORMAT_SHOW_YEAR | DateUtils.FORMAT_NO_MONTH_DAY;
mStringBuilder.setLength(0);
long millis = mCalendar.getTimeInMillis();
return DateUtils.formatDateRange(getContext(), millis, millis, flags);
}

private void onDayClick(CalendarDay calendarDay) {
if (mOnDayClickListener != null) {
mOnDayClickListener.onDayClick(this, calendarDay);
}
}

private boolean sameDay(int monthDay, Time time) {
return (mYear == time.year) && (mMonth == time.month) && (monthDay == time.monthDay);
}

private boolean prevDay(int monthDay, Time time) {
return ((mYear < time.year)) || (mYear == time.year && mMonth < time.month) || (mMonth == time.month && monthDay < time.monthDay);
}

//绘制日期
protected void drawMonthNums(Canvas canvas) {

int y = (mRowHeight + MINI_DAY_NUMBER_TEXT_SIZE) / 2 - DAY_SEPARATOR_WIDTH + MONTH_HEADER_SIZE;
int paddingDay = (mWidth - 2 * mPadding) / (2 * mNumDays);
int dayOffset = findDayOffset();
int day = 1;

while (day <= mNumCells) {
int x = paddingDay * (1 + dayOffset * 2) + mPadding;

//天数
String dayStr= String.format("%d", day);
//测量字符串天数
Rect dayRect=new Rect();
mMonthTitlePaint.getTextBounds(dayStr,0,dayStr.length(),dayRect);
//测量字符串标记
Rect flagRect=new Rect();
mMonthTitlePaint.getTextBounds(flag,0,flag.length(),flagRect);

//已经过了的日期
if (prevDay(day, today)) {
mMonthNumPaint.setColor(mPreviousDayColor);
if(isFlag(mYear,mMonth,day)){
//绘制方形背景
canvas.drawRect(x-flagRect.width()/2-MIN_HEIGHT/2,y+DEFAULT_HEIGHT-MIN_HEIGHT/2,x+flagRect.width()/2+MIN_HEIGHT/2,y+flagRect.height()+DEFAULT_HEIGHT+MIN_HEIGHT/2,flagPreBgPaint);
//绘制字体
canvas.drawText(flag, x-flagRect.width()/2-MIN_HEIGHT/2, y+flagRect.height()+DEFAULT_HEIGHT, flagTextPaint);
}
}else{
//当前日期是今天
if (mHasToday && (mToday == day)) {
mMonthNumPaint.setColor(getResources().getColor(R.color.default_blue));
mMonthNumPaint.setTypeface(Typeface.defaultFromStyle(Typeface.NORMAL));
if (mDrawRect) {
RectF rectF = new RectF(x - DAY_SELECTED_CIRCLE_SIZE, (y - MINI_DAY_NUMBER_TEXT_SIZE / 3) - DAY_SELECTED_CIRCLE_SIZE, x + DAY_SELECTED_CIRCLE_SIZE, (y - MINI_DAY_NUMBER_TEXT_SIZE / 3) + DAY_SELECTED_CIRCLE_SIZE);
canvas.drawRoundRect(rectF, 10.0f, 10.0f, todayCiclePaint);
}else{
canvas.drawCircle(x, y - MINI_DAY_NUMBER_TEXT_SIZE / 3, DAY_SELECTED_CIRCLE_SIZE, todayCiclePaint);
}
} else { //不是今天
mMonthNumPaint.setColor(mNormalDayColor);
mMonthNumPaint.setTypeface(Typeface.defaultFromStyle(Typeface.NORMAL));
}
if(isFlag(mYear,mMonth,day)){
//绘制方形背景
canvas.drawRect(x-flagRect.width()/2-MIN_HEIGHT/2,y+DEFAULT_HEIGHT-MIN_HEIGHT/2,x+flagRect.width()/2+MIN_HEIGHT/2,y+flagRect.height()+DEFAULT_HEIGHT+MIN_HEIGHT/2,flagNormalBgPaint);
//绘制字体
canvas.drawText(flag, x-flagRect.width()/2-MIN_HEIGHT/2, y+flagRect.height()+DEFAULT_HEIGHT, flagTextPaint);
}

}
//选择的日期
if ((mMonth == mSelectedBeginMonth && mSelectedBeginDay == day && mSelectedBeginYear == mYear) ) {
mMonthNumPaint.setColor(mSelectedTextColor);
if (mDrawRect) {
RectF rectF = new RectF(x - DAY_SELECTED_CIRCLE_SIZE, (y - MINI_DAY_NUMBER_TEXT_SIZE / 3) - DAY_SELECTED_CIRCLE_SIZE, x + DAY_SELECTED_CIRCLE_SIZE, (y - MINI_DAY_NUMBER_TEXT_SIZE / 3) + DAY_SELECTED_CIRCLE_SIZE);
canvas.drawRoundRect(rectF, 10.0f, 10.0f, mSelectedCirclePaint);
} else{
canvas.drawCircle(x, y - MINI_DAY_NUMBER_TEXT_SIZE / 3, DAY_SELECTED_CIRCLE_SIZE, mSelectedCirclePaint);
}
}

canvas.drawText(dayStr, x, y, mMonthNumPaint);
dayOffset++;
if (dayOffset == mNumDays) {
dayOffset = 0;
y += mRowHeight;
}
day++;
}
}

//是否需要绘制标记
private boolean isFlag(int year,int month,int day){
if(dates!=null){
//遍历当前天是否需要绘制
Calendar c = Calendar.getInstance();//获取一个日历实例
c.set(year, month, day);//设定日历的日期
Date curDay=c.getTime();
Iterator<String> it=dates.iterator();
while(it.hasNext()){
String date=it.next();
String curDayStr=OtherUtils.formatDate(curDay,"yyyy-MM-dd");
if(date.equals(curDayStr)){
return true;
}
}
return false;
}else{
return false;
}

}

public CalendarDay getDayFromLocation(float x, float y) {
int padding = mPadding;
if ((x < padding) || (x > mWidth - mPadding)) {
return null;
}
// (mRowHeight + MINI_DAY_NUMBER_TEXT_SIZE) / 2 - DAY_SEPARATOR_WIDTH + MONTH_HEADER_SIZE;
int yDay = (int) (y - MONTH_HEADER_SIZE + DAY_SEPARATOR_WIDTH) / mRowHeight;
int day = 1 + ((int) ((x - padding) * mNumDays / (mWidth - padding - mPadding)) - findDayOffset()) + yDay * mNumDays;

if (mMonth > 11 || mMonth < 0 || CalendarUtils.getDaysInMonth(mMonth, mYear) < day || day < 1)
return null;

return new CalendarDay(mYear, mMonth, day);
}

protected void initView() {
mMonthTitlePaint = new Paint();
mMonthTitlePaint.setAntiAlias(true);
mMonthTitlePaint.setTextSize(MONTH_TITLE_TEXT_SIZE);
mMonthTitlePaint.setTypeface(Typeface.create(mMonthTitleTypeface, Typeface.BOLD));
mMonthTitlePaint.setColor(mMonthTitleColor);
mMonthTitlePaint.setTextAlign(Align.CENTER);
mMonthTitlePaint.setStyle(Style.FILL);

mSelectedCirclePaint = new Paint();
mSelectedCirclePaint.setFakeBoldText(true);
mSelectedCirclePaint.setAntiAlias(true);
mSelectedCirclePaint.setColor(mSelectedBgColor);
mSelectedCirclePaint.setTextAlign(Align.CENTER);
mSelectedCirclePaint.setStyle(Style.FILL);

mMonthLinePaint = new Paint();
mMonthLinePaint.setAntiAlias(true);
mMonthLinePaint.setTextSize(MONTH_LINE_SIZE);
mMonthLinePaint.setColor(mMonthLineColor);
mMonthLinePaint.setStyle(Style.FILL);
mMonthLinePaint.setTextAlign(Align.CENTER);
mMonthNumPaint = new Paint();
mMonthNumPaint.setAntiAlias(true);
mMonthNumPaint.setTextSize(MINI_DAY_NUMBER_TEXT_SIZE);
mMonthNumPaint.setStyle(Style.FILL);
mMonthNumPaint.setTextAlign(Align.CENTER);
mMonthNumPaint.setFakeBoldText(false);

flagTextPaint=new Paint();
flagTextPaint.setAntiAlias(true);
flagTextPaint.setColor(flagTextColor);
flagTextPaint.setTextSize(MONTH_LINE_SIZE);
flagNormalBgPaint=new Paint();
flagNormalBgPaint.setAntiAlias(true);
flagNormalBgPaint.setColor(flagNormalBgColor);

flagPreBgPaint=new Paint();
flagPreBgPaint.setAntiAlias(true);
flagPreBgPaint.setColor(flagPreBgColor);

todayCiclePaint=new Paint();
todayCiclePaint.setAntiAlias(true);
todayCiclePaint.setStrokeWidth(4);
todayCiclePaint.setColor(todayTextColor);
todayCiclePaint.setStyle(Style.STROKE);
}

protected void onDraw(Canvas canvas) {
drawMonthTitle(canvas);
// drawMonthDayLabels(canvas);
drawMonthNums(canvas);
}

protected void onMeasure(int widthMeasureSpec, int heightMeasureSpec) {
setMeasuredDimension(MeasureSpec.getSize(widthMeasureSpec), mRowHeight * mNumRows + MONTH_HEADER_SIZE);
}

protected void onSizeChanged(int w, int h, int oldw, int oldh) {
mWidth = w;
}

public boolean onTouchEvent(MotionEvent event) {
if (event.getAction() == MotionEvent.ACTION_UP) {
CalendarDay calendarDay = getDayFromLocation(event.getX(), event.getY());
if (calendarDay != null) {
onDayClick(calendarDay);
}
}
return true;
}

public void reuse() {
mNumRows = DEFAULT_NUM_ROWS;
requestLayout();
}

public void setMonthParams(HashMap<String, Integer> params) {
if (!params.containsKey(VIEW_PARAMS_MONTH) && !params.containsKey(VIEW_PARAMS_YEAR)) {
throw new InvalidParameterException("You must specify month and year for this view");
}
setTag(params);

if (params.containsKey(VIEW_PARAMS_HEIGHT)) {
mRowHeight = params.get(VIEW_PARAMS_HEIGHT);
if (mRowHeight < MIN_HEIGHT) {
mRowHeight = MIN_HEIGHT;
}
}
if (params.containsKey(VIEW_PARAMS_SELECTED_BEGIN_DAY)) {
mSelectedBeginDay = params.get(VIEW_PARAMS_SELECTED_BEGIN_DAY);
}
// if (params.containsKey(VIEW_PARAMS_SELECTED_LAST_DAY)) {
// mSelectedLastDay = params.get(VIEW_PARAMS_SELECTED_LAST_DAY);
// }
if (params.containsKey(VIEW_PARAMS_SELECTED_BEGIN_MONTH)) {
mSelectedBeginMonth = params.get(VIEW_PARAMS_SELECTED_BEGIN_MONTH);
}
// if (params.containsKey(VIEW_PARAMS_SELECTED_LAST_MONTH)) {
// mSelectedLastMonth = params.get(VIEW_PARAMS_SELECTED_LAST_MONTH);
// }
if (params.containsKey(VIEW_PARAMS_SELECTED_BEGIN_YEAR)) {
mSelectedBeginYear = params.get(VIEW_PARAMS_SELECTED_BEGIN_YEAR);
}
// if (params.containsKey(VIEW_PARAMS_SELECTED_LAST_YEAR)) {
// mSelectedLastYear = params.get(VIEW_PARAMS_SELECTED_LAST_YEAR);
// }

mMonth = params.get(VIEW_PARAMS_MONTH);
mYear = params.get(VIEW_PARAMS_YEAR);

mHasToday = false;
mToday = -1;

mCalendar.set(Calendar.MONTH, mMonth);
mCalendar.set(Calendar.YEAR, mYear);
mCalendar.set(Calendar.DAY_OF_MONTH, 1);
mDayOfWeekStart = mCalendar.get(Calendar.DAY_OF_WEEK);

if (params.containsKey(VIEW_PARAMS_WEEK_START)) {
mWeekStart = params.get(VIEW_PARAMS_WEEK_START);
} else {
mWeekStart = mCalendar.getFirstDayOfWeek();
}

mNumCells = CalendarUtils.getDaysInMonth(mMonth, mYear);
for (int i = 0; i < mNumCells; i++) {
final int day = i + 1;
if (sameDay(day, today)) {
mHasToday = true;
mToday = day;
}

mIsPrev = prevDay(day, today);
}

mNumRows = calculateNumRows();
}

public void setOnDayClickListener(OnDayClickListener onDayClickListener) {
mOnDayClickListener = onDayClickListener;
}

public interface OnDayClickListener {
void onDayClick(MonthView monthView, CalendarDay calendarDay);
}

/**
* 根据手机的分辨率从 dp 的单位 转成为 px(像素)
*/
public static int dip2px(Context context, float dpValue) {
int scale = (int) context.getResources().getDisplayMetrics().density;
return (int) (dpValue * scale + 0.5f);
}

}

调用lib库

WeekCalendar的调用

1
2
3
4
5
6
7
8
9
10
11
12
13
14
15
16
17
18
 weekCalendar.setOnDateClickListener(new OnDateClickListener() {
@Override
public void onDateClick(DateTime dateTime) {
clickDateTime=dateTime;
journey_month.setText(dateTime.getMonthOfYear() + "");
journey_data_title.setText(OtherUtils.formatDate(dateTime.toDate()));
journeyListAdapter.setData(setCurJourneyList(dateTime.toDate()));//设置当天的行程数据
}

});
weekCalendar.setOnWeekChangeListener(new OnWeekChangeListener() {
@Override
public void onWeekChange(DateTime firstDayOfTheWeek, boolean forward) {
journey_month.setText(firstDayOfTheWeek.getMonthOfYear() + "");
Toast.makeText(context, "Week changed: " + firstDayOfTheWeek +
" Forward: " + forward, Toast.LENGTH_SHORT).show();
}
});

MonthCalendar的调用

这里通过嵌套在popwindow进行调用,当然也可以放在其它控件中

1
2
3
4
5
6
7
8
9
10
11
12
13
14
15
16
17
18
19
20
21
22
23
24
25
26
27
  LayoutInflater inflater = LayoutInflater.from(context);
vPop = inflater.inflate(R.layout.view_popwindow_calendar_select, null);
pop = new PopupWindow(vPop, ViewGroup.LayoutParams.MATCH_PARENT, ViewGroup.LayoutParams.MATCH_PARENT);
// pop.setBackgroundDrawable(new ColorDrawable(0));
pop.setFocusable(false);
pop.setOutsideTouchable(false);

dayPickerView = (DayPickerView) vPop.findViewById(R.id.pop_pickerView);

dayPickerView.setController(new DatePickerController() {
@Override
public int getMaxYear() {
return DateUtil.getEndYear();
}

@Override
public void onDayOfMonthSelected(int year, int month, int day) {
Log.e("kosmos", "onDayOfMonthSelected:" + day + " / " + month + " / " + year);
if (listener != null) {
listener.onCalendarSelect(year, month, day);
}
if (pop != null && pop.isShowing()) {
// pop.dismiss();
}
}

});

想查看完整代码的可以点击传送门

kotlin在AndroidStudio的环境配置

java代码转化kotlin

AndroidStudio中,help->FindAction->Convert Java File to Kotlin File
如果快捷键是android studio默认的(ctrl+shift+A)

可视化操作

  1. android studio中,Tools->Kotlin->Configure kotlin in project->Android with Gradle
  2. 选择所有模块配置还是单模块配置
  3. 选择kotlin版本号

    直接修改代码

  4. 修改项目根目录下的build.gradle文件
    1
    2
    3
    4
    5
    6
    7
    8
    9
    10
    11
    12
    13
    14
    15
    16
    17
    18
    19
    20
    21
    22
    23
    24
    25
    buildscript {
    ext.kotlin_version = '1.1.2-5'
    ext.anko_version= '0.8.2'
    repositories {
    jcenter()
    }
    dependencies {
    classpath 'com.android.tools.build:gradle:2.3.3'
    classpath "org.jetbrains.kotlin:kotlin-gradle-plugin:$kotlin_version"
    classpath "org.jetbrains.kotlin:kotlin-android-extensions:$kotlin_version"
    // NOTE: Do not place your application dependencies here; they belong
    // in the individual module build.gradle files
    }
    }

    allprojects {
    repositories {
    jcenter()
    }
    }


    repositories {
    mavenCentral()
    }
  5. 修改app下的build.gradle文件
    1
    2
    3
    4
    5
    6
    7
    8
    9
    10
    11
    12
    13
    14
    15
    16
    17
    18
    19
    20
    21
    22
    23
    24
    25
    26
    27
    28
    29
    30
    31
    32
    33
    34
    35
    36
    37
    38
    39
    40
    41
    42
    apply plugin: 'com.android.application'
    apply plugin: 'kotlin-android'
    apply plugin: 'kotlin-android-extensions'

    android {
    compileSdkVersion 25
    buildToolsVersion "25.0.3"
    defaultConfig {
    applicationId "kotlinstudy.jessie.com.kotlinstudy"
    minSdkVersion 15
    targetSdkVersion 25
    versionCode 1
    versionName "1.0"
    testInstrumentationRunner "android.support.test.runner.AndroidJUnitRunner"

    }


    buildTypes {
    release {
    minifyEnabled false
    proguardFiles getDefaultProguardFile('proguard-android.txt'), 'proguard-rules.pro'
    }
    }
    compileOptions {
    sourceCompatibility JavaVersion.VERSION_1_7
    targetCompatibility JavaVersion.VERSION_1_7
    }
    }

    dependencies {
    compile fileTree(include: ['*.jar'], dir: 'libs')
    androidTestCompile('com.android.support.test.espresso:espresso-core:2.2.2', {
    exclude group: 'com.android.support', module: 'support-annotations'
    })
    compile 'com.android.support:appcompat-v7:25.3.1'
    compile 'com.android.support.constraint:constraint-layout:1.0.2'
    testCompile 'junit:junit:4.12'
    compile "org.jetbrains.kotlin:kotlin-stdlib:$kotlin_version"
    compile "org.jetbrains.anko:anko-common:$anko_version"
    }

    findViewById

    1
    val forecastList: RecyclerView = find(R.id.forecast_list)

    activity的跳转

    1
    2
    startActivity<DetailActivity>(DetailActivity.ID to it.id,
    DetailActivity.CITY_NAME to weekForecast.city)

数据类的封装

1
2
3
4
5
6
7
8
9
10
data class ForecastList(val id: Long, val city: String, val country: String,
val dailyForecast: List<Forecast>) {

val size: Int
get() = dailyForecast.size

operator fun get(position: Int) = dailyForecast[position]
}

data class Forecast(val id: Long, val date: Long, val description: String, val high: Int,val low: Int,val iconUrl: String)

扩展函数

dp与px的转换

1
2
3
4
5
6
7
fun Int.dpToPx(): Int {
if (toInt() in intArrayOf(ViewGroup.LayoutParams.MATCH_PARENT, ViewGroup.LayoutParams.WRAP_CONTENT)) {
return this
}
return (this * Global.density).toInt() //这里的Gloabl.density是在应用启动时获取的
}
//params.topMargin = 16.dpTpPx()

设置view的宽高

1
2
3
4
5
6
7
fun View.setSize(width: Int, height: Int) {
val params = layoutParams
params.width = width
params.height = height
layoutParams = params
}
//yourView.setSize(100, 100)

设置imageview的图片加载

使用glide做图片加载

1
2
3
4
5
6
7
8
9
10
11
12
13
14
15
16
17
18
19
20
21
22
23
24
25
26
27
28
29
30
31
32
33
34
35
36
37
38
39
40
41
42
43
44
45
object GlideUtils {
/*
当fragment或者activity失去焦点或者destroyed的时候,Glide会自动停止加载相关资源,确保资源不会被浪费
*/
fun loadUrlImage(context: Context, url: String, imageView: ImageView){
get(context, url).placeholder(R.drawable.icon_back).error(R.drawable.icon_back).centerCrop().into(
object : SimpleTarget<GlideDrawable>() {
override fun onResourceReady(resource: GlideDrawable,
glideAnimation: GlideAnimation<in GlideDrawable>) {
imageView.setImageDrawable(resource)
}
})
}

/**
* 加载圆形图片
*/
fun loadCircleImage(context: Context,url: String,imageView: ImageView){
get(context, url)
.asBitmap() //这句不能少,否则下面的方法会报错
.centerCrop()
.into(object :BitmapImageViewTarget(imageView){
override fun setResource(resource: Bitmap?) {
super.setResource(resource)
var circularBitmapDrawable = RoundedBitmapDrawableFactory.create(context.resources, resource)
circularBitmapDrawable.isCircular=true
imageView.setImageDrawable(circularBitmapDrawable)

}
} )
}

fun loadRoundImage(context: Context,url: String,size:Int,imageView: ImageView){
get(context, url)
.transform(CenterCrop(context),GlideRoundTransform(context, size))
.into(imageView)
}

fun get(context: Context, url: String): DrawableTypeRequest<String> = Glide.with(context).load(url)
}


fun ImageView.loadUrl(url: String) {
GlideUtils.loadUrlImage(context, url, this)
}

内联函数关闭io流

1
2
3
4
5
6
7
8
9
10
11
12
13
14
15
16
17
18
19
20
21
22
23
24
25
inline fun <T : Closeable?> T.use(block: (T) -> Unit) {
var closed = false
try {
block(this)
} catch (e: Exception) {
closed = true
try {
this?.close()
} catch (closeException: Exception) {
}
throw e
} finally {
if (!closed) {
this?.close()
}
}
}
// 使用
fun testIo(bitmap: Bitmap) {
val file = File("/pic/")
val fileOutputStream: FileOutputStream? = FileOutputStream(file)
fileOutputStream.use { t ->
bitmap.compress(Bitmap.CompressFormat.PNG, 100, t)
}
}

with函数块

with函数块,用对象作为函数的参数,内部通过 this 指代该对象,直接调用对象的方法或者属性
典型用法,在onBindViewHolder中捆绑数据

1
2
3
4
5
6
7
8
9
10
 with(model){
//是否选中
holder.itemView.checkedCb.isChecked = isSelected
//加载商品图片
holder.itemView.goodsIconIv.loadUrl(goodsIcon)
//商品描述
holder.itemView.goodsDescTv.text = goodsDesc
//商品SKU
holder.itemView.goodsSkuTv.text = goodsSku
}

kotlin代码埋点

1
2
3
4
5
6
7
8
9
10
11
12
fun <T : View> T.clickWithTrack(eventName: String, time: Long = 600, block: (T) -> Unit) = this.clickWithTrigger(time) {
TrackAgent.currentEvent().customEvent(eventName)//自定义埋点逻辑
block(it as T) //正常逻辑
}

fun <T : View> T.clickWithTrack(eventName: String, trackMap: HashMap<String, String>, time: Long = 600, block: (T) -> Unit) = this.clickWithTrigger(time) {
TrackAgent.currentEvent().customEvent(eventName, trackMap)//自定义埋点逻辑
block(it as T)//正常逻辑
}
// 使用
view.clickWithTrack(key) {}
view.clickWithTrack(key,trackMap) {}

重复点击过滤

1
2
3
4
5
6
7
8
9
10
11
12
13
14
15
16
17
18
19
20
21
22
23
24
25
26
27
28
29
30
31
32
33
34
35
36
37
38
39
40
41
42
43
44
45
46
47
48
49
50
/***
* 设置有效点击时间范围和点击事件
* @param delay Long 有效点击时间,默认600毫秒后
*/
fun <T : View> T.clickWithTrigger(time: Long = 600, block: (T) -> Unit){
triggerDelay = time
setOnClickListener {
if (clickEnable()) {
block(it as T)
}
}
}

/*
* 最后一次点击时间属性扩展
*/
private var <T : View> T.triggerLastTime: Long
// 从tag取出
get() = if (getTag(1123460103) != null) getTag(1123460103) as Long else 0
// 保存到tag
set(value) {
setTag(1123460103, value)
}

/*
* 有效点击时间属性扩展
*/
private var <T : View> T.triggerDelay: Long
// 从tag取出
get() = if (getTag(1123461123) != null) getTag(1123461123) as Long else -1
// 保存到tag
set(value) {
setTag(1123461123, value)
}

/**
* 点击是否有效判断
*/
private fun <T : View> T.clickEnable(): Boolean {
var flag = false
val currentClickTime = System.currentTimeMillis()
if (currentClickTime - triggerLastTime >= triggerDelay) {
flag = true
}
triggerLastTime = currentClickTime
return flag
}

// 使用
view.clickWithTrigger(700) {}

sharedPreferences封装

1
2
3
4
5
6
7
8
9
10
11
12
13
14
15
16
17
18
19
20
21
22
23
24
25
26
27
28
29
30
31
32
33
34
35
36
37
38
39
40
41
42
43
44
45
46
47
48
49
50
51
52
53
54
55
56
57
58
59
60
61
class Preference<T>(val context: Context, val name: String?, val default: T) : ReadWriteProperty<Any?, T> {
val prefs by lazy {
context.getSharedPreferences("xxxx", Context.MODE_PRIVATE)
}

override fun getValue(thisRef: Any?, property: KProperty<*>): T = with(prefs) {
val res: Any = when (default) {
is Long -> {
getLong(name, 0)
}
is String -> {
getString(name, default)
}
is Float -> {
getFloat(name, default)
}
is Int -> {
getInt(name, default)
}
is Boolean -> {
getBoolean(name, default)
}
else -> {
throw IllegalArgumentException("This type can't be saved into Preferences")
}
}
res as T
}

override fun setValue(thisRef: Any?, property: KProperty<*>, value: T) = with(prefs.edit()) {
when (value) {
is Long -> putLong(name, value)
is String -> putString(name, value)
is Float -> putFloat(name, value)
is Int -> putInt(name, value)
is Boolean -> putBoolean(name, value)
else -> {
throw IllegalArgumentException("This type can't be saved into Preferences")
}
}.apply()
}
}

//调用例子
class EntranceActivity : BaseActivity() {

private var userId: String by Preference(this, "userId", "")

override fun onCreate(savedInstanceState: Bundle?) {
testUserId()
}

fun testUserId() {
if (userId.isEmpty()) {
println("userId is empty")
userId = "default userId"
} else {
println("userId is $userId")
}
}
}

getExtra封装

1
2
3
4
5
6
7
8
9
10
11
12
13
14
15
16
17
18
19
20
21
22
23
24
25
26
27
28
29
30
31
32
33
34
35
36
37
38
39
40
41
42
43
44
45
46
47
48
49
class ExtrasDelegate <out T>(private val extraName: String, private val defaultValue: T){
private var extra: T? = null

// 适配AppCompatActivity
operator fun getValue(thisRef: AppCompatActivity, property: KProperty<*>): T {
extra = getExtra(extra, extraName, thisRef)
return extra ?: defaultValue
}

// 适配Fragment
operator fun getValue(thisRef: Fragment, property: KProperty<*>): T {
extra = getExtra(extra, extraName, thisRef)
return extra ?: defaultValue
}
}

// 调用委托类
fun <T> extraDelegate(extra: String, default: T) = ExtrasDelegate(extra, default)

// 委托调用入口
fun extraDelegate(extra: String) = extraDelegate(extra, null)

// 根据key取值,适配AppCompatActivity
@Suppress("UNCHECKED_CAST")
private fun <T> getExtra(oldExtra: T?, extraName: String, thisRef: AppCompatActivity): T? =
oldExtra ?: thisRef.intent?.extras?.get(extraName) as T?

// 根据key取值,适配Fragment
@Suppress("UNCHECKED_CAST")
private fun <T> getExtra(oldExtra: T?, extraName: String, thisRef: Fragment): T? =
oldExtra ?: thisRef.arguments?.get(extraName) as T?

// 调用例子
startActivity<GoodsDetailActivity>(GoodsConstant.KEY_GOODS_ID to item.id)
class GoodsDetailActivity : BaseActivity() {
private val goodsId: Int? by extraDelegate(GoodsConstant.KEY_GOODS_ID)
}
override fun onCreate(savedInstanceState: Bundle?) {
testGoodsId()
}

fun testGoodsId() {
if (goodsId.isEmpty()) {
println("goodsId is empty")
userId = "default goodsId"
} else {
println("goodsId is $goodsId")
}
}

Application 的单例

使用not null 委托模式

1
2
3
4
5
6
7
8
9
10
class App : Application() {
companion object {
var instance: App by Delegates.notNull()
}

override fun onCreate() {
super.onCreate()
instance = this
}
}

recyclerview的使用

初始化recyclerview,设置layoutManager和adapter

1
2
3
4
lateinit var mAdapter: MyAdapter
recyclerView.layoutManager = LinearLayoutManager(context)
mAdapter = MyAdapter(context, mList,{ data: DataBean -> Toast.makeText(activity,data.type, Toast.LENGTH_SHORT).show()})
recyclerView.adapter = mAdapter

自定义adapter

1
2
3
4
5
6
7
8
9
10
11
12
13
14
15
16
17
18
19
20
21
22
23
24
25
26
27
28
29
30
31
32
33
34
35
36
37
38
39
40
41
42
43
44
45
46
47
48
49
50
51
52
53
54
55
56
57
58
59
60
61
62
63
64
65
66
67
68
69
70
71
72
73
74
75
76
77
78
79
80
81
82
83
84
85
class MyAdapter(context: Context, list: ArrayList<DataBean>, val itemClick: (DataBean) -> Unit) : RecyclerView.Adapter<MyAdapter.MyViewHolder>() {
var context: Context? = null;
var list: ArrayList<DataBean>? = null
var inflater: LayoutInflater? = null

init {
this.context = context
this.list = list
this.inflater = LayoutInflater.from(context)
}

override fun onCreateViewHolder(parent: ViewGroup?, viewType: Int): MyViewHolder {
return MyViewHolder(inflater?.inflate(R.layout.item_rank, parent, false), context!!,itemClick)
}

override fun getItemCount(): Int {
return list?.size ?: 0
}

override fun onBindViewHolder(holder: MyViewHolder?, position: Int) {
var photoUrl : String? = list?.get(position)?.cover?.feed
photoUrl?.let { ImageLoadUtils.display(context!!,holder?.iv_photo, it) }
var title : String? = list?.get(position)?.title
holder?.tv_title?.text = title
var category = list?.get(position)?.category
var duration = list?.get(position)?.duration
var minute =duration?.div(60)
var second = duration?.minus((minute?.times(60)) as Long )
var realMinute : String
var realSecond : String
if(minute!!<10){
realMinute = "0"+minute
}else{
realMinute = minute.toString()
}
if(second!!<10){
realSecond = "0"+second
}else{
realSecond = second.toString()
}
holder?.tv_time?.text = "$category / $realMinute'$realSecond''"
holder?.itemView?.setOnClickListener {
//跳转视频详情页
var intent : Intent = Intent(context, VideoDetailActivity::class.java)
var desc = list?.get(position)?.description
var playUrl = list?.get(position)?.playUrl
var blurred = list?.get(position)?.cover?.blurred
var collect = list?.get(position)?.consumption?.collectionCount
var share = list?.get(position)?.consumption?.shareCount
var reply = list?.get(position)?.consumption?.replyCount
var time = System.currentTimeMillis()
var videoBean = VideoBean(photoUrl,title,desc,duration,playUrl,category,blurred,collect ,share ,reply,time)
var url = SPUtils.getInstance(context!!,"beans").getString(playUrl!!)
if(url.equals("")){
var count = SPUtils.getInstance(context!!,"beans").getInt("count")
if(count!=-1){
count = count.inc()
}else{
count = 1
}
SPUtils.getInstance(context!!,"beans").put("count",count)
SPUtils.getInstance(context!!,"beans").put(playUrl!!,playUrl)
ObjectSaveUtils.saveObject(context!!,"bean$count",videoBean)
}
intent.putExtra("data",videoBean as Parcelable)
context?.let { context -> context.startActivity(intent) }
}
}


inner class MyViewHolder(itemView: View?, context: Context, val itemClick: (DataBean) -> Unit) : RecyclerView.ViewHolder(itemView) {
var iv_photo: ImageView = itemView?.findViewById(R.id.iv_photo) as ImageView
var tv_title: TextView = itemView?.findViewById(R.id.tv_title) as TextView
var tv_time: TextView = itemView?.findViewById(R.id.tv_time) as TextView
init {
tv_title?.typeface = Typeface.createFromAsset(context?.assets, "fonts/FZLanTingHeiS-L-GB-Regular.TTF")
bind()
}
fun bind() {
itemView.setOnClickListener {
itemClick(list?.get(layoutPosition) as DataBean)
}
}
}
}

封装操作符

1
2
3
4
5
6
7
8
9
10
11
12
13
14
15
16
17
18
19
20
21
22
23
// 自定义Run方法
fun <T,R> T.myRun(m:() -> R): R{
return m()
}
common().myRun{
println("A")
}
fun <T> T.myRunOk(mm:() -> Boolean){
mm()
}
common().myRunOk{
true
}
// 自定义with方法
fun<T,R> myWith(input:T, mm:T.() -> R):R {
return input.mm()
}
myWith("123"){length}
// 自定义let方法
fun <T,R> T.myLet(mm: (T) -> R):R {
return mm(this)
}
"123".myLet {print(it)}

封装线程

1
2
3
4
5
6
7
8
9
10
11
12
13
14
15
16
17
// 封装线程
fun ktRun(start: Boolean = true, name: String ? = null, myRunAction: () -> Unit): Thread {
val thread = object: Thread(){
override fun run(){
super.run()
myRunAction()
}
}

name ?: "MyThread"
if (start){
thread.start()
}
return thread
}

ktRun{}

封装循环

1
2
3
4
5
6
7
// 封装循环
fun countLoop(count: Int,myFun: (Int) -> Unit){
for (i in 0 .. count){
myFun(i)
}
}
countLoop(4){}

类和继承

1
class Invoice {}

Kotlin 中类可以有一个主构造函数以及多个二级构造函数。

主构造函数是类头的一部分:跟在类名后面,如果构造函数有注解或可见性声明,需带constructor 关键字

语法格式class 类名 可见性 注解 constructor(参数名1:类型1,参数名2:类型2.....)

1
class Customer public @inject constructor (name: String) {...}

没有注解或可见性说明,则 constructor 关键字是可以省略。

初始化代码可以放在以 init 做前缀的初始化块中初始化

1
2
3
4
5
class Person(val firstName: String, val lastName: String, var age: Int) {
init {
logger,info("Customer initialized with value ${name}")
}
}

在同一个类中代理另一个构造函数使用 this 关键字

1
2
3
4
5
class Person(val name: String) {
constructor (name: String, paret: Person) : this(name) {
parent.children.add(this)
}
}

与java相同,如果一个非抽象类没有声明构造函数,会产生一个没有参数的构造函数。
如果不想类有公共的构造函数,就得声明一个拥有不可见的空主构造函数。

1
2
class DontCreateMe private constructor () {
}

创建类的实例

Kotlin 没有 new 关键字,直接通过类名(参数1,参数2...)进行初始化

1
2
val invoice = Invoice()
val customer = Customer("Joe Smith")

属性和字段

每个字段对应的get,set写法

Getters 和 Setters

1
2
3
4
5
var stringRepresentation: String
get() = this.toString()
set (value) {
setDataFormString(value) // 格式化字符串,并且将值重新赋值给其他元素
}

备用字段

用field标识符来表示,只允许在属性的访问器函数内使用,起到局部变量的作用。

1
2
3
4
5
var counter = 0 // 初始化值会直接写入备用字段
set(value) {
if (value >= 0)
field = value
}

备用属性

感觉跟备用字段挺像的

1
2
3
4
5
6
7
8
private var _table: Map<String, Int>? = null
public val table: Map<String, Int>
get() {
if (_table == null) {
_table = HashMap() // 参数类型是自动推导
}
return _table ?: throw AssertionError("Set to null by another thread")
}

编译时常量

满足以下条件

  • 在顶级声明的 或者 是一个object的成员

  • 以String或基本类型进行初始化

  • 没有自定义getter

这种属性可以被当做注解使用 @Deprected(SUBSYSTEM_DEPRECATED)

1
2
const val SUBSYSTEM_DEPRECATED: String = "This subsystem is deprecated"
@Deprected(SUBSYSTEM_DEPRECATED) fun foo() { ... }

延迟初始化属性

希望在访问这个属性的时候,避免非空检查,用lateinit修饰符。

这个修饰符只能够被用在类的 var 类型的可变属性定义中,不能用在构造方法中,并且属性不能有自定义的 getter 和 setter访问器,这个属性的类型必须是非空的,同样也不能为一个基本类型。

在一个lateinit的属性初始化前访问他,会导致一个特定异常。

1
2
3
4
5
6
7
8
9
10
11
public class MyTest {
lateinit var subject: TestSubject

@SetUp fun setup() {
subject = TestSubject()
}

@Test fun test() {
subject.method()
}
}

嵌套类

普通内部类
类可以标记为 inner这样就可以访问外部类的成员。

1
2
3
4
5
6
7
8
class Outer {
private val bar: Int = 1
inner class Inner {
fun foo() = bar
}
}

val demo = Outer().Inner().foo() //==1

对象表达式

相当于java中的匿名内部类,不一样的是对象表达式可以访问闭合范围内的变量,但不用final修饰

语法格式调用函数(object:父类名1(参数1,参数2...),父类名2(参数1,参数2...){需要重写的变量,需重写的函数1,需重写的函数2})

1
2
3
4
5
6
7
8
9
10
11
12
fun countClicks(windows: JComponent) {
var clickCount = 0
var enterCount = 0
window.addMouseListener(object : MouseAdapter() {
override fun mouseClicked(e: MouseEvent) {
clickCount++
}
override fun mouseEntered(e: MouseEvent){
enterCount++
}
})
}

父类有构造函数,则必须传递相应的构造参数。多个父类可以用逗号隔开,跟在冒号后面:

1
2
3
4
5
6
7
8
9
open class A(x: Int) {
public open val y: Int = x
}

interface B { ... }

val ab = object : A(1), B {
override val y = 14
}

如果没有父类

1
2
3
4
5
6
val adHoc = object {
var x: Int = 0
var y: Int = 0
}

print(adHoc.x + adHoc.y)

对象声明

关键字object之后指定了一个名称, 那么它就不再是“对象表达式”,而是一个对“对象声明”。感觉像是匿名内部类的另一种写法。

1
2
3
4
5
6
7
8
9
10
object MyInfo: Info("submit"),IClickListener {

override fun doClick() {
println("MyInfo do click, $text") // Log: MyInfo do click, , submit
}
}

fun main(args: Array<String>) {
MyInfo.doClick()
}

跟在 object 关键字后面是对象名,和变量声明一样。
可以继承父类

1
2
3
4
5
6
7
8
9
object DefaultListener : MouseAdapter() {
override fun mouseClicked(e: MouseEvent) {
// ...
}

override fun mouseEntered(e: MouseEvent) {
// ...
}
}

伴随对象

用 companion 关键字标记对象声明,跟java不一样,Kotlin中并不支持静态方法,调用方式有两种,一种是类名.伴随对象.XX,另外一种方式是类名.xx

1
2
3
4
5
6
7
8
9
10
11
12
13
14
15
class Books(var name: String, val page: Int) {
companion object ComBooks{
val a : Int = 10
fun doNote() {
println("do note")
}
}
}

fun main(args: Array<String>) {
Books.ComBooks.doNote()
println("Book.a = ${Books.ComBooks.a}")
println("-------------")
Books.doNote()
}

对象表达式,对象声明,伴随对象区别:

  • 对象表达式在使用的地方被立即执行。
  • 对象声明是延迟加载的, 在第一次使用的时候被初始化。
  • 伴生对象所在的类被加载,伴生对象被初始化,与Java静态成员一样。

继承

Kotlin 中所有的类都有共同的父类 Any ,类似java中都继承Object,它是一个没有父类声明的类的默认父类。
声明一个明确的父类,继承类的时候带了构造参数,继承接口的时候不带。

1
2
open class Base(p: Int)
class Derived(p: Int) : Base(p)

默认情形下,kotlin 中所有的类都是 final,如果类有主构造函数,则基类必须在主构造函数中使用参数立即初始化。如果类没有主构造函数,则必须在每一个构造函数中用super关键字初始化基类。

1
2
3
4
5
6
class MyView : View {
constructor(ctx: Context) : super(ctx) {
}
constructor(ctx: Context, attrs: AttributeSet) : super(ctx,attrs) {
}
}

可见性修饰词

  • private,protected,internal,以及 public 。默认的修饰符是 public。
  • 与java不同的是,跟是否可重写没有关系。
  • private 只在该类中可见
  • protected 和 private 一样但在子类中也可见
  • internal 在本模块的所有可以访问到声明区域可见
  • public 任何地方可见
  • 外部类不可以访问内部类的 private 成员。
  • 如果你复写了一个protected成员并且没有指定可见性,那么该复写的成员具有protected可见性。

接口

都可以包含抽象方法,以及方法的实现,java中接口的方法都是抽象的,显得更强大了。和抽象类不同的是,接口不能保存状态。可以有属性但必须是val的,或者提供访问器的实现。接口属性不可以有后备字段。
接口用关键字 interface 来定义:

1
2
3
4
5
6
7
8
9
10
11
12
13
14
interface MyInterface {
val property: Int // abstract

val propertyWithImplementation: String
get() = "foo"

fun foo() {
print(property)
}
}

class Child : MyInterface {
override val property: Int = 29
}

一个类或对象可以实现一个或多个接口

1
2
3
4
5
class Child : MyInterface {
fun bar () {
//函数体
}
}

复写

复写方法

kotlin 需要把可以复写的成员都明确注解出来,类名,函数名前面加open或者是abstract,复写时加override,java是不需要单独声明的。

1
2
3
4
5
6
7
8
open class Base {
open fun v() {}
fun nv() {}
}

class Derived() : Base() {
override fun v() {}
}

复写属性

与方法类似,var属性覆盖一个val属性,但反之则不允许

1
2
3
4
5
6
7
interface Foo {
val count: Int
}
class Bar1(override val count: Int) : Foo //可以在构造函数中重写
class Bar2 : Foo {
override var count: Int = 0
}

C 继承 a() 或 b() 的实现没有任何问题,因为它们都只有一个实现。但是 f() 有俩个实现,因此我们在 C 中必须复写 f() 并且提供自己的实现来消除歧义。

1
2
3
4
5
6
7
8
9
10
11
12
13
14
15
16
17
open class A {
open fun f () { print("A") }
fun a() { print("a") }
}

interface B {
fun f() { print("B") } // 接口的成员变量默认是 open 的
fun b() { print("b") }
}

class C() : A() , B {
// 编译器会要求复写f()
override fun f() {
super<A>.f() // 调用 A.f()
super<B>.f() // 调用 B.f()
}
}

抽象类

一个类或一些成员可能被声明成 abstract。抽象方法默认带open,在它的类中没有实现方法。可以用一个抽象成员去复写一个带open的非抽象方法。如果函数没有函数体,那么默认是抽象的。

1
2
3
4
5
6
7
open class Base {
open fun f() {}
}

abstract class Derived : Base() {
override abstract fun f()
}

扩展

Kotlin 提供了一种,可以在不继承父类,也不使用类似装饰器设计模式的情况下对指定类进行扩展。 支持函数扩展和属性扩展。

函数扩展

fun 类名.扩展函数名(入参),为 MutableList<Int>类添加一个 swap 函数:

1
2
3
4
5
6
7
fun MutableList<Int>.swap(x: Int, y: Int) {
val temp = this[x] // this 对应 list
this[x] = this[y]
this[y] = tmp
}
val l = mutableListOf(1, 2, 3)
l.swap(0, 2)// 在 `swap()` 函数中 `this` 持有的值是 `l`

扩展实际上并没有修改它所扩展的类。定义一个扩展,你并没有在类中插入一个新的成员,只是让这个类的实例对象能够通过.调用新的函数。扩展函数是静态分发的,扩展函数的调用决定于声明的参数的类型

1
2
3
4
5
6
7
8
9
open class C 
class D: C()
fun C.foo() = "c"
fun D.foo() = "d"
fun printFoo(c: C) {
println(c.foo())
}
printFoo(D())
//输出 c

同名同参数的成员函数和扩展函数都存在时,调用的是成员函数

1
2
3
4
5
6
class C {
fun foo() { println("member") }

}
fun C.foo() { println("extension") }
//输出member

即使是一个空对象仍然可以调用该扩展,然后在扩展的内部进行 this == null 的判断。

1
2
3
4
5
fun Any?.toString(): String {
if (this == null) return "null"
// 在空检查之后,`this` 被自动转为非空类型,因此 toString() 可以被解析到任何类的成员函数中
return toString()
}

属性扩展

1
2
3
4
5
6
7
8
9
// 使用扩展属性(extension property)
var View.padLeft: Int
set(value) {
setPadding(value, paddingTop, paddingRight, paddingBottom)
}

get() {
return paddingLeft
}

伴随对象扩展

语法格式类名.Companion.扩展函数名

1
2
3
4
5
6
class MyClass {
companion object {}
}
fun MyClass.Companion.foo(){

}

扩展域

1
2
3
4
5
6
7
8
9
10
11
12
13
14
package foo.bar
fun Baz.goo() { ... }

package com.example,usage

import foo.bar.goo // 导入所有名字叫 "goo" 的扩展

// 或者

import foo.bar.* // 导入foo.bar包下得所有数据

fun usage(baz: Baz) {
baz.goo()
}

数据类

自带:

  • equals()/hashCode 函数
  • toString 格式是 “User(name=john, age=42)”
  • 对应按声明顺序出现的所有属性
  • copy() 函数

必须满足:

  • 主构造函数应该至少有一个参数;
  • 主构造函数的所有参数必须标注为 val 或者 var ;
  • 数据类不能是 abstract,open,sealed,或者 inner ;
  • 数据类不能继承其它的类(但可以实现接口)。
  • 在 JVM 中如果构造函数是无参的,则所有的属性必须有默认的值,(参看Constructors);
1
data class User(val name: String = "", val age: Int = 0)

复制

会对一些属性做修改但想要其他部分不变

1
2
val jack = User(name = "jack", age = 1)
val olderJack = jack.copy(age = 2)

数据类和多重声明

1
2
3
val jane = User("jane", 35)
val (name, age) = jane
println("$name, $age years of age") //打印出 "Jane, 35 years of age"

枚举类

每个枚举都是枚举类的一个实例,它们是可以初始化的。

1
2
3
4
5
enum class Color(val rgb: Int) {
RED(0xFF0000),
GREEN(0x00FF00),
BLUE(0x0000FF)
}

可以有对应的方法,以及复写基本方法。用分号把枚举常量定义和成员定义分开。

1
2
3
4
5
6
7
8
9
enum class ProtocolState {
WAITING {
override fun signal() = Taking
},
Taking{
override fun signal() = WAITING
};
abstract fun signal(): ProtocolState
}

通过名字获得枚举常量

1
2
EnumClass.valueOf(value: String): EnumClass
EnumClass.values(): Array<EnumClass>

泛型

泛型类

1
2
3
class Box<T>(t: T){
var value = t
}

类型可以推断的

1
val box = Box(1)//1是 Int 型,因此编译器会推导出我们调用的是 Box<Int>

声明处变型

通过注解类型参数 T 的来源,来确保它仅从 Source<T>成员中返回(生产),并从不被消费。使用out 修饰符:

1
2
3
4
5
6
7
8
abstract class Source<out T> {
abstract fun nextT(): T
}

fun demo(strs: Source<String>) {
val objects: Source<Any> = strs // This is OK, since T is an out-parameter
// ...
}

接受一个类型参数逆变:只可以被消费而不可以 被生产。使用in。

1
2
3
4
5
6
7
8
9
abstract class Comparable<in T> {
abstract fun compareTo(other: T): Int
}

fun demo(x: Comparable<Number>) {
x.compareTo(1.0) // 1.0 has type Double, which is a subtype of Number
// Thus, we can assign x to a variable of type Comparable<Double>
val y: Comparable<Double> = x // OK!
}

多重声明

可以通过给对象插入多个成员函数

1
val (name, age) = person

在for循环中使用

1
2
3
4
for ((a, b) in collection) { ... }
for ((key, value) in map) {

}

一个函数返回俩个值

1
2
3
4
5
6
7
8
data class Result(val result: Int, val status: Status)

fun function(...): Result {
//...
return Result(result, status)
}

val (result, status) = function(...)

代理

类代理

Derived 类可以继承 Base 接口并且指定一个对象代理它全部的公共方法:

1
2
3
4
5
6
7
8
9
10
11
12
13
14
interface Base {
fun print()
}

class BaseImpl(val x: Int) : Base {
override fun print() { printz(x) }
}

class Derived(b: Base) : Base by b

fun main() {
val b = BaseImpl(10)
Derived(b).print()
}

代理属性

1
2
3
class Example {
var p: String by Delegate()
}

语法结构是: val/var 属性名 属性类型 by 类名(参数1,参数2...)
在 by 后面的表达式就是代理,因为get() set() 对应的属性会被 getValue() setValue()方法代理。前面添加operator关键字,必须要提供getValues()函数(如果是 var还需要 setValue())。

1
2
3
4
5
6
7
8
9
class Delegate {
operator fun getValue(thisRef: Any?, property: KProperty<*>): String {
return "$thisRef, thank you for delegating '${property.name}' to me!"
}

operator fun setValue(thisRef: Any?, property: KProperty<*>, value: String) {
println("$value has been assigned to '${property.name} in $thisRef.'")
}
}

调用的时候直接创建对象,通过代理属性直接调用getValue(),调用e.p=”test”是直接调用setValue()方法

1
2
val e = Example()
println(e.p)

标准代理

Kotlin 标准库为几种常用的代理提供了工厂方法

lazy() 是一个接受 lamdba 并返回一个实现延迟属性的代理,第一次调用 执行 lamdba 并传递 lazy() 并存储结果,以后每次调用时只是简单返回之前存储的值。

1
2
3
4
5
6
7
8
9
10
11
12
13
val lazyValue: String by lazy {
println("computed!")
"Hello"
}

fun main(args: Array<String>) {
println(lazyValue)
println(lazyValue)
}
//输出
//computed! 真正执行
//Hello 真正执行
//Hello 返回储存的值

可观察熟悉

Delegates.observable() 需要两个参数:一个初始值和一个用于修改的值 。每次我们给属性赋值时都会调用赋值操作进行之前的值。它有三个参数:一个将被赋值的属性,旧值,新值:

1
2
3
4
5
6
7
8
9
10
11
12
13
14
15
16
17
import kotlin.properties.Delegates

class User {
var name: String by Delegates.observable("<no name>") {
prop, old, new ->
println("$old -> $new")
}
}

fun main(args: Array<String>) {
val user = User()
user.name = "first"
user.name = "second"
}
//输出结果
//<no name> -> first
//first -> second

在map中存储属性

这种操作经常出现在解析 JSON 或者其它动态的操作中。这种情况下你可以使用 map 来代理它的属性。

这是一个只读的map

1
2
3
4
class User(val map: Map<String, Any?>) {
val name: String by map
val age: Int by map
}

一个可变的map

1
2
3
4
class MutableUser(val map: MutableMap<String, Any?>) {
var name: String by map
var age: Int by map
}

调用的时候

1
2
3
4
val user = User(mapOf(
"name" to "John Doe",
"age" to 25
))

通过属性的名字直接取值

1
2
println(user.name) // Prints "John Doe"
println(user.age) // Prints 25

反射

类引用

1
val c = MyClass::class

函数引用

:: 操作符右边不能用重载函数。

1
2
3
fun isOdd(x: Int) =x % 2 !=0
val numbers = listOf(1, 2, 3)
println(numbers.filter( ::isOdd) ) //prints [1, 3]

组合函数

1
2
3
4
5
6
7
8
9
10
11
12
13
14
//f的入参等于g的返回,整个函数是g的入参,f的返回
fun<A, B, C> compose(f: (B) -> C, g: (A) -> B): (A) -> C {
return {x -> f(g(x))}
// x 为string的入参
//调用g 得到长度
//调用f 得到是否为奇数
}
fun isOdd(x: Int) =x % 2 !=0 //入参int,返回boolean f
fun length(s: String) = s.length//入参string,返回int g

val oddLength = compose(::isOdd, ::length)
val strings = listOf("a", "ab", "abc")

println(strings.filter(oddLength)) // Prints "[a, abc]"

属性引用

1
2
3
4
5
6
var x = 1
fun main(args: Array<String>) {
println(::x.get())
::x.set(2)
println(x)
}

访问类的属性

1
2
3
4
5
6
class A(val p: Int)

fun main(args: Array<String>) {
val prop = A::p
println(prop.get(A(1))) // prints "1"
}

构造函数引用

1
2
3
4
class Foo
fun function(factory : () -> Foo) {
val x: Foo = factory()
}

直接调用

1
function(:: Foo)

密封类

密封类用于代表严格的类结构,值只能是有限集合中的某中类型,不可以是任何其它类型。这就相当于一个枚举类的扩展。

但每个枚举常量只有一个实例,而密封类的子类可以有包含不同状态的多个实例。

密封类可以有子类但必须全部嵌套在密封类声明内部。

声明密封类需要在 class 前加一个 sealed修饰符。

1
2
3
4
5
sealed class Expr {
class Const(val number: Double) : Expr()
class Sum(val e1: Expr, val e2: Expr) : Expr()
object NotANumber : Expr()
}

与when表达式结合

1
2
3
4
5
6
fun eval(expr: Expr): Double = when(expr) {
is Const -> expr.number
is Sum -> eval(expr.e1) + eval(expr.e2)
NotANumber -> Double.NaN
// the `else` clause is not required because we've covered all the cases
}


定义函数

入参类型写在变量的后面,返回参数类型写在最后,函数关键字fun。

语法格式fun 函数名(参数名1:参数类型1,参数名2:参数类型2....):返回类型

1
2
3
fun sum(a: Int, b: Int): Int {
return a + b
}

可以是表达式的函数体,可推断返回值类型

1
fun sum(a: Int, b: Int) = a + b

没有指定它的返回值(类似于java空返回void),返回 Unit

1
2
3
fun printSum(a: Int, b: Int): Unit {
println("sum of $a and $b is ${a + b}")
}

Unit的返回类型可以被缺省

1
2
3
fun printSum(a: Int, b: Int) {
println("sum of $a and $b is ${a + b}")
}

中缀表达式

  1. 使用infix修饰
  2. 只有一个参数
  3. 参数不能为变长且不能有默认值
1
2
3
4
5
infix fun Int.add(i:Int):Int = this + i
infix fun Int.加(i:Int):Int = this + i

println(1 add 2)
println(12)

默认参数

函数参数可以设置默认值,当参数被忽略时会使用默认值。比起java来,少了重载

1
2
3
fun read(b: Array<Byte>, off: Int = 0, len: Int = b.size() ) {
...
}

调用默认

1
reformat(str)

调用非默认

1
reformat(str, true, true, false, '_')

使用命名参数:

1
2
3
4
5
6
reformat(str,
normalizeCase = true,
uppercaseFirstLetter = true,
divideByCamelHumps = false,
wordSeparator = '_'
)

调用部分非默认:

1
reformat(str, wordSeparator = '_')

变长函数

函数的参数(通常是最后一个参数)可以用 vararg修饰符进行标记一个变长入参,相当于传入数组:

1
2
3
4
5
6
fun asList<T>(vararg ts: T): List<T> {
val result = ArrayList<T>()
for (t in ts)
result.add(t)
return result
}

标记后,允许给函数传递可变长度的参数:

1
val list = asList(1, 2, 3)

如果变长入参不是最后一个参数,后面的参数需要通过命名参数语法进行传值。
当调用变长参数的函数时,如果需要传递一个 array 的内容给函数,我们就可以使用 * 前缀操作符:

1
2
val a = array(1, 2, 3)
val list = asList(-1, 0, *a, 4)

函数范围

Kotlin 中可以在文件顶级声明函数,不用像java一样创建一个类来持有函数,除了顶级函数,Kotlin 函数可以声明为局部的,作为成员函数或扩展函数。

一个函数包含另一函数

1
2
3
4
5
6
7
8
9
fun dfs(graph: Graph) {
fun dfs(current: Vertex, visited: Set<Vertex>) {
if (!visited.add(current)) return
for (v in current.neighbors)
dfs(v, visited)
}

dfs(graph.vertices[0], HashSet())
}

局部函数可以访问外部函数的局部变量,局部函数甚至可以返回到外部函数,通过return@标签名的方式

1
2
3
4
5
6
7
8
9
10
11
fun reachable(from: Vertex, to: Vertex): Boolean {
val visited = HashSet<Vertex>()
fun dfs(current: Vertex) {
if (current == to) return@reachable true
if (!visited.add(current)) return
for (v in current.neighbors)
dfs(v)
}
dfs(from)
return false
}

成员函数

定义在一个类里面

1
2
3
class Sample() {
fun foo() { print("Foo") }
}

成员函数的调用

1
Sample.foo()

泛型函数

1
2
3
fun sigletonArray<T>(item: T): Array<T> {
return Array<T>(1, {item})
}

高阶函数与 lambda 表达式

kotlin的高阶函数可以接受函数作为参数,并返回一个函数。接收一个 lock 对象和一个函数,运行函数并释放 lock

1
2
3
4
5
6
7
8
9
fun <T> lock(lock: Lock, body: () -> T ) : T {
lock.lock()
try {
return body()
}
finally {
lock.unlock()
}
}

body 这里代表函数参的引用,() -> T,是一个没有参数并返回 T 类型的函数

调用lock() 函数,我们可以传给它另一个函数做参数,两种调用方式,一种是通过::函数名,另一种是通过字面函数

1
2
fun toBeSynchroized() = sharedResource.operation()//需要传递的函数
val result = lock(lock, ::toBeSynchroized)

传递一个字面函数(通常是 lambda 表达式)

1
2
val result = lock(lock, {sharedResource.operation()})
lock (lock) {sharedResource.operation()} //最后一个参数是函数,可以省略括号

Lambda表达式:入参->函数主体

对比java的写法:

Java编写的接口

1
2
3
public interface OnClickListener {  
void onClick(View v);
}

调用时java写法

1
2
3
4
5
6
view.setOnClickListener(new OnClickListener() {  
@Override
public void onClick(View v) {
Toast.makeText(v.getContext(), "Click", Toast.LENGTH_SHORT).show();
}
});

kotlin写法,这里用到了对象表达式

1
2
3
4
5
view.setOnClickListener(object : OnClickListener {  
override fun onClick(v: View) {
toast("Click")
}
})

加入lambda写法,入参view->函数体toast(“Click”)

1
view.setOnClickListener({ view -> toast("Click")})

如果没有使用左边的参数,可以省去左边部分

1
view.setOnClickListener({ toast("Click") })

被执行的函数是当前函数的最后一个参数,可以直接放到括号外

1
view.setOnClickListener() { toast("Click") }

被执行的函数是当前函数的唯一参数,可以去掉当前函数的括号

1
view.setOnClickListener { toast("Click") }

内联函数

函数的调用过程:每个函数都是一个对象,在函数体内部访问的那些外层变量, 内存占用(函数对象和类都会占用内存)以及虚方法调用都会带来运行时的消耗,函数实际上将程序执行顺序转移到该函数所存放在内存中某个地址,将函数的程序内容执行完后,再返回到转去执行该函数前的地方。

为了解决使用高阶函数在运行时会带来一些不利,出现了内联函数。在程序编译时,编译器将程序中出现的内联函数的表达式整合到函数被调用的地方去,从而生成的代码内存地址是连续的,减少了压栈/出栈的时间。
内联关键字inline,在方法的最前面添加

1
2
3
4
5
inline fun lock<T>(lock: Lock, body: () -> T): T {
...
body()
...
}

如果一个内联函数的参数中有多个 Lambda 表达式, 而你只希望内联其中的一部分, 你可以对函数的一部分参数添加 noinline 标记:

1
2
3
inline fun foo(inlined: () -> Unit, noinline notInlined: () -> Unit) {
// ...
}

空白的 return 在 lambda 函数中是禁止的,因为 lambda 函数不可以造一个闭合函数返回,但如果 lambda 函数是内联传递的,是可以的

1
2
3
4
5
6
7
8
9
10
fun foo() {
ordinaryFunction {
return // 错误 不可以在这返回
}
}
fun foo() {
inlineFunction {
return //
}
}

返回与跳转

与java支持的跳转类型相同

  • return
  • break 结束最近的闭合循环
  • continue 跳到最近的闭合循环的下一次循环

break 和 continue 标签

标签通过 标签名@ 来定义,如:abc@,fooBar@,调用时,是返过来 @标签名

break 是跳转标签后面的表达式,continue 是跳转到循环的下一次迭代。

1
2
3
4
5
6
7
8
9
10
11
12
13
14
15
16
17
18
19
20
21
22
23
loop@ for (i in 1..100) {
for (j in i..100) {
if (...)
break@loop
}
}

return@a 1 //表示 “在标签 @a 返回 1 ”

//用和传入的 lambda 表达式名字相同的标签
fun foo() {
ints.forEach {
if (it == 0) return@forEach
print(it)
}
}

//用命名函数自动定义的标签
foo outer() {
foo inner() {
return@outer
}
}

this表达式

为了在范围外部访问 this ,使用this@标签名来访问

1
2
3
4
5
6
7
8
9
10
11
12
13
14
15
16
17
18
19
20
21
22
23
class A { // implicit label @A
inner class B { // implicit label @B
fun Int.foo() { // implicit label @foo
val a = this@A // A's this
val b = this@B // B's this

val c = this // foo()'s receiver, an Int
val c1 = this@foo // foo()'s receiver, an Int

val funLit = @lambda {String.() ->
val d = this // funLit's receiver
val d1 = this@lambda // funLit's receiver
}


val funLit2 = { (s: String) ->
// foo()'s receiver, since enclosing function literal
// doesn't have any receiver
val d1 = this
}
}
}
}


自从google宣布kotlin成为android开发一级语言,国内就掀起了一股学习热潮,kotlin有以下优点:

  • 简洁易读
  • 没有分号
  • 字符串模板
  • 空安全
  • 自带数据类支持
  • 支持函数属性扩展和代理
  • 兼容java
  • 智能类型转换
  • 类型推断
  • 丰富的集合操作符
  • 支持DSL
  • 支持字面函数(lambdas)

更像是java的升级版,将大大提高开发效率。当然每个语言都有它的优势,这里没有黑java的意思,语言只是生产工具。作为一个有追求的coder,我们应该选择更加高效的方式,提高我们的核心竞争力,现在开始进入kotlin的学习之旅,对比java,从语法开始学习。


基本类型

与java相似

类型 位宽
Double 64
Float 32
Long 64
Int 32
Short 16
Byte 8

可以使用下划线增加数值常量的可读性

1
2
3
4
5
val oneMillion = 1_000_000
val creditCardNumber = 1234_5678_9012_3456L
val socialSecurityNumber = 999_99_9999L
val hexBytes = 0xFF_EC_DE_5E
val bytes = 0b11010010_01101001_10010100_10010010

相等

装箱过的数值是不保留特征

  • 参照相等(指向相同的对象)

  • 结构相等(类型相同)

1
2
3
4
5
6
val a: Int = 10000
print (a === a ) // 打印 'true'
val boxedA: Int? =a
val anotherBoxedA: Int? = a
print (boxedA === anotherBoxedA ) // 注意这里打印的是 'false'
print(boxedA == anotherBoxedA) // 打印 'true'

== === 与 equals

==

  1. 如果作用于基本数据类型的变量,则直接比较其存储的 “值”是否相等
  2. 如果作用于引用类型的变量,则比较的是所指向的对象的地址

    ===

  3. 对于基本数据类型,如果类型不同,其结果就是不等。如果同类型相比,与“==”一致,直接比较其存储的 “值”是否相等;
  4. 对于引用类型,与“==”一致,比较的是所指向的对象的地址

    equals

  5. equals方法不能作用于基本数据类型的变量
  6. 如果没有对equals方法进行重写,则比较的是引用类型的变量所指向的对象的地址;
  7. 诸如String、Date等类对equals方法进行了重写的话,比较的是所指向的对象的内容。

string的判断用==与equals均可

短类型和长类型间的转换

短类型是不会隐式转换为长类型的,需要显示转换

1
2
3
val b: Byte = 1 // OK, 字面值常量会被静态检查
val i: Int = b // ERROR
val i: Int = b.toInt() // 显式转换

基本类型显示转换

toByte(): Byte

toShort(): Short

toInt(): Int

toLong(): Long

toFloat(): Float

toDouble(): Double

toChar(): Char

短类型加长类型会隐式转换为长类型

1
val l = 1.toLong + 1 // Long  + Int => Long

数组

Kotlin 中由 Array 类表示,有 getset 方法,以及 size 方法,以及一些常用的函数:

创建数组

1
2
3
4
5
arrayOf(1, 2, 3)//创建一个int数组
arrayOfNulls(5)//创建一个指定大小的空数组
//指定数组大小并提供一个通过索引产生数组元素值的工厂函数
// 创建一个 Array<String> 内容为 ["0", "1", "4", "9", "16"]
val asc = Array(5, {i -> (i * i).toString() })

原始类型提供的数组创建函数ByteArray, ShortArray, IntArray

1
2
val x: IntArray = intArrayOf(1, 2, 3)
x[0] = x[1] + x[2]

定义包名

1
2
3
package my.demo
import java.util.*
//...

字符串

字符串的元素可以通过索引操作读取: s[i] 。字符串可以用 for 循环迭代:

1
2
3
for (c in str) {
println(c)
}

多行string是由三个引号包裹的("""),可以通过trim-margin()函数移除空格,默认|作边界前缀,也可以选择其他符号比如trim-margin(>)

1
2
3
4
5
6
val text = """
|Tell me and I forget.
|Teach me and I remember.
|Involve me and I learn.
|(Benjamin Franklin)
""".trimMargin()

字符串模板

字符串可以包含模板表达式,即可求值的代码片段,并将其结果连接到字符串中。$变量名/表达式

1
2
3
4
5
6
7
8
9
10
11
12
val s = "abc"
val str = "$s.length is ${s.length}" // 求职为 "abc.length is 3"
val s2 = "${s1.replace("is", "was")}, but now is $a"
println(s2)
fun maxOf(a: Int, b: Int) = if (a > b) a else b
fun main(args: Array<String>) {
println("max of 0 and 42 is ${maxOf(0, 42)}")
}
//$的转义
val price = """
${'$'}9.99
"""

注释

与java一样的单行和多行注释

1
2
3
4
// 单行注释

/* 哈哈哈哈
这是块注释 */

空安全

不允许为空的string

1
2
var a: String ="abc"
a = null //编译错误

允许为空的string

1
2
var b: String? = "abc"
b = null

调用的时候

1
2
val l = a.length()
val l = b.length() //错误:b 不可为空

java一样检查null

1
2
3
4
if (b != null && b.length() >0)
print("Stirng of length ${b.length}")
else
print("Empty string")

安全调用

1
b?.length()

如果 b 不为空则返回长度,否则返回空。这个表达式的的类型是Int?

链式调用中同样有效

1
bob?.department?.head?.name

Elvis 操作符

类似java中的三目运算符,b!=null?(b.length):-1左边表达式不为空则返回,否则返回右边的表达式

1
2
3
4
5
6
7
8
val l = b.length()?: -1
//结合return与throw
fun foo(node: Node): String? {
val parent = node.getParent() ?: return null
val name = node.getName() ?: throw IllegalArgumentException("name expected")

//...
}

!! 操作符

NPE-lovers。 b!! ,会返回一个非空的 b 或者抛出一个 b 为空的 NPE(null pointer exception)

1
val l = b !!.length()

安全转换

java中普通的转换可能产生 ClassCastException 异常。另一个选择就是使用安全转换,如果不成功就返回空

1
val aInt: Int? = a as? Int

类型检查和转换

is !is 表达式

类似java中的instanceof

1
2
3
4
5
6
7
8
9
10
if (obj is String) {
print(obj.length)
}

if (obj !is String) { // same as !(obj is String)
print("Not a String")
}
else {
print(obj.length)
}

智能转换

编译器会跟踪 is 检查静态变量,自动插入安全转换

1
2
3
4
5
fun demo(x: Any) {
if (x is String) {
print(x.length) // x is automatically cast to String
}
}

不安全的转换符

使用as转换,如果转换是不被允许的那么转换符就会抛出一个异常。

1
val x: String?= y as String?

安全转换符

使用as?转换,不管 as? 右边的是不是一个非空 String 结果都会转换为可空的

1
val x: String ?= y as? String

流程控制

if表达式

1
2
3
4
5
6
7
8
var max: Int
if (a > b)
max = a
else
max = b

// 作为表达式
val max = if (a > b) a else b

When表达式

相当于java的switch,条件支持表达式,多变量可在同一分支处理,用逗号隔开

1
2
3
4
5
6
7
when (x) {
0,1 -> print("x == 0 or x == 1")
in 1..10 -> print("x is in the range")
in validNumbers -> print("x is valid")
!in 10..20 -> print("x is outside the range")
else -> print("none of the above")
}

for循环

集合迭代

1
2
3
for (item: Int in ints){
// ...
}

数组迭代,可通过索引,或者withIndex函数

1
2
3
for ((index, value) in array.withIndex()) {
println("the element at $index is $value")
}

while循环

与java语法类似

1
2
3
4
5
6
7
while (x > 0) {
x--
}

do {
val y = retrieveData()
} while (y != null) // y 在这是可见的

Ranges

语法格式start..endin标识符,在范围内的判断,!in不在范围内,step循环增量

反向遍历

downto,语法格式 start downto end

reversed(),语法格式(start..end).reversed()

1
2
3
4
5
6
7
8
9
10
11
12
13
14
15
16
17
18
19
20
21
22
23
24
25
26
27
28
29
// Checking if value of comparable is in range. Optimized for number primitives.
if (i in 1..10) println(i)

if (x in 1.0..3.0) println(x)

if (str in "island".."isle") println(str)

// Iterating over arithmetical progression of numbers. Optimized for number primitives (as indexed for-loop in Java).
for (i in 1..4) print(i) // prints "1234"

for (i in 4..1) print(i) // prints nothing

for (i in 4 downTo 1) print(i) // prints "4321"

for (i in 1..4 step 2) print(i) // prints "13"

for (i in (1..4).reversed()) print(i) // prints "4321"

for (i in (1..4).reversed() step 2) print(i) // prints "42"

for (i in 4 downTo 1 step 2) print(i) // prints "42"

for (x in 1.0..2.0) print("$x ") // prints "1.0 2.0 "

for (x in 1.0..2.0 step 0.3) print("$x ") // prints "1.0 1.3 1.6 1.9 "

for (x in 2.0 downTo 1.0 step 0.3) print("$x ") // prints "2.0 1.7 1.4 1.1 "

for (str in "island".."isle") println(str) // error: string range cannot be iterated over


android原生的dialog样式很不美观,大多数情况下,我们需要根据需求自定义弹窗的样式,而dialogfragment是官方推荐的对话框控件。
使用DialogFragment来管理对话框,当旋转屏幕和按下后退键时可以更好的管理其声明周期,它和Fragment有着基本一致的声明周期。屏幕旋转时,传统的dialog会报异常,而通过DialogFragment实现的对话框则可以完全不必考虑旋转的问题。且DialogFragment也允许开发者把Dialog作为内嵌的Fragment进行重用,可以在大屏幕和小屏幕显示出不同的效果。详情可以查看[鸿洋大神的博文][1]。
所以利用dialogfragment来封装常用的弹窗工具类再合适不过了,这里记录一下详细过程:


最终效果gif:
效果gif
这是封装好的lib库,上图
封装好的lib库截图
这里我们封装了常见的提示弹窗,选择列表弹窗(支持垂直列表,水平列表,网格列表,同时支持单选与多选),加载弹窗,三种模式。

封装dialog lib

新建一个项目,具体过程不描述了,新建一个module,选择android libiary,填写好相关信息后finish。

创建一个弹窗基类

继承DialogFragment创建一个弹窗基类BaseDialogFragment,以便做统一管理。
统一默认颜色,背景,以及图标。

1
2
3
4
protected int layout;//布局文件id
protected static final int DEFAULT_COLOR = -1; //default
protected static final int DEFAULT_BG= -1;
protected static final int DEFAULT_ICON=-1;

统一动画,这里我们默认两种动画

1
2
3
protected int animation = R.style.BottomDialog;//动画类型
public static final int BOTTOM_TO_TOP=0;
public static final int TOP_TO_BOTTOM=1;

由子类传入布局文件,并提供显示弹窗和设置动画的方法,具体代码如下:

1
2
3
4
5
6
7
8
9
10
11
12
13
14
15
16
17
18
19
20
21
22
23
24
25
26
27
28
29
30
31
32
33
34
35
36
37
38
39
@Override
public Dialog onCreateDialog(Bundle savedInstanceState) {
//Step1 build Dialog
if (layout == 0) {
throw new RuntimeException("no correct layout found.");
}

View view = LayoutInflater.from(getActivity()).inflate(layout, null);
Dialog dialog= setDialog(view);

return dialog;
}

protected abstract Dialog setDialog(View view);
public BaseDialogFragment setDialogAnimation(int animation){
if(animation==TOP_TO_BOTTOM){
this.animation= R.style.TopDialog;
}else{
this.animation= R.style.BottomDialog;
}

return this;
}
public void showDialog(FragmentManager fragmentManager){
FragmentTransaction ft = fragmentManager.beginTransaction();
Fragment fragment = fragmentManager.findFragmentByTag("dialogFragment");
//避免重复弹窗
if (fragment != null) {
ft.remove(fragment);
}

show(ft, "dialogFragment");//显示一个Fragment并且给该Fragment添加一个Tag,可通过findFragme ntByTag找到该Fragment
fragmentManager.executePendingTransactions();
}

@Override
public void onDestroyView() {
super.onDestroyView();
}

封装提示弹窗

创建BaseNormalDialogFragment类继承BaseDialogFragment,添加icon的图标设置和是否显示的属性,提供按键监听接口。

1
2
3
4
5
6
7
8
9
10
protected static final int DEFAULT_ICON=-1;
protected static final int HIDE_ICON=-2;//隐藏字段
protected ClickListener clickListener;//按键监听

//监听接口
public interface ClickListener {
void clickSure();

void clickCancel();
}

外部注册监听:

1
2
3
4
public BaseNormalDialogFragment setOnBtnClickListener(ClickListener clickListener) {
this.clickListener = clickListener;
return this;
}

抽象自定义ui方法,待子类实现:

1
2
3
4
5
6
7
8
9
10
11
12
13
14
15
16
17
18
19
protected abstract int getSureTextColor();

protected abstract int getCancelTextColor();

protected abstract String getSureText();

protected abstract String getCancelText();

protected abstract String getContent();

protected abstract int getSureBg();

protected abstract int getCancelBg();

protected abstract int getDialogIcon();

protected abstract int getDividerVerticalColor();

protected abstract int getDividerHorizontalColor();

初始化弹窗设置ui和监听:

1
2
3
4
5
6
7
8
9
10
11
12
13
14
15
16
17
18
19
20
21
22
23
24
25
26
27
28
29
30
31
32
33
34
35
36
37
38
39
40
41
42
43
44
45
46
47
48
49
50
51
52
53
54
55
56
57
58
59
60
61
62
63
64
65
66
//设置自定义窗口和监听
public Dialog setDialog(View view) {
Dialog dlg = new Dialog(getActivity(), R.style.MyDialogBottom);
dlg.setCancelable(false);
dlg.setCanceledOnTouchOutside(false);
dlg.setContentView(view);
dlg.getWindow().setBackgroundDrawableResource(R.color.transparent);
TextView textMsg = (TextView) view.findViewById(R.id.text_msg);
Button sureButton = (Button) view.findViewById(R.id.btn_sure);
Button cancelButton = (Button) view.findViewById(R.id.btn_cancel);
ImageView dialog_icon= (ImageView) view.findViewById(R.id.dialog_icon);
ImageView divider_vertical= (ImageView) view.findViewById(R.id.divider_vertical);
ImageView divider_horizontal= (ImageView) view.findViewById(R.id.divider_horizontal);

if (getSureTextColor() != DEFAULT_COLOR) {
sureButton.setTextColor(getResources().getColor(getSureTextColor()));
}
if (getCancelTextColor() != DEFAULT_COLOR) {
cancelButton.setTextColor(getResources().getColor(getCancelTextColor()));
}
if (getCancelBg() != DEFAULT_BG) {
sureButton.setBackgroundResource(getSureBg());
}
if (getSureBg() != DEFAULT_BG) {
sureButton.setBackgroundResource(getSureBg());
}

if (getDividerHorizontalColor() != DEFAULT_COLOR){
divider_horizontal.setBackgroundColor(getResources().getColor(getDividerHorizontalColor()));
}
if (getDividerVerticalColor() != DEFAULT_COLOR){
divider_vertical.setBackgroundColor(getResources().getColor(getDividerVerticalColor()));
}

if( getDialogIcon() != DEFAULT_ICON){
if(getDialogIcon()==HIDE_ICON){
dialog_icon.setVisibility(View.GONE);
}else{
dialog_icon.setVisibility(View.VISIBLE);
dialog_icon.setImageResource(getDialogIcon());
}
}

textMsg.setText(getContent());
sureButton.setText(getSureText());
cancelButton.setText(getCancelText());
sureButton.setOnClickListener(new View.OnClickListener() {
@Override
public void onClick(View view) {
if (clickListener != null) {
clickListener.clickSure();
}
dismiss();
}
});
cancelButton.setOnClickListener(new View.OnClickListener() {
@Override
public void onClick(View view) {
if (clickListener != null) {
clickListener.clickCancel();
}
dismiss();
}
});
return dlg;
}

最后封装一个提示窗子类,传入布局文件,当然这里也可以根据需求自己做扩展,传入不同的布局文件,但要保证控件id相同。

1
2
3
4
5
6
7
8
9
10
public static ListDialogFragment newInstance(int orientation) {
//创建一个带有参数的Fragment实例
ListDialogFragment fragment = new ListDialogFragment();
fragment.orientation=orientation;
Bundle bundle = new Bundle();
bundle.putInt(TAG_ARG, R.layout.dialog_list);
fragment.setArguments(bundle);//把参数传递给该DialogFragment

return fragment;
}

提示窗效果图:
提示窗效果图
布局文件如下:

1
2
3
4
5
6
7
8
9
10
11
12
13
14
15
16
17
18
19
20
21
22
23
24
25
26
27
28
29
30
31
32
33
34
35
36
37
38
39
40
41
42
43
44
45
46
47
48
49
50
51
52
53
54
55
56
57
58
59
60
61
62
63
64
65
66
67
68
69
70
71
72
73
74
75
76
77
78
79
80
81
82
83
84
85
86
<LinearLayout
xmlns:android="http://schemas.android.com/apk/res/android"
android:layout_width="match_parent"
android:layout_height="wrap_content"
android:gravity="center"
android:orientation="vertical"
android:padding="30dp">

<RelativeLayout
android:layout_width="match_parent"
android:layout_height="200dp"
android:background="@drawable/dialog_bg_round">

<LinearLayout
android:id="@+id/dia_ll"
android:layout_width="fill_parent"
android:layout_height="45dp"
android:layout_alignParentBottom="true"
android:orientation="horizontal">

<Button
android:id="@+id/btn_cancel"
android:layout_width="0dp"
android:layout_height="match_parent"
android:layout_weight="1"
android:background="@null"
android:text="取消"
android:textColor="@color/default_blue"
/>

<ImageView
android:id="@+id/divider_vertical"
android:layout_width="1dp"
android:layout_height="45dp"
android:background="@color/default_blue"
/>

<Button
android:id="@+id/btn_sure"
android:layout_width="0dp"
android:layout_height="match_parent"
android:layout_weight="1"
android:background="@drawable/dialog_btn_bg_round"
android:text="确定"
android:textColor="@color/white"/>
</LinearLayout>

<ImageView

android:id="@+id/divider_horizontal"
android:layout_width="match_parent"
android:layout_height="1dp"
android:layout_above="@id/dia_ll"
android:background="@color/default_blue"
/>

<RelativeLayout
android:layout_width="match_parent"
android:layout_height="match_parent"
android:layout_above="@id/dia_ll"
android:gravity="center"
>

<ImageView
android:id="@+id/dialog_icon"
android:layout_width="60dp"
android:layout_height="60dp"
android:layout_centerInParent="true"
android:src="@drawable/dialog_icon"
/>

<TextView
android:id="@+id/text_msg"
android:layout_width="wrap_content"
android:layout_height="wrap_content"
android:layout_below="@id/dialog_icon"
android:layout_centerInParent="true"
android:layout_marginTop="15dp"
android:text="发现新版本"
android:textColor="@color/default_blue"
/>


</RelativeLayout>
</RelativeLayout>
</LinearLayout>

向外暴露ui设置和接口,具体代码这里就不贴了,后面可查看源码。

提示弹窗的使用

1
2
3
4
5
6
7
8
9
10
11
12
13
14
15
16
17
18
19
20
21
22
23
NormalDialogFragment.newInstance()
.setContent("这只是一个普通的提示弹窗")
.setSureTextColor(R.color.white)
.setCancelTextColor(R.color.default_blue)
.setSuretext("确定")
.setCanceltext("取消")
.setDividerHorizontalColor(R.color.default_line)
.setDividerVerticalColor(R.color.default_line)
.hideIcon()
.setSureBg(R.drawable.dialog_btn_bg_round)
.setOnBtnClickListener(new BaseNormalDialogFragment.ClickListener() {
@Override
public void clickSure() {
Toast.makeText(context, "点击了确定", Toast.LENGTH_SHORT).show();
}

@Override
public void clickCancel() {
Toast.makeText(context, "点击了取消", Toast.LENGTH_SHORT).show();
}
})
.setDialogAnimation(BaseListDialogFragment.BOTTOM_TO_TOP)
.showDialog(getFragmentManager());

封装加载弹窗

创建BaseLoadDialogFragment继承BaseDialogFragment,暴露一些自定义ui的方法,代码如下:

1
2
3
4
5
6
7
8
9
10
11
12
13
14
15
16
17
18
//获得加载文字颜色
protected abstract int getLoadMsgColor();

//获得加载文字
protected abstract String getLoadMsgText();

//获得加载图片
protected abstract int getLoadImg();


//设置加载进度图1
protected abstract int getLoadShape1();

//设置加载进度图2
protected abstract int getLoadShape2();

//设置背景
protected abstract int getBackgroundShape();

根据设置的ui初始化

1
2
3
4
5
6
7
8
9
10
11
12
13
14
15
16
17
18
19
20
21
22
23
24
25
26
27
28
29
30
31
32
33
34
35
36
37
38
39
40
41
42
43
44
45
46
47
48
49
@Override
protected Dialog setDialog(View view) {
Dialog dlg = new Dialog(getActivity(), R.style.MyDialogBottom);
dlg.setCancelable(false);
dlg.setCanceledOnTouchOutside(false);
dlg.setContentView(view);
dlg.getWindow().setBackgroundDrawableResource(R.color.transparent);
ProgressBar pb_progress = (ProgressBar) view.findViewById(R.id.pb_progress);
TextView load_msg = (TextView) view.findViewById(R.id.load_msg);
ImageView dot_loading1 = (ImageView) view.findViewById(R.id.dot_loading1);
ImageView dot_loading2 = (ImageView) view.findViewById(R.id.dot_loading2);
ImageView dot_loading3 = (ImageView) view.findViewById(R.id.dot_loading3);
LinearLayout ly_background= (LinearLayout) view.findViewById(R.id.ly_background);
ly_background.setBackgroundResource(getBackgroundShape());
load_msg.setText(getLoadMsgText());
if (getLoadMsgColor() != DEFAULT_COLOR) {
load_msg.setTextColor(getResources().getColor(getLoadMsgColor()));
}
if (getLoadImg() != DEFAULT_COLOR) {
pb_progress.setIndeterminateDrawable(getResources().getDrawable(getLoadImg()));
}
Drawable drawableBlue = getResources().getDrawable(getLoadShape1());
Drawable drawableGray = getResources().getDrawable(getLoadShape2());

AnimationDrawable anim1 = new AnimationDrawable();
anim1.addFrame(drawableBlue, 300);
anim1.addFrame(drawableGray, 300);
anim1.setOneShot(false);
dot_loading1.setBackgroundDrawable(anim1);
anim1.start();

AnimationDrawable anim2 = new AnimationDrawable();
anim2.addFrame(drawableGray, 300);
anim2.addFrame(drawableBlue, 300);
anim2.addFrame(drawableGray, 300);
anim2.setOneShot(false);
dot_loading2.setBackgroundDrawable(anim2);
anim2.start();

AnimationDrawable anim3 = new AnimationDrawable();
anim3.addFrame(drawableGray, 300);
anim3.addFrame(drawableBlue, 300);
anim3.setOneShot(false);
dot_loading3.setBackgroundDrawable(anim3);
anim3.start();
return dlg;
}

封装一个加载窗子类,传入布局文件,这里也可以根据需求自己做扩展,传入不同的布局文件,但要保证控件id相同。

1
2
3
4
5
6
7
8
public static LoadDialogFragment newInstance(){
LoadDialogFragment fragment=new LoadDialogFragment();
Bundle bundle = new Bundle();
bundle.putInt(TAG_ARG, R.layout.dialog_load);
fragment.setArguments(bundle);//把参数传递给该DialogFragment

return fragment;
}

加载窗效果图:
加载窗效果图
布局文件如下:

1
2
3
4
5
6
7
8
9
10
11
12
13
14
15
16
17
18
19
20
21
22
23
24
25
26
27
28
29
30
31
32
33
34
35
36
37
38
39
40
41
42
43
44
45
46
47
48
49
50
51
52
53
54
55
56
57
58
59
60
61
62
<?xml version="1.0" encoding="utf-8"?>
<LinearLayout xmlns:android="http://schemas.android.com/apk/res/android"
android:id="@+id/ly_background"
android:layout_width="wrap_content"
android:layout_height="wrap_content"
android:background="@drawable/bg_load"
android:gravity="center_horizontal"
android:orientation="vertical"
android:paddingBottom="20dp"
android:paddingLeft="30dp"
android:paddingRight="30dp"
android:paddingTop="20dp" >

<ProgressBar
android:id="@+id/pb_progress"
style="@style/CustomProgressStyle"
android:layout_width="48dp"
android:layout_height="48dp"
android:indeterminateDrawable="@drawable/load_progress"/>

<LinearLayout
android:orientation="horizontal"
android:layout_width="wrap_content"
android:layout_height="wrap_content">

<TextView
android:id="@+id/load_msg"
android:layout_width="wrap_content"
android:layout_height="wrap_content"
android:layout_marginTop="15dp"
android:text="Message"
android:textColor="@color/white" />


<ImageView
android:id="@+id/dot_loading1"
android:layout_width="5dp"
android:layout_height="5dp"
android:layout_gravity="bottom"
android:layout_marginBottom="3dp"
android:layout_marginLeft="5dp"
/>

<ImageView
android:id="@+id/dot_loading2"
android:layout_width="5dp"
android:layout_height="5dp"
android:layout_gravity="bottom"
android:layout_marginBottom="3dp"
android:layout_marginLeft="5dp"
/>

<ImageView
android:id="@+id/dot_loading3"
android:layout_width="5dp"
android:layout_height="5dp"
android:layout_gravity="bottom"
android:layout_marginBottom="3dp"
android:layout_marginLeft="3dp"
/>
</LinearLayout>
</LinearLayout>

同样向外暴露ui设置和接口,具体代码这里就不贴了,后面可查看源码。

加载弹窗的使用

1
2
3
4
5
6
7
8
9
10
 LoadDialogFragment loadDialogFragment = LoadDialogFragment.newInstance()
.setLoadMsgText("正在加载中")
.setLoadImg(R.drawable.load_progress)
.setLoadShape1(R.drawable.load_cicle_blue)
.setLoadShape2(R.drawable.load_cicle_gray)
.setBackgroundShape(R.drawable.bg_load)
.setLoadMsgColor(R.color.white);

loadDialogFragment .setDialogAnimation(BaseListDialogFragment.BOTTOM_TO_TOP).showDialog(getFragmentManager());
// loadDialogFragment.dismiss();

封装选择列表窗

这里展示样式可以分为三种情况,水平,垂直以及网格列表,展示位置也有三种情况,顶部,中间,底部,选择模式可以分为两种情况,单选和多选。
创建BaseListDialogFragment类继承BaseDialogFragment,创建展示样式,位置,选择模式的属性,列表适配器和按键监听。这里的监听有两个,多选时,除了对item的选择监听外,还需要对顶部的确定和返回监听。

1
2
3
4
5
6
7
8
9
10
11
12
13
14
15
16
17
public static final int HORIZONTAL = 0;
public static final int VERTICAL = 1;
public static final int GRID=2;
protected int orientation;
private DialogListAdapter dialogListAdapter;
private DialogListAdapter.OnItemClickListener onItemClickListener;
private ClickListener clickListener;

public static final int BOTTOM=Gravity.BOTTOM;//底部
public static final int CENTER=Gravity.CENTER;//中间
public static final int TOP=Gravity.TOP;//顶部

public interface ClickListener {
void clickSure(List<Item> selectItems);

void clickBack();
}

外部注册监听:

1
2
3
4
5
6
7
8
9
10
public BaseListDialogFragment setOnItemClickListener(DialogListAdapter.OnItemClickListener onItemClickListener) {
this.onItemClickListener = onItemClickListener;
return this;
}

//只在多选时有效
public BaseListDialogFragment setClickListener(ClickListener clickListener) {
this.clickListener = clickListener;
return this;
}

对于列表项,需要添加数据源和适配器,数据源我们需要封装一个Item类,通过传入这个List进行设置。

封装item类

1
2
3
4
5
6
7
8
9
10
11
12
13
14
15
16
17
18
19
20
21
22
23
24
25
26
27
28
29
30
31
32
33
34
35
36
37
38
39
40
41
42
43
44
45
46
public class Item {
private int id;
private String title;
private Drawable icon;
private boolean check;
public Item() {
}

public Item(int id, String title, Drawable icon) {
this.id = id;
this.title = title;
this.icon = icon;
}

public int getId() {
return id;
}

public void setId(int id) {
this.id = id;
}

public String getTitle() {
return title;
}

public void setTitle(String title) {
this.title = title;
}

public Drawable getIcon() {
return icon;
}

public void setIcon(Drawable icon) {
this.icon = icon;
}

public boolean isCheck() {
return check;
}

public void setCheck(boolean check) {
this.check = check;
}
}

定义适配器

列表采用RecyclerView,适配器与RecyclerView的一致,由于展示样式不同,定义两种holder,对应不同的item布局。
图标文字上下排列的holder,水平列表根据数据个数设置item的宽度,网格列表则根据设置的每排显示个数来设置,代码如下:

1
2
3
4
5
6
7
8
9
10
11
12
13
14
15
16
17
18
19
20
21
22
23
24
25
26
27
28
29
30
31
32
33
34
35
36
37
38
39
40
public class TopHolder extends RecyclerView.ViewHolder {
private TextView item;

public TopHolder(View view) {
super(view);

LinearLayout.LayoutParams params = new LinearLayout.LayoutParams(LinearLayout.LayoutParams.MATCH_PARENT, LinearLayout.LayoutParams.WRAP_CONTENT);
if(orientation == HORIZONTAL){
params.width = getScreenWidth(context) / mItems.size();
}else{
params.width = getScreenWidth(context) / rowNum;
}
params.setMargins(0, padding, 0, padding);
item = new TextView(view.getContext());
item.setLayoutParams(params);
item.setMaxLines(1);
item.setEllipsize(TextUtils.TruncateAt.END);
item.setGravity(Gravity.CENTER);
item.setTextColor(ContextCompat.getColor(view.getContext(), R.color.black));
item.setTextSize(TypedValue.COMPLEX_UNIT_PX, context.getResources().getDimension(R.dimen.font_14));
item.setCompoundDrawablePadding(topPadding);

TypedValue typedValue = new TypedValue();
view.getContext().getTheme().resolveAttribute(android.R.attr.selectableItemBackground, typedValue, true);
item.setBackgroundResource(typedValue.resourceId);

((LinearLayout) view).addView(item);
}

private Drawable icon(Drawable drawable) {
if (drawable != null) {
Bitmap bitmap = ((BitmapDrawable) drawable).getBitmap();
Drawable resizeIcon = new BitmapDrawable(context.getResources(), Bitmap.createScaledBitmap(bitmap, topIcon, topIcon, true));
Drawable.ConstantState state = resizeIcon.getConstantState();
resizeIcon = DrawableCompat.wrap(state == null ? resizeIcon : state.newDrawable().mutate());
return resizeIcon;
}
return null;
}
}

图标文字左右排列的代码如下:

1
2
3
4
5
6
7
8
9
10
11
12
13
14
15
16
17
18
19
20
21
22
23
24
25
26
27
28
29
30
31
32
33
34
35
36
37
public class LeftHolder extends RecyclerView.ViewHolder {
private TextView item;

public LeftHolder(View view) {
super(view);

LinearLayout.LayoutParams params = new LinearLayout.LayoutParams(LinearLayout.LayoutParams.MATCH_PARENT, LinearLayout.LayoutParams.WRAP_CONTENT);
view.setLayoutParams(params);
params.setMargins(padding, padding, padding, padding);
item = new TextView(view.getContext());
item.setLayoutParams(params);
item.setMaxLines(1);
item.setEllipsize(TextUtils.TruncateAt.END);
item.setGravity(Gravity.CENTER_VERTICAL);
item.setTextColor(ContextCompat.getColor(view.getContext(), R.color.black));
item.setTextSize(TypedValue.COMPLEX_UNIT_PX, context.getResources().getDimension(R.dimen.font_14));
item.setCompoundDrawablePadding(leftPadding);

TypedValue typedValue = new TypedValue();
view.getContext().getTheme().resolveAttribute(android.R.attr.selectableItemBackground, typedValue, true);
item.setBackgroundResource(typedValue.resourceId);

((LinearLayout) view).addView(item);
}

private Drawable icon(Drawable drawable) {
if (drawable != null) {
Bitmap bitmap = ((BitmapDrawable) drawable).getBitmap();

Drawable resizeIcon = new BitmapDrawable(context.getResources(), Bitmap.createScaledBitmap(bitmap, leftIcon, leftIcon, true));
Drawable.ConstantState state = resizeIcon.getConstantState();
resizeIcon = DrawableCompat.wrap(state == null ? resizeIcon : state.newDrawable().mutate());
return resizeIcon;
}
return null;
}
}

根据展示样式,创建不同的holder,网格和水平列表采用图标文字上下排列的方式,垂直列表采用图标文字左右排列的方式:

1
2
3
4
5
6
7
8
@Override
public RecyclerView.ViewHolder onCreateViewHolder(ViewGroup parent, int viewType) {
if (orientation == GRID)
return new TopHolder(new LinearLayout(parent.getContext()));
else if (orientation == HORIZONTAL)
return new TopHolder(new LinearLayout(parent.getContext()));
else return new LeftHolder(new LinearLayout(parent.getContext()));
}

同样,根据展示样式,进行不同的数据捆绑和按键监听,需要根据选择模式,进行颜色变化的处理:

1
2
3
4
5
6
7
8
9
10
11
12
13
14
15
16
17
18
19
20
21
22
23
24
25
26
27
28
29
30
31
32
33
34
35
36
37
38
39
40
41
42
43
44
45
46
47
48
49
50
51
52
53
54
55
56
57
58
59
60
61
62
63
64
65
66
67
68
69
70
71
72
73
74
75
76
77
78
79
80
81
82
83
84
85
86
87
88
89
90
@Override
public void onBindViewHolder(RecyclerView.ViewHolder holder, int position) {
final Item item = mItems.get(position);

final TopHolder topHolder;
final LeftHolder leftHolder;

if (orientation == GRID) {
topHolder = (TopHolder) holder;

topHolder.item.setText(item.getTitle());
topHolder.item.setCompoundDrawablesWithIntrinsicBounds(null, topHolder.icon(item.getIcon()), null, null);
topHolder.item.setOnClickListener(new View.OnClickListener() {
@Override
public void onClick(View view) {
if (itemClickListener != null) {
if(multipleChoice){
if(item.isCheck()){
item.setCheck(false);
topHolder.item.setTextColor(context.getResources().getColor(baseListDialogFragment.getItemTextColor()));
topHolder.item.setBackgroundColor(context.getResources().getColor(R.color.transparent));
selectItems.remove(item);
}else{
item.setCheck(true);
topHolder.item.setTextColor(context.getResources().getColor(baseListDialogFragment.getSelectItemTextColor()));
topHolder.item.setBackgroundColor(context.getResources().getColor(baseListDialogFragment.getSelectItemBackgoundColor()));
selectItems.add(item);
}

}
itemClickListener.click(item,baseListDialogFragment);
}
}
});
} else if (orientation == HORIZONTAL) {
topHolder = (TopHolder) holder;

topHolder.item.setText(item.getTitle());
topHolder.item.setCompoundDrawablesWithIntrinsicBounds(null, topHolder.icon(item.getIcon()), null, null);
topHolder.item.setOnClickListener(new View.OnClickListener() {
@Override
public void onClick(View view) {
if (itemClickListener != null) {
if (multipleChoice){
if(item.isCheck()){
item.setCheck(false);
topHolder.item.setTextColor(context.getResources().getColor(baseListDialogFragment.getItemTextColor()));
topHolder.item.setBackgroundColor(context.getResources().getColor(R.color.transparent));
selectItems.remove(item);
}else{
item.setCheck(true);
topHolder.item.setTextColor(context.getResources().getColor(baseListDialogFragment.getSelectItemTextColor()));
topHolder.item.setBackgroundColor(context.getResources().getColor(baseListDialogFragment.getSelectItemBackgoundColor()));
selectItems.add(item);
}
}
itemClickListener.click(item,baseListDialogFragment);

}
}
});
} else {
leftHolder = (LeftHolder) holder;

leftHolder.item.setText(item.getTitle());
leftHolder.item.setCompoundDrawablesWithIntrinsicBounds(leftHolder.icon(item.getIcon()), null, null, null);
leftHolder.item.setOnClickListener(new View.OnClickListener() {
@Override
public void onClick(View view) {
if (itemClickListener != null) {
if (multipleChoice){
if(item.isCheck()){
item.setCheck(false);
leftHolder.item.setTextColor(context.getResources().getColor(baseListDialogFragment.getItemTextColor()));
leftHolder.item.setBackgroundColor(context.getResources().getColor(R.color.transparent));
selectItems.remove(item);
}else{

item.setCheck(true);
leftHolder.item.setTextColor(context.getResources().getColor(baseListDialogFragment.getSelectItemTextColor()));
leftHolder.item.setBackgroundColor(context.getResources().getColor(baseListDialogFragment.getSelectItemBackgoundColor()));
selectItems.add(item);
}
}
itemClickListener.click(item,baseListDialogFragment);
}
}
});
}
}

添加数据源和适配器,设置recyclerview的layoutmanager,水平和垂直列表使用LinearLayoutManager,网格列表使用GridLayoutManager。

1
2
3
4
5
6
7
8
9
10
11
12
13
14
15
16
17
18
19
public void addItems(List<Item> items, RecyclerView dialog_list) {

LinearLayout.LayoutParams params = new LinearLayout.LayoutParams(LinearLayout.LayoutParams.MATCH_PARENT, LinearLayout.LayoutParams.WRAP_CONTENT);
RecyclerView.LayoutManager manager;
dialogListAdapter = new DialogListAdapter(getActivity().getApplicationContext(), items, orientation,getMultipleChoice(),this);
dialogListAdapter.setOrientation(orientation);
dialogListAdapter.setItemClick(onItemClickListener);
dialogListAdapter.setRowNum(getRowNum());
if (orientation == HORIZONTAL)
manager = new LinearLayoutManager(getActivity().getApplicationContext(), LinearLayoutManager.HORIZONTAL, false);
else if (orientation == GRID)
manager = new GridLayoutManager(getActivity().getApplicationContext(), getRowNum());
else
manager = new LinearLayoutManager(getActivity().getApplicationContext(), LinearLayoutManager.VERTICAL, false);

dialog_list.setLayoutParams(params);
dialog_list.setLayoutManager(manager);
dialog_list.setAdapter(dialogListAdapter);
}

初始化弹窗设置ui和监听:

1
2
3
4
5
6
7
8
9
10
11
12
13
14
15
16
17
18
19
20
21
22
23
24
25
26
27
28
29
30
31
32
33
34
35
36
37
38
39
40
41
42
43
44
45
46
47
48
49
50
51
52
53
54
55
56
57
58
59
60
61
62
@Override
protected Dialog setDialog(View view) {
Dialog dlg;
dlg= new Dialog(getActivity(), animation);
dlg.setContentView(view);
setCancelable(true);
dlg.setCanceledOnTouchOutside(true);
dlg.getWindow().setGravity(getGravity());
dlg.getWindow().setLayout(WindowManager.LayoutParams.MATCH_PARENT, WindowManager.LayoutParams.WRAP_CONTENT);
RelativeLayout rl_title= (RelativeLayout) view.findViewById(R.id.rl_title);
if(getTitleBarColor()!= DEFAULT_COLOR){
rl_title.setBackgroundColor(getResources().getColor(getTitleBarColor()));
}

TextView text_list_title = (TextView) view.findViewById(R.id.text_list_title);
text_list_title.setText(getListTitleText());

if (getListTitleColor() != DEFAULT_COLOR) {
text_list_title.setTextColor(getResources().getColor(getListTitleColor()));
}

if(getMultipleChoice()){
TextView text_list_sure = (TextView) view.findViewById(R.id.text_list_sure);
TextView text_list_back = (TextView) view.findViewById(R.id.text_list_back);
text_list_sure.setText(getSureText());
text_list_back.setText(getBackText());
text_list_back.setVisibility(View.VISIBLE);
text_list_sure.setVisibility(View.VISIBLE);
if (getBackTextTitleColor() != DEFAULT_COLOR) {
text_list_sure.setTextColor(getResources().getColor(getSureTextTitleColor()));
}

if (getSureTextTitleColor() != DEFAULT_COLOR) {
text_list_back.setTextColor(getResources().getColor(getBackTextTitleColor()));
}

text_list_sure.setOnClickListener(new View.OnClickListener() {
@Override
public void onClick(View view) {
clickListener.clickSure(dialogListAdapter.getSelectItems());
dismiss();
}
});


text_list_back.setOnClickListener(new View.OnClickListener() {
@Override
public void onClick(View view) {
clickListener.clickBack();
dismiss();
}
});
}

RecyclerView dialog_list = (RecyclerView) view.findViewById(R.id.dialog_list);
if(getListColor()!=DEFAULT_COLOR){
dialog_list.setBackgroundColor(getResources().getColor(getListColor()));
}
addItems(getDataList(), dialog_list);

return dlg;
}

抽象自定义ui方法,待子类实现:

1
2
3
4
5
6
7
8
9
10
11
12
13
14
15
16
17
18
19
20
21
22
23
24
25
26
27
28
29
public abstract String getListTitleText();

public abstract String getBackText();

public abstract String getSureText();

public abstract int getListTitleColor();

public abstract int getBackTextTitleColor();

public abstract int getSureTextTitleColor();

public abstract boolean getMultipleChoice();

public abstract int getGravity();

public abstract int getTitleBarColor();

public abstract List<Item> getDataList();

public abstract int getListColor();

public abstract int getRowNum();

public abstract int getItemTextColor();

public abstract int getSelectItemTextColor();

public abstract int getSelectItemBackgoundColor();

同样,封装一个列表窗子类,传入布局文件,这里也可以根据需求自己做扩展,传入不同的布局文件,但要保证控件id相同。

1
2
3
4
5
6
7
8
public static LoadDialogFragment newInstance(){
LoadDialogFragment fragment=new LoadDialogFragment();
Bundle bundle = new Bundle();
bundle.putInt(TAG_ARG, R.layout.dialog_load);
fragment.setArguments(bundle);//把参数传递给该DialogFragment

return fragment;
}

列表窗效果图:
垂直列表
垂直列表
网格列表
网格列表
水平列表
水平列表
布局文件是同一个,代码如下:

1
2
3
4
5
6
7
8
9
10
11
12
13
14
15
16
17
18
19
20
21
22
23
24
25
26
27
28
29
30
31
32
33
34
35
36
37
38
39
40
41
42
43
44
45
46
47
48
49
50
51
52
53
54
55
56
57
58
59
60
61
62
<?xml version="1.0" encoding="utf-8"?>
<LinearLayout xmlns:android="http://schemas.android.com/apk/res/android"
android:layout_width="match_parent"
android:layout_height="wrap_content"
android:orientation="vertical"

>

<RelativeLayout
android:id="@+id/rl_title"
android:layout_width="match_parent"
android:layout_height="45dp">

<TextView
android:id="@+id/text_list_back"
android:layout_width="wrap_content"
android:layout_height="wrap_content"
android:text="取消"
android:layout_marginLeft="12dp"
android:layout_centerVertical="true"
android:layout_alignParentLeft="true"
android:visibility="gone"
android:textColor="@color/colorAccent"
android:textSize="14sp" />

<TextView
android:id="@+id/text_list_title"
android:layout_width="wrap_content"
android:layout_height="wrap_content"
android:layout_centerHorizontal="true"
android:text="分享到"
android:layout_centerInParent="true"
android:textColor="@color/black"
android:textSize="16sp" />

<TextView
android:id="@+id/text_list_sure"
android:layout_width="wrap_content"
android:layout_height="wrap_content"
android:text="确认"
android:layout_marginRight="12dp"
android:layout_centerVertical="true"
android:layout_alignParentRight="true"
android:textColor="@color/colorAccent"
android:visibility="gone"
android:textSize="14sp" />

<ImageView
android:layout_alignParentBottom="true"
android:layout_width="match_parent"
android:src="@color/default_line"
android:layout_height="1px" />
</RelativeLayout>

<android.support.v7.widget.RecyclerView
android:id="@+id/dialog_list"
android:background="@color/white"
android:layout_width="match_parent"
android:layout_height="wrap_content">

</android.support.v7.widget.RecyclerView>
</LinearLayout>

也是向外暴露ui设置和接口,具体代码这里就不贴了。

列表弹窗的使用

1
2
3
4
5
6
7
8
9
10
11
12
13
14
15
16
17
18
19
20
21
22
23
24
25
26
27
28
29
30
31
32
33
34
35
36
37
38
39
40
41
42
43
44
45
46
47
48
49
50
51
52
53
54
55
56
List<Item> items = new ArrayList<>();

items.add(new Item(1, "通讯录", getResources().getDrawable(R.mipmap.icon_content_phone)));
items.add(new Item(2, "好友", getResources().getDrawable(R.mipmap.icon_friend)));
items.add(new Item(3, "朋友圈", getResources().getDrawable(R.mipmap.icon_moments)));
items.add(new Item(4, "微信", getResources().getDrawable(R.mipmap.icon_wechat)));
items.add(new Item(5, "微博", getResources().getDrawable(R.mipmap.icon_weibo)));
ListDialogFragment.newInstance(orientation)
.setListTitleText("分享到")
.setListTitleColor(R.color.black)
.setBackText("返回")
.setSureText("确定")
.setRowNum(3) //仅在网格布局有效
.setBackTextTitleColor(R.color.colorAccent)
.setSureTextTitleColor(R.color.colorAccent)
.setItems(items)
.setTitleBarColor(R.color.white)
.setListColor(R.color.white)
.setItemTextColor(R.color.black)
.setMultipleChoice(multipleChoice)
.setSelectBackgroundColor(R.color.white)
.setSelectItemTextColor(R.color.colorAccent)
.setGravity(gravity)
.setClickListener(new BaseListDialogFragment.ClickListener() { //只在多选时有效
@Override
public void clickSure(List<Item> selectItems) {
if(selectItems.size()>0){
String selectStr="";
Iterator<Item> it=selectItems.iterator();
while(it.hasNext()){
selectStr+=" "+it.next().getTitle();
}
Toast.makeText(context, "选择了"+selectStr, Toast.LENGTH_SHORT).show();

}else{
Toast.makeText(context, "点击了确定", Toast.LENGTH_SHORT).show();
}
}

@Override
public void clickBack() {
Toast.makeText(context, "点击了取消", Toast.LENGTH_SHORT).show();
}
})
.setOnItemClickListener(new DialogListAdapter.OnItemClickListener() {
@Override
public void click(Item item, BaseListDialogFragment baseListDialogFragment) {
Toast.makeText(context, item.getTitle(), Toast.LENGTH_SHORT).show();
if(!multipleChoice){
baseListDialogFragment.dismiss();
}

}
})
.setDialogAnimation(animation)
.showDialog(getFragmentManager());

到此,弹窗工具类就封装完成了~源码传送门